Do you play CS:GO on Windows PC? Have you ever encountered CS:GO mic not working while playing the game? Do you know how to solve this issue? Don’t worry. MiniTool Partition Wizard puts together some fixes in this post and you can have a try.
Counter-Strike: Global (CS:GO) is a multiplayer first-person shooter video game developed by Valve and Hidden Path Entertainment. It is available on many platforms, including Windows, OS X, Xbox 360, PlayStation 3 and Linus.
Recently, many Windows users report that their CS:GO voice chat doesn’t work and they can’t communicate with their teammates. It is quite annoying. If you’re bothered by the same problem, you can follow the solutions below to troubleshoot it.
Solution 1: Set Your Microphone as the Default Device
When you encounter CS:GO mic not working, the easiest way to solve the problem is to set your Microphone as the default device.
Step 1: Press Win + R to invoke Run window. Then type mmsys.cpl in the box and click OK to open Sound settings quickly.
Step 2: Switch to Recording tab.
Step 3: Right-click the microphone that you’re using currently and select Set as Default Device.
Step 4: Right-click your microphone and choose Properties. Then go to Levels tab and turn up the volume for Microphone and Microphone Boost.
Step 5: Click Apply and OK to save the changes you have made.
After that, you can restart your CS:GO and check if the voice chat works properly. If it still doesn’t work, you can try the next solution.
Solution 2: Make Sure the Game is Allowed to Use Microphone
Privacy settings related to microphone might be reset after updating Windows. In this case, CS:GO might be not allowed to access your microphone, which leads to CS:GO voice chat not working eventually.
To check for that, you can follow the steps below.
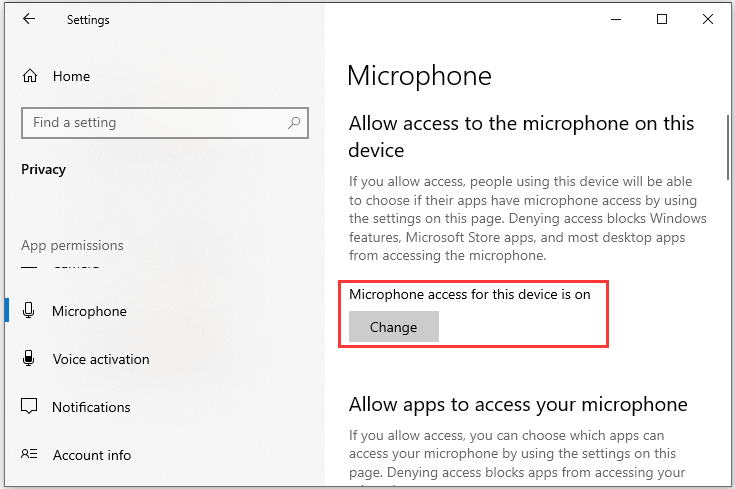
Step 1: Press Win + I to go to Windows Settings. Then select Privacy category.
Step 2: In the left pane, select Microphone. In the right pane, check whether the Microphone access for this device is on. If it is off, click Change button and toggle it on.

Step 3: Make sure the button for Allow apps to access your microphone is on, too.
Step 4: Under Choose which apps can access your microphone section, turn on the apps related to your audio output, as you can’t see Steam or CS:GO here.
After change the related settings, you can relaunch your game and check if the issue has been fixed.
Solution 3: Restart the Windows Audio Service
Another reason for mic not working in CS:GO is that the Windows Audio service is running into glitches. In this case, you can restart the service to fix the problem.
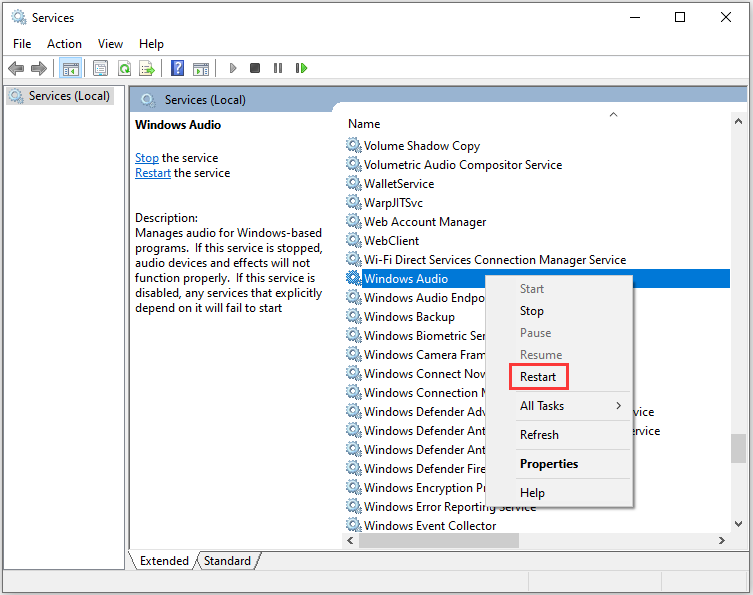
Step 1: Invoke Run window, type services.msc and click OK to open Services.
Step 2: In Services, scroll down to find Windows Audio service. Then right-click it and select Restart.

After the process is completed, exit the window and restart your PC. Then you can run CS:GO and check whether the mic works properly in the game.
Solution 4: Update Your Device Drivers
Outdated, corrupted or incompatible device drivers could also lead to mic not working CS:GO. In this case, you have to update your device drivers, especially the audio and graphics card drivers.
If you don’t know how to update the device drivers, you can refer to our previous post: How to Update Device Drivers Windows 10 (2 Ways). You can also visit the official website of manufacturer or use a reliable third-party software to update drivers. After that, you need to reboot the PC to make the changes to take effect.
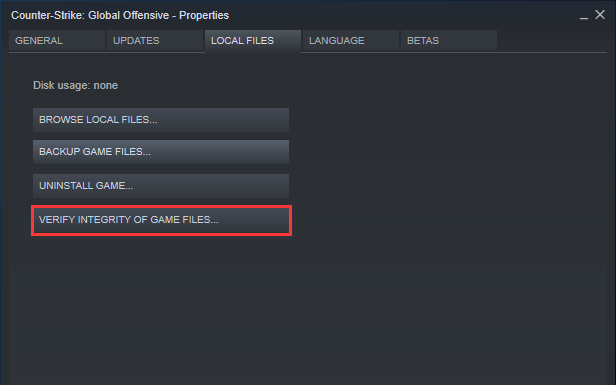
In addition, corrupted or missing game files might also cause mic not working in CS:GO. If all the solutions above fail to solve the problem, you can verify integrity of game files in Steam. You just need to right-click Counter-Strike: Global Offensive from your game list, and then click VERIFY INTEGRITY OF GAME FILES under LOCAL FILES tab.


![[Easy Fix] CSGO Keeps Crashing on PC](https://images.minitool.com/partitionwizard.com/images/uploads/2020/06/csgo-keeps-crashing-thumbnail.jpg)
User Comments :