Windows 10 Stop Code Critical Process Died
Critical_Process_Died refers to when a critical system process dies while showing its bug check error code 0x000000EF or a blue screen error. If a critical system can’t run properly, the operating system will run into some troubles.
Consequently, it will crash and show you errors on your computer in Windows 10 like “Your PC ran into a problem and needs to restart. We’re just collecting some error info, and then we’ll restart for you. (n% complete)”, just like the following screenshot.
Some computers ever enter the loop of continuous rebooting due to “Critical Process Died” every time. The related topic – Critical Process Died keeps restarting is also can be found online.
This Windows 10 stop code occurs when the process required to boot the operating system ended accidentally for some unknown reasons. This error typically occurs after a Windows 10 system upgrade or the installation of a new Windows in PCs.
Due to Windows 10 advantages, most people choose to upgrade to the new system. However, this upgrade may cause some issues, for example, partition disappearance, slow startup speed, etc. Even during the process of Windows upgrade or after a successful upgrade, the 0x000000ef error or BSOD stop code could appear due to the compatibility issue, RAM issue, corrupted or modified system files, bad sectors, etc.
Well then, what should you do to fix Windows 10 when its critical process died after update? Get the solutions in the following sections now.
Related article: Windows 10 Blue Screen of Death – You Can Quickly Fix It
How to Fix Critical_Process_Died Windows 10
In fact, Windows 10 Critical Process Died on boot is a common issue talked about in many forums and articles, and we have found some useful solutions to fix it as follows.
Quick Video Guide:
Solution 1: Restart Computer in Safe Mode
In general, this error can make your desktop or laptop unable unusable and you have to restart your computer. You always get this issue every time you restart the computer. In this case, you can restart the computer in safe mode.
This is quite a quick way for turning on the computer Windows system, which may prevent you from getting this error in the process of computer startup.
- Restart Windows 10.
- Press Shift + F8 before Windows 10 starts loading so that you make it start the recovery mode, from where you can boot into Safe Mode.
- Then you need to go to Advanced Boot Options and set boot mode as Safe Mode to open your computer.
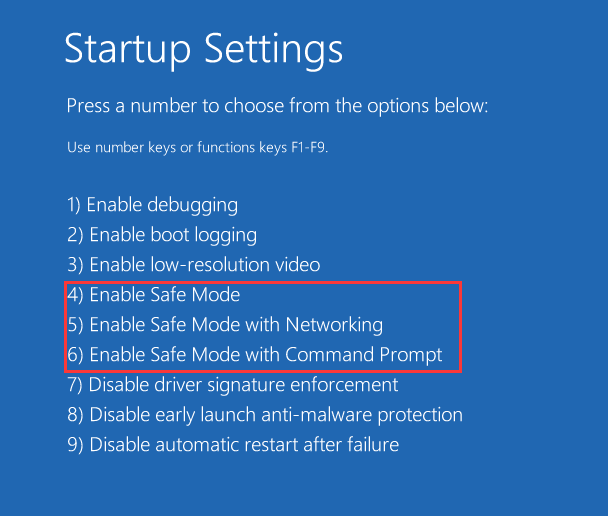
You can also enter into Safe Mode through another way. Please use an installation disc or restart your PC several times to boot to WinRE. Then click Troubleshoot → Advanced options → Startup Settings → Restart. You will get the following screenshot; press the corresponding key so as to enable Safe Mode.
Solution 2: Upgrade All Drivers
After you restart the computer in Safe Mode, you should check whether there are some errors in all your device drivers. Generally, many blue screen errors like 0x000000ef error could be caused by hardware or drivers. Please follow the guidance listed below:
- You can enter into Device Manager by pressing Win + X.
- Start checking all drivers. If you find a driver that shows a yellow exclamatory mark, it means the driver is faulty.
In this case, you need to uninstall and reinstall this driver.
In addition, it is possible that the hardware drivers are no longer compatible with your Windows system after an upgrade. Therefore, it is necessary to upgrade all drivers by right-clicking a driver and selecting Upgrade Driver Software. This is a useful Critical Process Died Windows 10 fix.
Solution 3: Use SFC /Scannow
When Windows 10 stop code Critical Process Died occurs, it is possible that it is caused by corrupted or missing system files. In this case, you can use the SFC /Scannow command to check the file system.
If this System File Checker discovers that the protected files are overwritten by incorrect files, it will extract the correct system file from the system file backup (namely dllcache) and replace the incorrect file. This command is useful for repairing system files, and you can follow the steps below:
Step 1: Input command prompt in the Search box. Then right-click Command Prompt and select Run as administrator to open the command window.
Step 2: Type sfc /scannow and press Enter key. You need to wait for a few minutes until the system scan finishes.
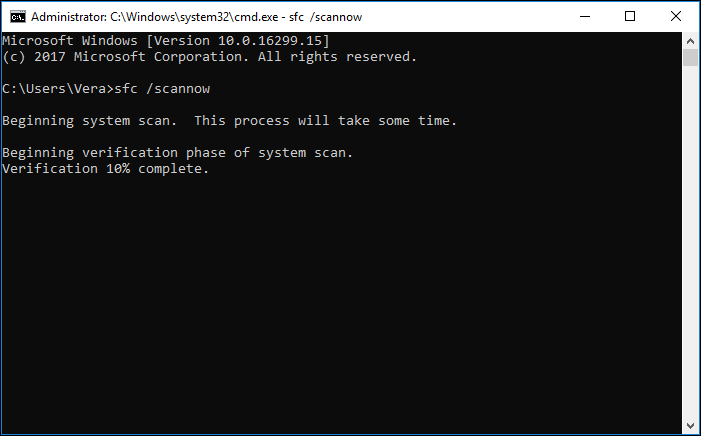
When Verification reaches 100%, if there are no corrupted system files, you can receive a note “Windows Resource Protection did not find any integrity violations”.
If there are some errors in system files, this tool can find and repair them; a message like “Windows Resource Protection found corrupt files and successfully repaired them. Details are included in the CBS.Log windirLogsCBSCBS.log. For example C:WindowsLogsCBSCBS.log. Note that logging is currently not supported in offline servicing scenarios” will be displayed.
At last, you need to restart your computer if this command prompt has repaired any file.
Solution 4: Run DISM to Repair Corrupted System Image
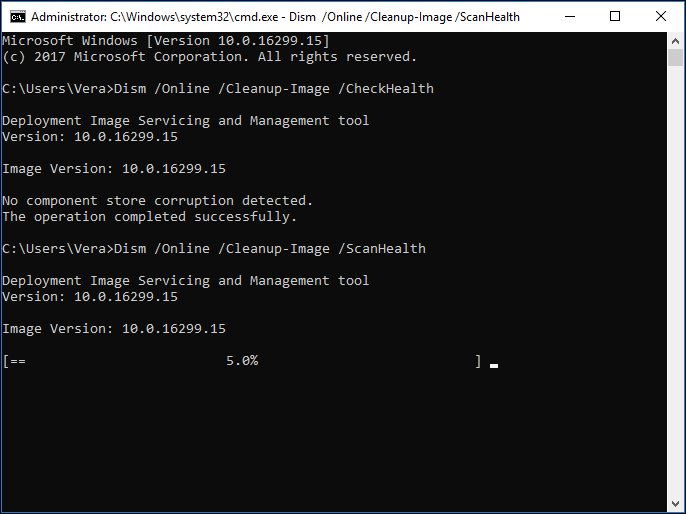
If sfc /scannow command is unable to fix Windows 10 blue screen Critical Process Died, you can run DISM to fix the Windows system image. In Windows 10, there is a command-line utility called Deployment Image Servicing and Management, also known as DISM. This method is recommended by many users.
Similarly, run Command Prompt as administrator. Then, type following the command lines:
Dism /Online /Cleanup-Image /CheckHealth
Dism /Online /Cleanup-Image /ScanHealth
Dism /Online /Cleanup-Image /RestoreHealth
If you want to get more information, please click this article – Repair Windows 10 Image with DISM and Other Useful Tips for DISM to get help.
Solution 5: Perform a Clean Boot
If you experience BSOD Critical Process Died Windows 10, you can choose to perform a clean boot in Safe Mode. Just press Win+R to open the Run box and type msconfig to open the System Configuration window. Then choose Selective startup and Load system services in System Configuration window.
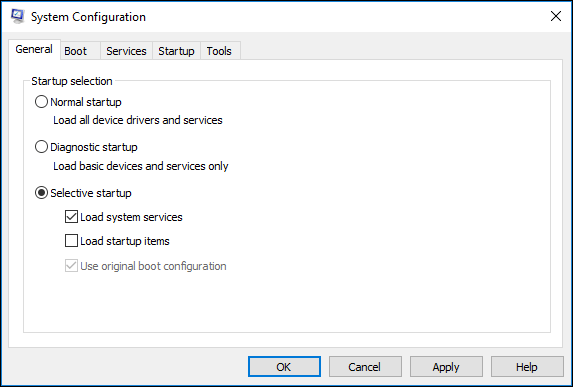
At last, check Hide all Microsoft services and click the Disable all button.
Solution 6: Uninstall the Latest Software
You might have installed some software with viruses on your computer. Perhaps the virus attack caused this error, so please uninstall the latest installed software.
Solution 7: Restore to the Previous Point
If the error has appeared only recently, you can use the created system restore point to restore to its previous status. Here, you can do this in Windows Recovery Environment and then choose System Restore under the Advanced Options window.
Solution 8: Use MiniTool Partition Wizard When There Are Bad Sectors
Move 1: Check Bad Errors in Hard Drive
Another common possible cause is that there could be bad disk blocks. If there are bad sectors in your hard drive, Windows stop code Critical Process Died on startup may happen. In this case, you need to check whether there are bad sectors in your disk.
How to perform this operation? MiniTool highly recommends the professional partition and disk management software – MiniTool Partition Wizard to be used to check disk errors with simple steps. This partition manager provides you the Surface Test feature to scan all sectors in the disk by reading all data from each sector in Windows 10/8/7/XP/Vista.
When Critical Process Died 0x00000ef error appears, Windows 10 won’t boot. Thus, first you need to create a bootable disc or USB drive by installing MiniTool Partition Wizard Pro Edition in your computer and using its Bootable Media feature. Next, boot your PC from the bootable device to MiniTool Recovery Environment to check disk errors.
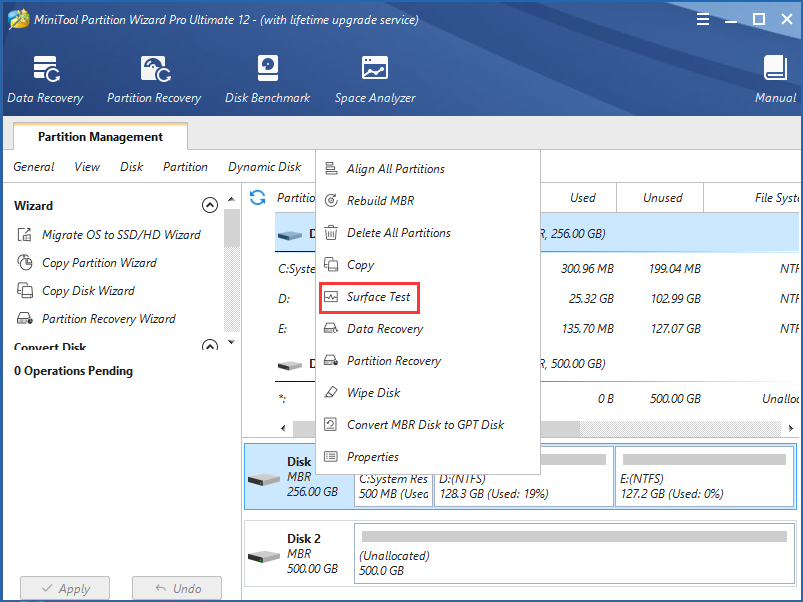
Step 1: After launching MiniTool Partition Wizard, select a target hard drive and right-click on this disk to select the Surface Test function. You can also click this feature from the Check Disk menu.
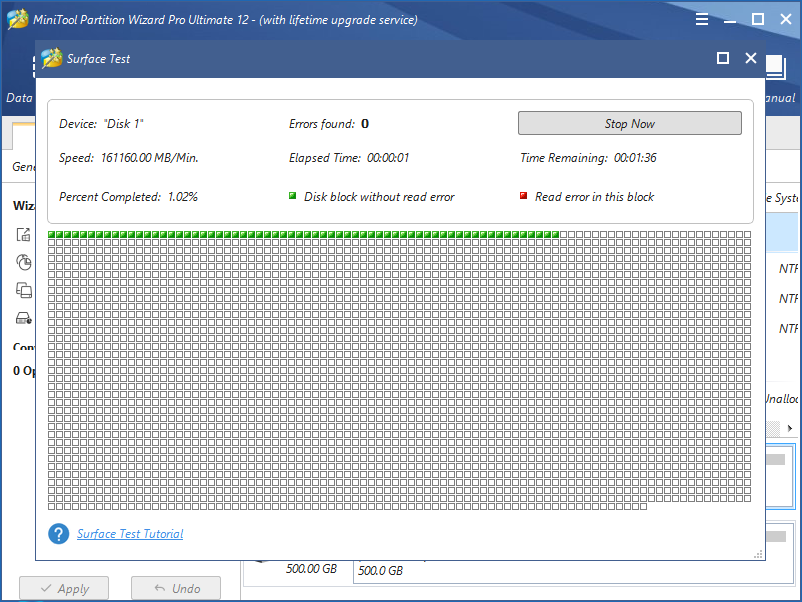
Step 2: Then please click Start Now to start the process. You need to wait for a few minutes during the process of disk scanning. MiniTool Partition Wizard will mark the disk block without any reading error in green and the ones with errors in red. Next, click OK to continue.
Step 3: At last, click Apply to perform all operations.
In addition, you can also do a partition surface test by checking each sector on all partitions. After finishing disk errors check, you can ensure whether there are bad sectors or not in your hard drive. And then please take measures according to the actual situation.
Move 2: Repair Bad Sectors
After finishing the disk test, if there are bad sectors, you need to shield them. When searching for “disk bad sector repair” on Google, you will find some useful ways or videos. Just follow them to shield the bad blocks.
Or you can refer to this related article: What to Do If I Find Bad Sectors on Hard Drive in Windows 10/8/7?
Move 3: Make a Backup for Important Data on Disk in Windows 10
① Clone the Entire Disk for All Data
After finishing checking the disk, you might discover the bad errors in the disk. In this case, in order to reduce the risk of data loss, you should make a backup for all your important data on the hard drive after shielding the bad sectors.
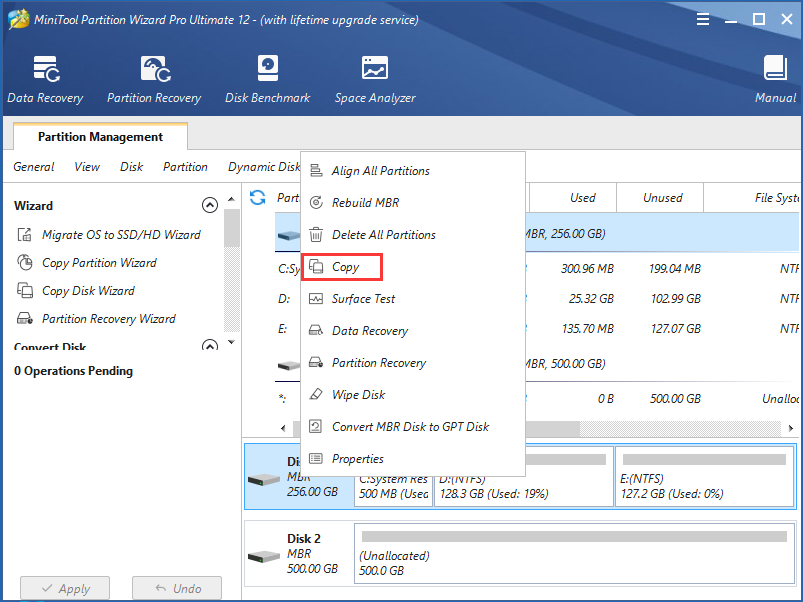
Step 1: Launch this application, right-click the source hard drive and select Copy. You can also click Copy Disk in the Convert Disk menu.
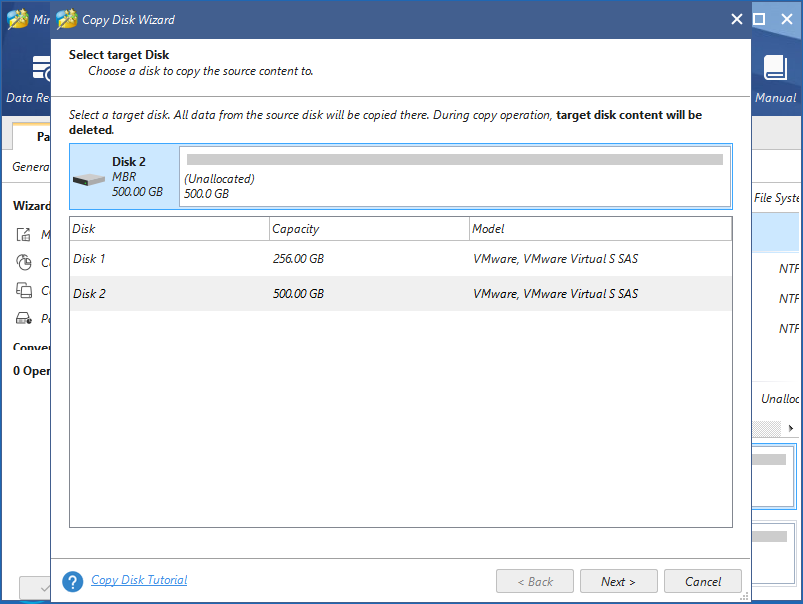
Step 2: Then you need to choose a disk to copy the source content to. All data from the source disk will be copied there. During copy operation, target disk content will be deleted, so you should make a backup for the data if there are important files saved on the source hard drive. Then click the Next button.
Step 3: Then you can review the changes. Moreover, there are two copy options you can choose: Fit partitions to entire disk or Copy partitions without resizing.
1. If you copy the entire disk to SSD or an advanced format disk , it is suggested to choose Force to align to 1MB for a better performance.
2. If you choose to use GUID Partition Table, the target disk will become GPT disk.
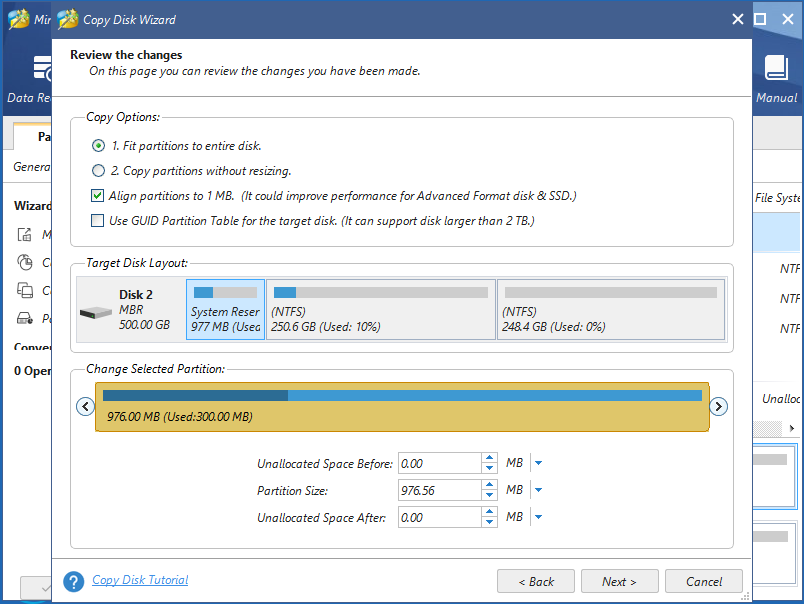
Step 4: Then MiniTool Partition Wizard will tell you that if you want to boot from the new disk, you should enter into BIOS to change the boot order after finishing the copy. If you are only making a backup for the entire disk, it is not necessary to do this step.
Step 5: Finally, click Apply to execute all operations.
It is very easy to clone all data in the hard drive to another disk in Windows 10. In addition, you can use MiniTool Partition Wizard to copy partitions to keep data safe.
② Make a Backup for Windows 10 System
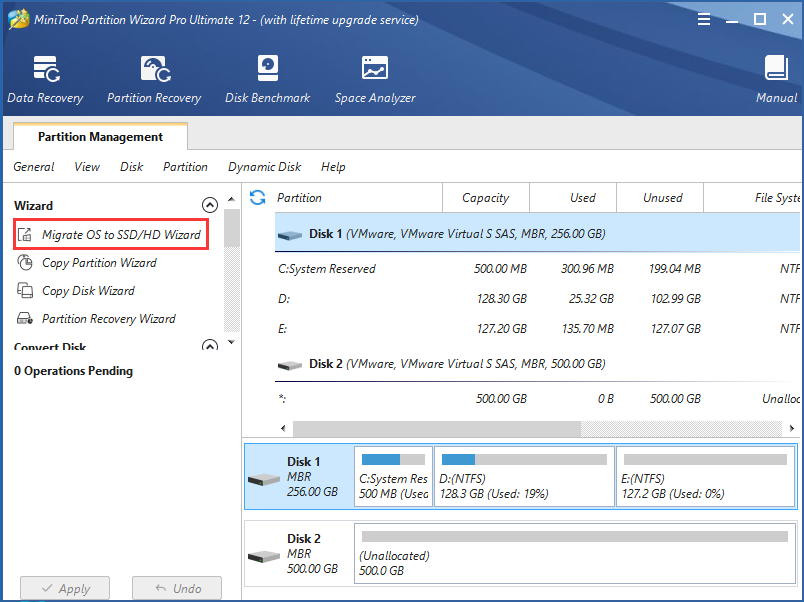
If you have fixed the Critical Process Died 0x000000ef error successfully, we suggest you should do a system backup so it can be used to restore the system when something goes wrong in Windows 10. This partition manager is very powerful helping with system migration. Just click this post – Easily Migrate Windows 10 to SSD without Reinstalling OS Now!
In addition to MiniTool Partition Wizard, you can also use another data backup software – MiniTool ShadowMaker to back up important files without booting Windows in the event of Windows 10 0x000000ef error. This freeware allows you not only to create an image but also clone disk for a backup.
MiniTool ShadowMaker TrialClick to Download100%Clean & Safe
Now, all solutions to Windows 10 blue screen Critical Process Died have been shown to you. If you are also bothered by this issue, just try them to see if they can fix it for you. If they did, you can share them to Twitter so more people will know.
Bottom Line
In conclusion, the above content introduces you the solutions to Windows 10 stop code Critical Process Died on startup. Now it’s your turn to take measures to solve this issue.
If you have any questions or suggestions, welcome to leave a message below. Or write your idea in an email and send it to [email protected].


User Comments :