When moving or copying a file to a new location, you may receive “Are you sure you want to copy this file without its properties…”. Do you know what you should do? Click Yes, Skip, or Cancel? In this article, MiniTool will show you how to stop this message and then you can move or copy files to a new location without interruption.
Click Yes When Receiving “Are You Sure to Copy This File Without Its Properties”?
Usually, to manage files, we would like to move or copy a file to a new location on computer. However, sometimes, when changing the location of a file (from an NTFS drive to a FAT16/32 drive), you might be clumsy as your Windows computer asks you a question:
Are you sure you want to copy this file without its properties?
When the message pops up, you may wonder whether you should click the Yes button or not. But please put this question to one side and firstly you should figure out why this question pops up?
The reason is that the NTFS file system, basically, can support some properties (such as properties related to ADS and file encryption information), that FAT file system cannot support, thus bringing this question.
After getting the answer to the above question, you have to figure out the second question.
What does it mean when a file cannot be copied with its properties?
Copying or moving a file without some of its properties from an NTFS drive to a FAT drive will simply mean that the properties will be lost, whereas the file will remain intact and functional. We can conclude that this message is just a note not a problem you need to fix.
Therefore, the answer to whether you can click the Yes button on the prompt window is that it is safely for you to click the Yes button on the prompt window.
However, this message keeping popping up on the computer screen is a bit annoying, especially moving or copying files in large batches from an NTFS drive to a FAT drive as the moving or copying process will be interrupted every time when the window prompts.
In other words, you need to keep your eyes on the computer screen for a long time to click the Yes button to continue the moving or copying process.
Facing this annoying situation, you may desire not to receive this message anymore in the future. To do that, you just need to convert the destination partition from FAT file system to NTFS.
After completing this conversion, you will not see “The file has properties that cannot be copied to the new location” and harvest some benefits from NTFS file system as the following content shows:
- Higher data security by encrypting files (to secure digital data, please refer to this post: 5 Operations to Keep Your Digital Data Secure Effectively);
- Free disk space by compressing files, folders or the whole disk (MiniTool also offers solutions to fix disk space running out, and you can click free up disk space to figure out them);
- A single file more than 4GB size can be saved in NTFS partition (Sometimes, when you move a file larger than 4GB to a FAT32 drive, you will run into “The file is too large for the destination file system”);
- …
If you want to learn more comparison between FAT32 and NTFS, you can read the following recommended article:
Now, it is time to show you how to stop “Are you sure you want to copy this file without its properties”. The following content shows you how to convert FAT to NTFS with three different tools. What are they? Let’s check them.
Stop the Message by Converting to NTFS via MiniTool Partition Wizard
To convert file system from FAT to NTFS, you can try the recommended third-party software – MiniTool Partition Wizard.
This tool can help you convert a FAT drive to NTFS drive with ease in this situation.
You can also use it in your daily life since it is a professional partition manager that can help you manage your hard drive safely and quickly, such as extending system partition and other partitions, upgrading to a larger hard drive without reinstalling Windows OS, and so on.
How to use MiniTool Partition Wizard to complete the conversion to stop “Are you sure you want to copy this file without its properties”? Here are two methods. Let’s check them one by one.
MiniTool Partition Wizard FreeClick to Download100%Clean & Safe
Way 1: Activate the Convert FAT to NTFS Feature
The Covert FAT to NTFS feature built in MiniTool Partition Wizard can help you complete the conversion with a few steps and without data loss. To use it, please follow the steps below:
Step 1: Click the offered downloadable button, install it, and launch it to get its main interface.
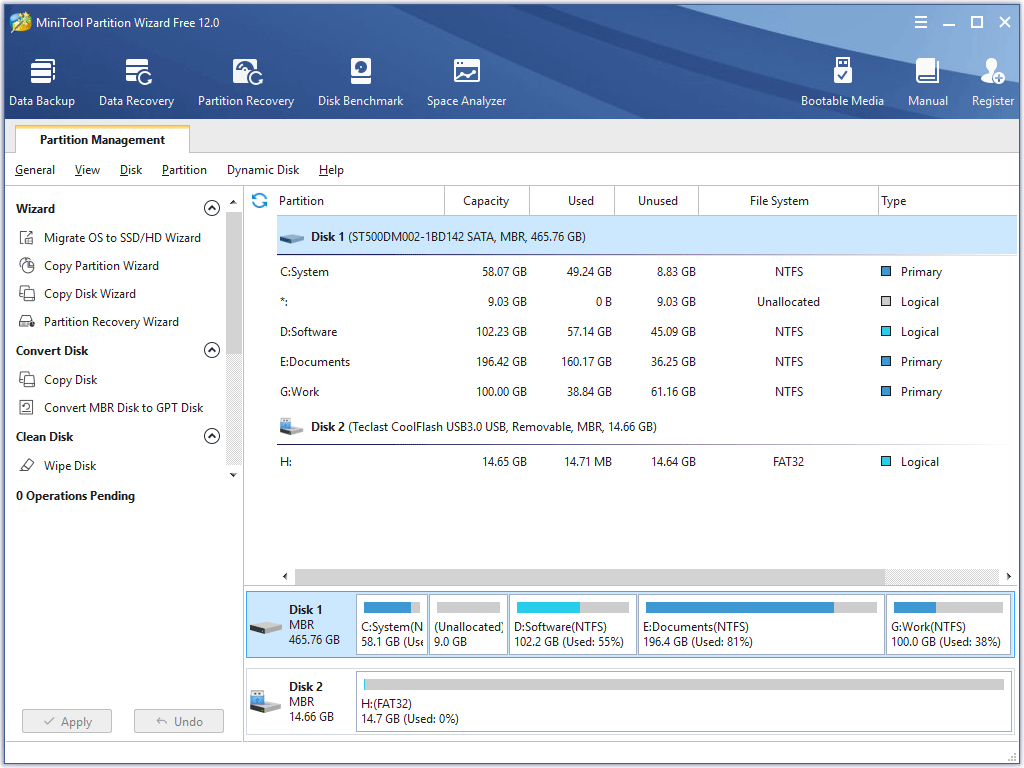
Step 2: In the Disk Map, choose the FAT partition and then choose the Convert FAT to NTFS feature from the left panel or choose it from the right-click menu.
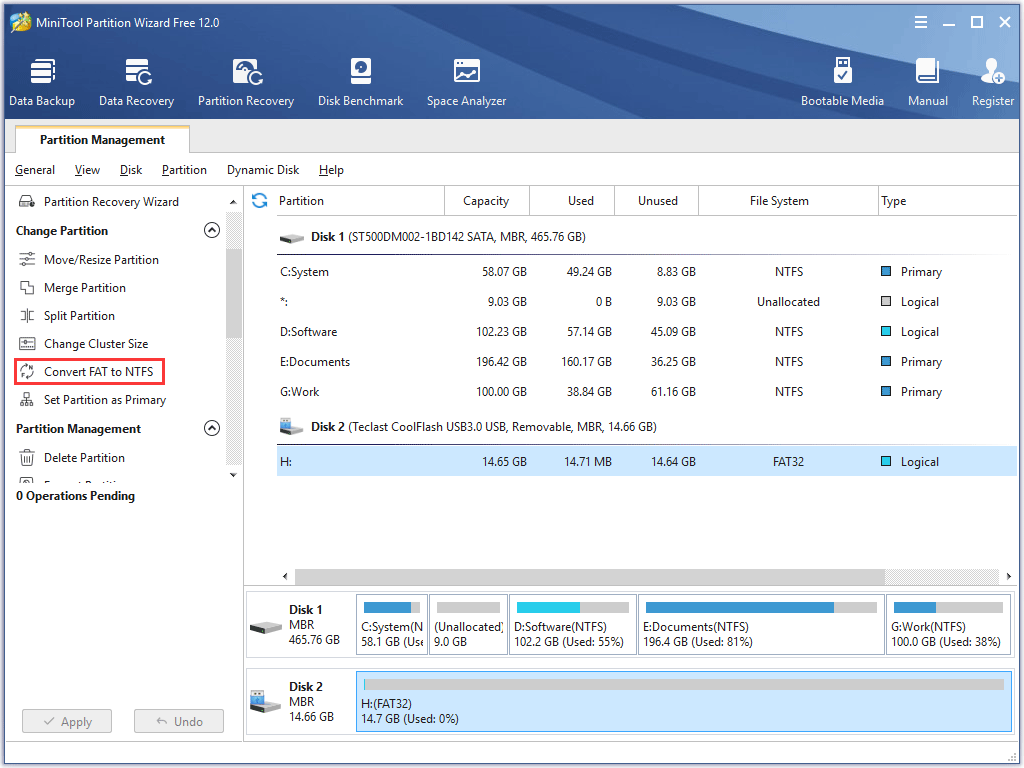
Step 3: Confirm the information displayed on the newly pop-up window. Click the Start button. Once clicking, the conversion will start automatically and instantly.
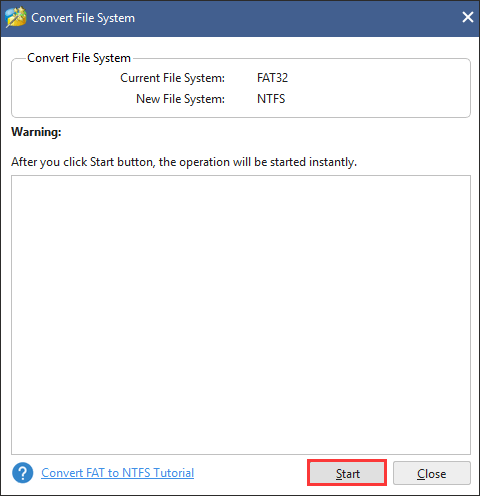
Step 4: Please wait for some seconds and then click the Close button until you see the message “Conversion complete” pops on the Convert File System window.
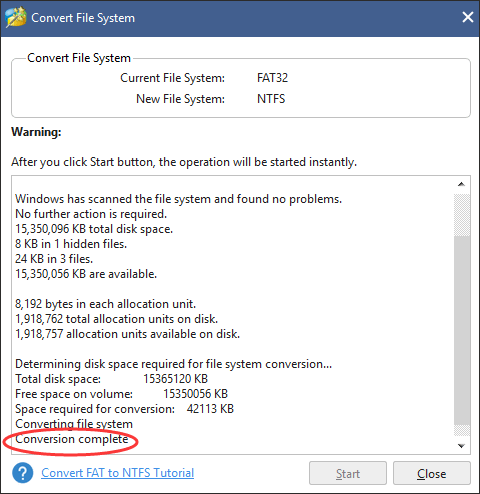
Now, you can see that the original FAT partition has been turned to NTFS partition successfully in the Disk Map. You can try copying your files to this NTFS partition and the “copy this file without its properties” message should not show up.
Way 1 is quite easy, right? MiniTool also offers you another reliable way to convert FAT to NTFS. But you should pay more attention in case of data loss. Please keep reading.
Way 2: Activate the Format Partition Feature
MiniTool Partition Wizard is also a professional formatter that can help you format SD card, USB flash drive, and external hard drive (like 8TB external hard drive) with ease.
How to convert FAT to NTFS with the Format Partition feature built in MiniTool Partition Wizard? Please refer to the following tutorial.
Step 1: Get MiniTool Partition Wizard and launch it to get its main interface.
Step 2: Select the FAT partition from the Disk Map and then select the Format Partition feature from the left panel.
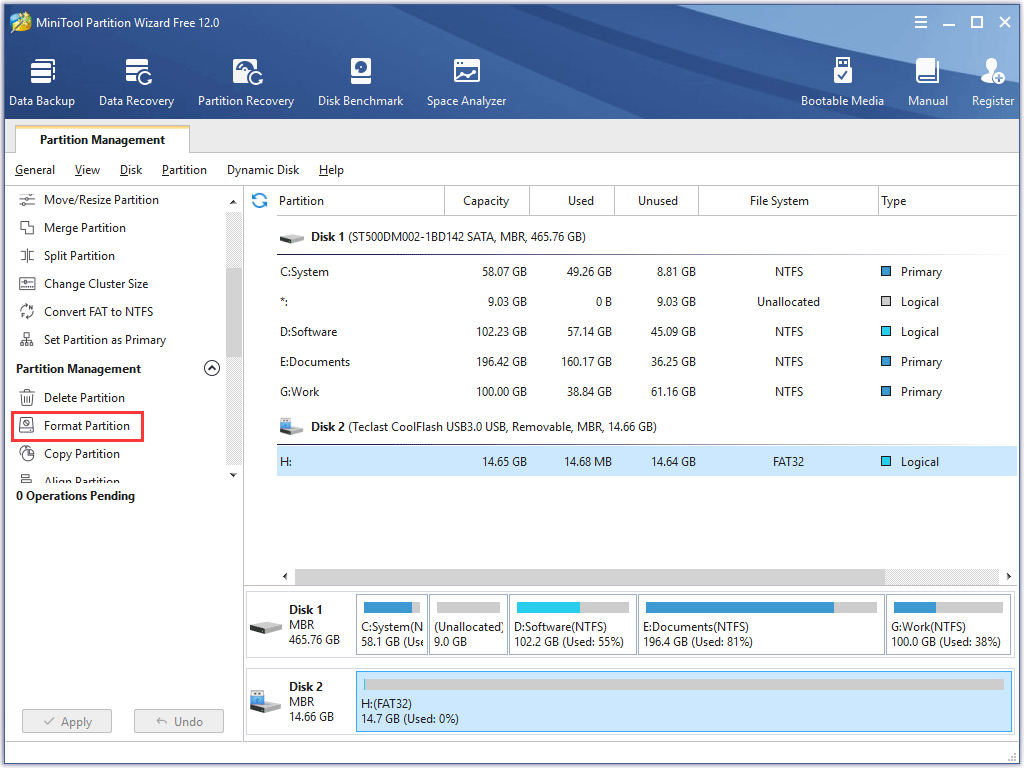
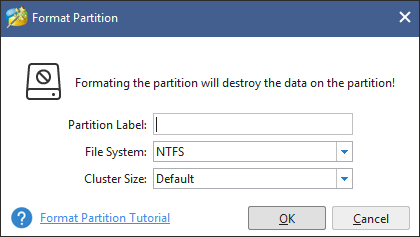
Step 3: In the Format Partition window, please select NTFS as the new file system for the partition and then click the OK button to confirm.
Step 4: Click the Apply button on the main interface to start this formatting.
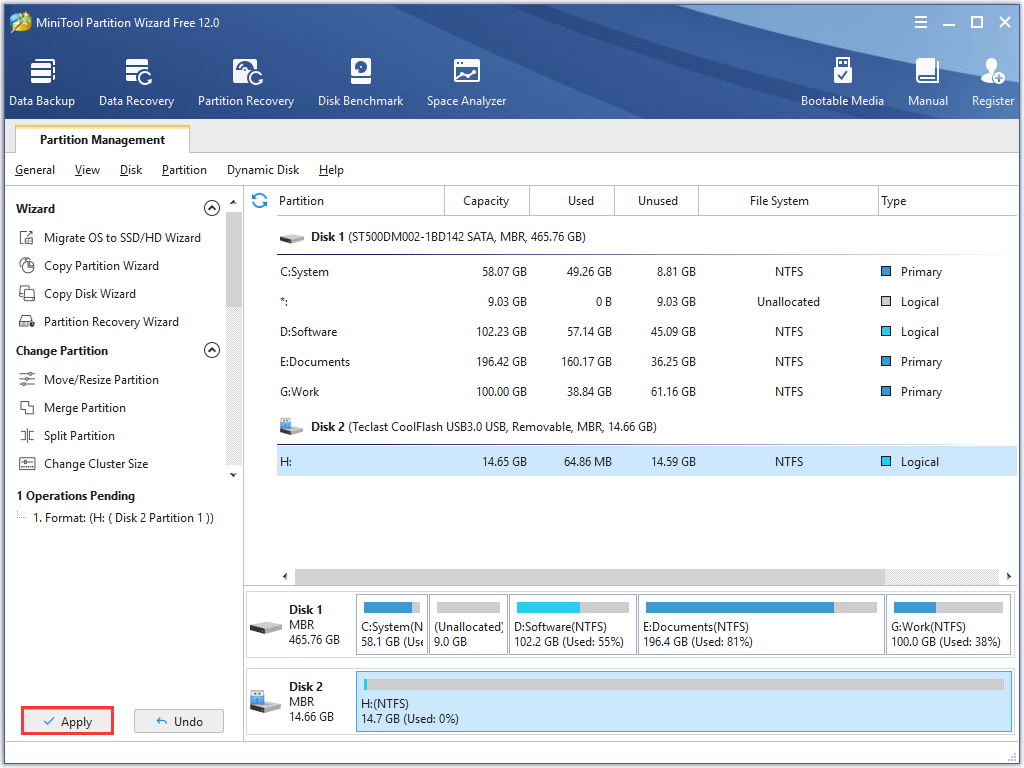
Now, the FAT partition has been formatted to NTFS, and you can continue to copy or move files to this partition without interruption.
Stop the Message by Converting FAT to NTFS via Command Prompt
Command Prompt, a command-line interpreter application available in most Windows operating systems, can also help you complete this conversion.
To do that, please follow the following steps:
- Press the Windows + R key on the keyboard simultaneously to get the Run window.
- Once the Run window pops up, please type cmd in the search bar and click the OK button to confirm.
- After accessing the Command Prompt window, please type convert # : /fs:ntfs (# refers to the partition driver letter. If your FAT partition does not have this letter, you can assign a drive letter to it now) and hit the Enter key. (Here I take my partition F for example)
- This conversion should be completed successfully after a few seconds and you can try copying a file to this partition.
Stop the Message by Converting FAT to NTFS via Disk Management
Disk Management is the third utility that can help you convert partition file system from FAT to NTFS, but please note this conversion can cause data loss. So, you also need to back up this FAT partition at first if there is any important data.
Here is the tutorial on converting FAT to NTFS via Disk Management:
Step 1: Get the Run window by pressing the Windows + R key on the keyboard simultaneously.
Step 2: Type diskmgmt.msc in the search bar and click the OK button to enter Disk Management.
Step 3: After accessing the Disk Management window, please select the FAT partition and right-click it and then select the Format option from the menu.
Step 4: In the Format window, please select NTFS as the file system and then click the OK button to confirm. Finally, click the OK button again (If you do not back up one partition and format it directly via Disk Management or other tools in other situations, you can try restoring the lost data back to your computer).
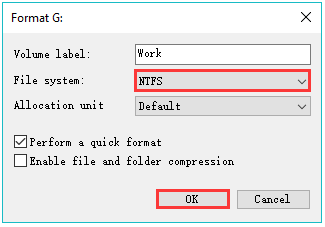
After completing the above four steps, you can continue to copy or move files to this partition.
Bottom Line
This article comes to an end. After reading, have you figured out what it means when a file cannot be copied with its properties, and have learned what you should do when facing this message and how to stop this message?
If you encounter any questions when converting FAT to NTFS by using the methods mentioned in this article, please do not hesitate to let us know. You can leave your difficulties in the following comment zone or email us via [email protected].


User Comments :