USB drives are closely related to our daily life, bringing us convenience. They not only act as storage devices, but also help resolve some issues. Hope the cool uses for USB drives I introduced in this post will help you make better use of USB flash drives. In addition, more uses of USB flash drives are waiting to be discovered.
In recent years, the technology of USB flash drive has been significantly improved and the capacity of USB drive continuously increased. In addition, USB flash drives also derived a lot of interesting usage such as making bootable media and creating a live system on USB drive. Today I would like to share the cool uses for USB drive.
About USB Drives
What is a USB flash drive and how do you use it? A USB drive is a small portable storage device that has no moving parts. It can be connected to computers and other devices via a built-in USB connector. USB flash drives are often referred to as pen drives and thumb drives.
Structure of USB Drive
Generally speaking, USB drive is made up of three parts:
- Casing.
- Side A: USB connector + mass storage controller chip + test points + flash memory chip
- Side B: write protection chip + crystal oscillator + LED
Advantages of USB Flash Drive
USB flash drive usually comes with tiny size, making itself portable. Besides, USB drive also provides fast writing speed. What’s more, the capacity of USB drive normally ranges from 8 GB to 256 GB.
What Can You Do with a USB Flash Drive?
What can you do with a USB flash drive? Flash drive uses are often referred to as a portable storage space for file transferring. As a matter of fact, uses of USB flash drives are more than that. Creating a multifunctional USB drive is very helpful for those who often work with computers. Here I want to share 4 cool uses for USB drives.
Create a Live System on USB Drive
The common practice is to install Windows 10 on an HDD/SSD. Is it possible to install Windows 10 on USB flash drive? In this way, where the operating system in computer gets corrupt, USB drive can be used as a time-saving rescue.
In fact, creating a live system on USB drive is not an entirely new thing. Some of you must know that Windows To Go has made it possible. Windows To Go, a built-in feature of Windows 8 and Windows 10 Enterprise Edition, enables Windows 8 and Windows 10 Enterprise to boot and run from a USB drive, as long as the computer meets Windows 8 hardware requirements.
Although Windows To Go is the official tool to install Windows 10 on a USB drive, it can only be found in Windows 8/10 Enterprise Edition (in Control Panel) and requires that the USB drive must be at least 32GB.
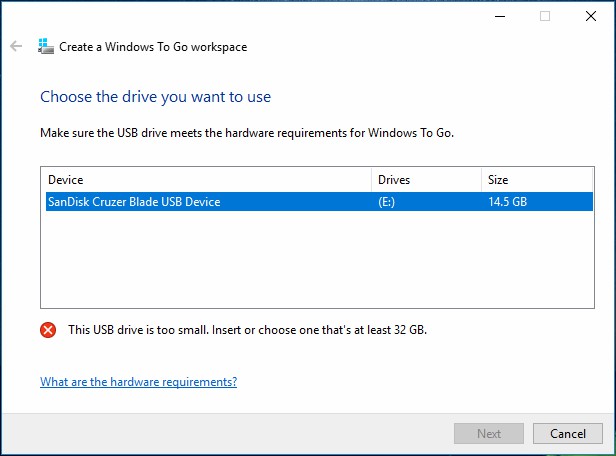
For those running Windows 10 Home and Pro Editions, they do have another choice that is to get help from third-party programs. I recommend using WTG Assistant which makes it possible to create a WTG USB drive/removable disk on a non-Enterprise edition of Windows 10.
Here is the way to install Windows 10 on USB drive. Please follow the instructions below to perform this USB flash drive hacks.
Before starting:
- Download WTG Assistant.
- Download the .iso file of Windows 10 Enterprise.
- Prepare a USB flash drive (My suggestion is USB3.0, 16GB at least). If necessary, back up the USB drive for it will be formatted later.
Step 1: Decompress the Windows 10 Enterprise .iso file and then you will get an “install.wim” file under the “Sources” folder.
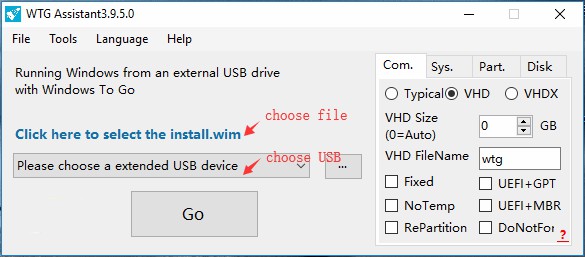
Step 2: Run WTG Assistant to get the main interface. Then you should first of all click the highlighted words to choose the “install.wim” file and drop down the box to select the USB drive as the location for Windows 10 installation. Finally, press “Go“.
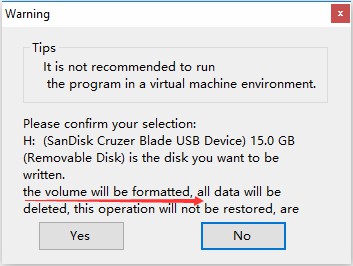
Step 3: WTG Assistant will send you a warning message in the pop-up window, saying that the volume will be formatted. Since you have covered the backup process in advance, you just click “Yes“.
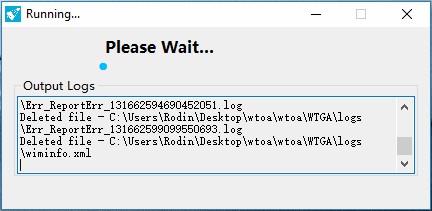
Step 4: This process will take tens of minutes, please wait patiently.
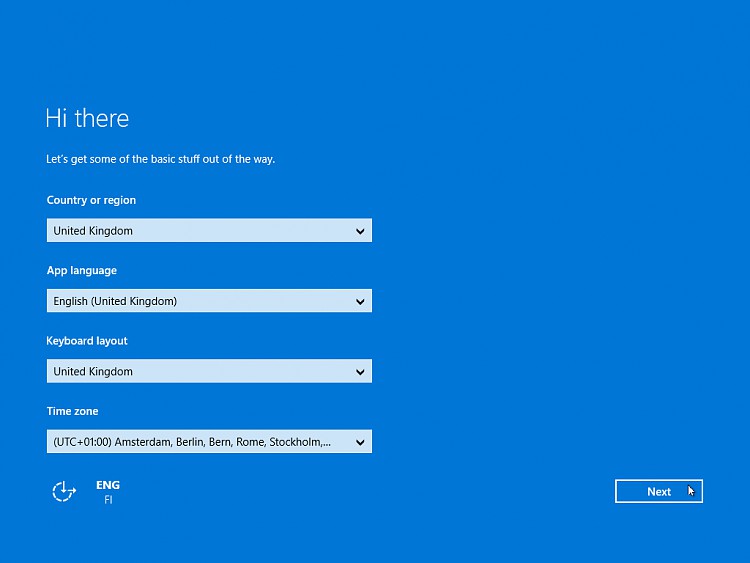
Step 5: When the operation is complete, restart your PC, enter BIOS and set your PC to boot from the USB drive. You will be led to finish a couple of settings before you finally see the desktop of Windows 10.
Mass-produce USB Drive That Cannot Be Formatted
During flash drive uses, many users encounter the following errors: format did not complete successfully, USB drive shows 0 bytes. In these cases, they are unable to read and write the USB drive. However, in my opinion, they can have one last try to make the USB drive usable. The solution here is to mass-produce the USB stick.
What does it mean by saying “mass-produce USB sticks”? In fact, it means to batch rewrite data on the mass storage controller chip to achieve mass production of USB flash drives. The last step in the production of USB flash drive is mass production and the tool used to finish this USB flash drive hack is called USB mass production utility.
It is not a tough job to mass-produce USB drives as long as you follow the simple guide below:
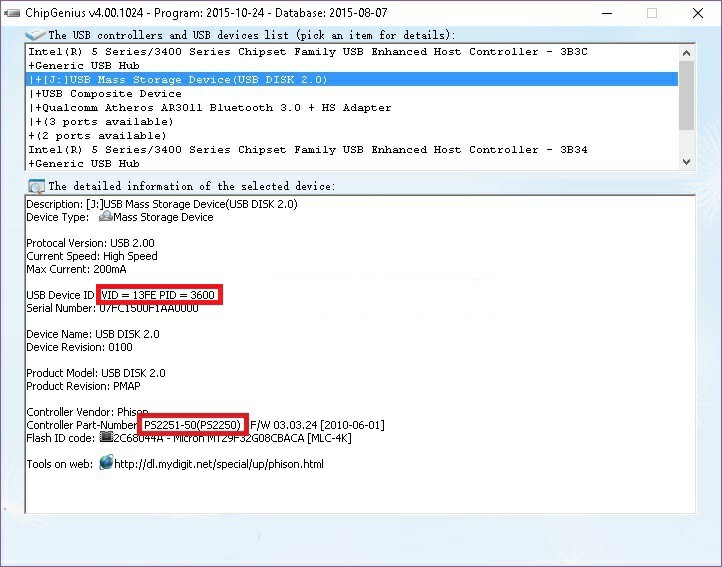
Please note that this solution only works when the chip manufacturer of your USB drive is Phison and the chip model is PS2251-50(PS2250).
Step 1: Download ChipGenius – a professional testing tool for USB device master chip – to have a check. ChipGenius will show you the detailed information of your USB drive as long as it is connected to the computer. Please remember the values of Master Model, VID, and PID.
Step 2: Download Phison MPALL, after compression, run MPParamEdit_F1.exe.
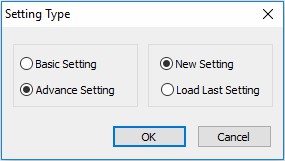
Step 3: Check “Advance Setting” and “New Setting” at the first pop-up window.
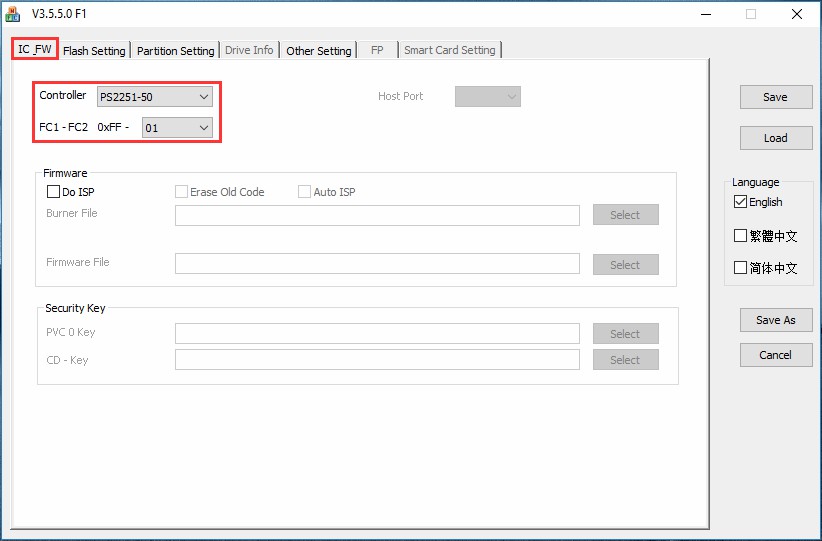
Step 4: Choose your language. Then under IC_FW, select the Controller according to the test result in ChipGenius. In my example, it is “PS2251-50“, and in FC1 – FC2 0xFF, I choose “01“.
Step 5: Navigate to Partition Settings, choose “2” under “No. of Partition“, tick “CD-Rom“, select the desired CD-ROM PE Image, finally, make sure it is “21” under “Mode”.
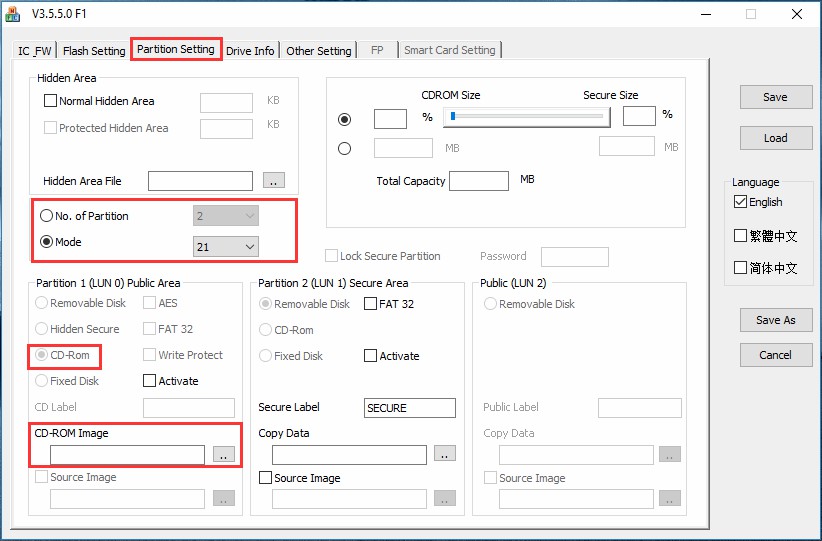
Step 6: Switch to Drive Info where you need to input the correct VID and PID. Finally, press “Save As” button and save this configuration as .ini file to the root dictionary of Phison MPALL.
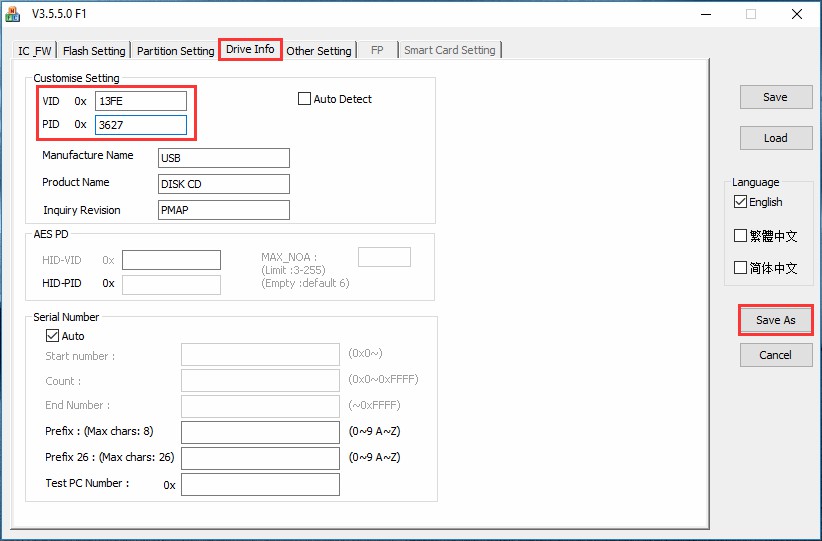
Step 7: Now it is time to connect your USB drive and run MPALL _F1_9000. First of all press “Update” to make your USB drive recognized. Then drop down the box in the upper right corner to select the configuration file. Please make sure the check box is also ticked. Finally, click “Start“.
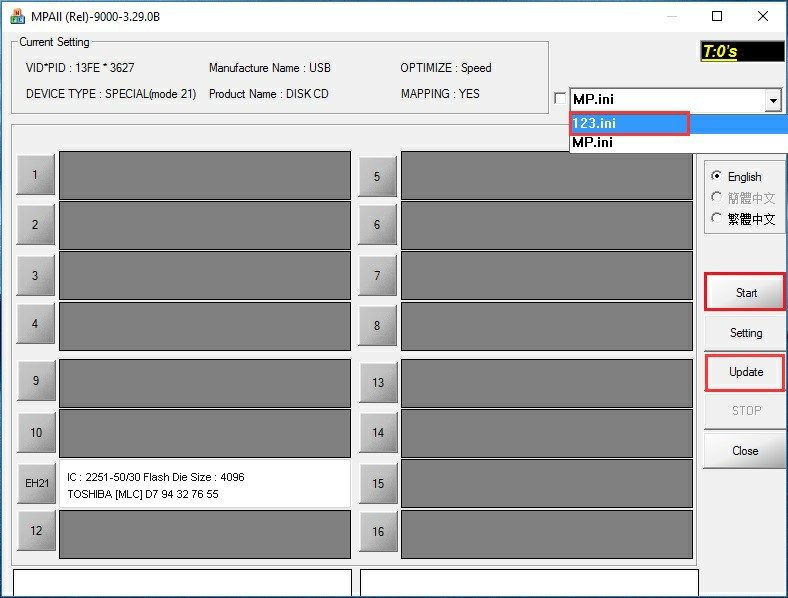
Step 8. The mass production process begins, please wait patiently. When finished, you will find that your USB drive is divided into two parts: one DVD RW part and one SECURE part. By now you can use this USB drive to enter WinPE.
Cool uses for USB drives are far more than those. Next, I want to show you how to create a Windows bootable USB with the help of UltraISO.
Install Windows 10 from USB
UltraISO is a powerful and convenient disc image file creating/editing/format conversion tool. It can be used to edit the disc image and extract files from the image directly. In addition, UltraISO can also create an image from a CD-ROM or turn files into an .iso file. What’s more, you can also handle the boot information for ISO files to make a bootable disc.
Word of warning: creating a boot disk will erase the original data saved on the USB drive. So please make a backup of the important file before you move into the following steps.
The following steps show you how to create a Windows 10 bootable USB.
Step 1: On the main interface, click “Open” under “File”. Then in the pop-up window, select the .iso file you want to burn.
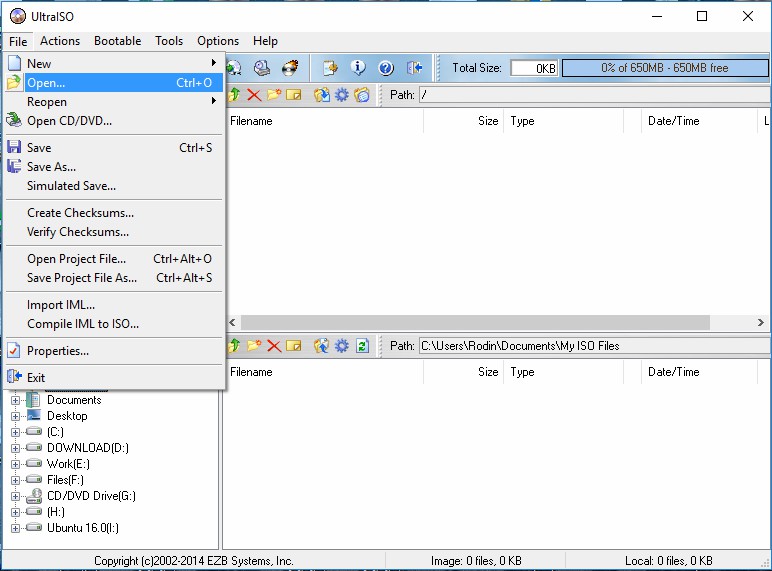
Step 2: In the local disk list located at the lower left part, select the USB drive to be made as the boot disk.
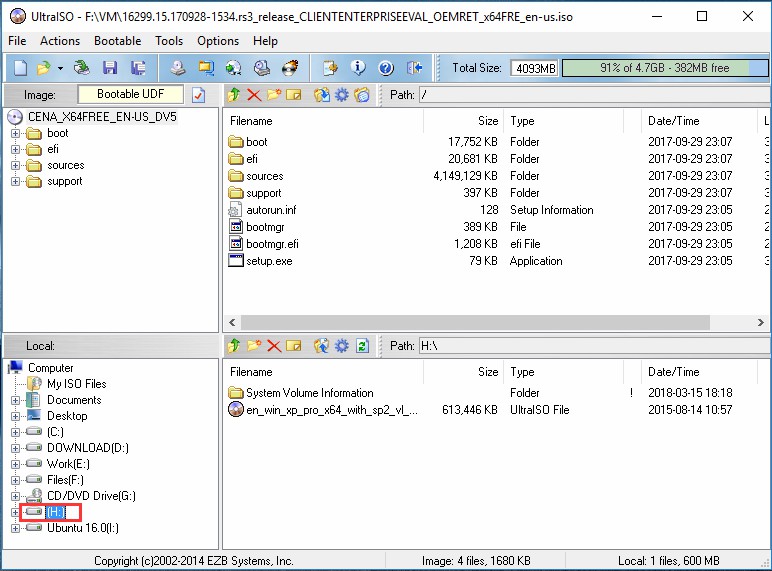
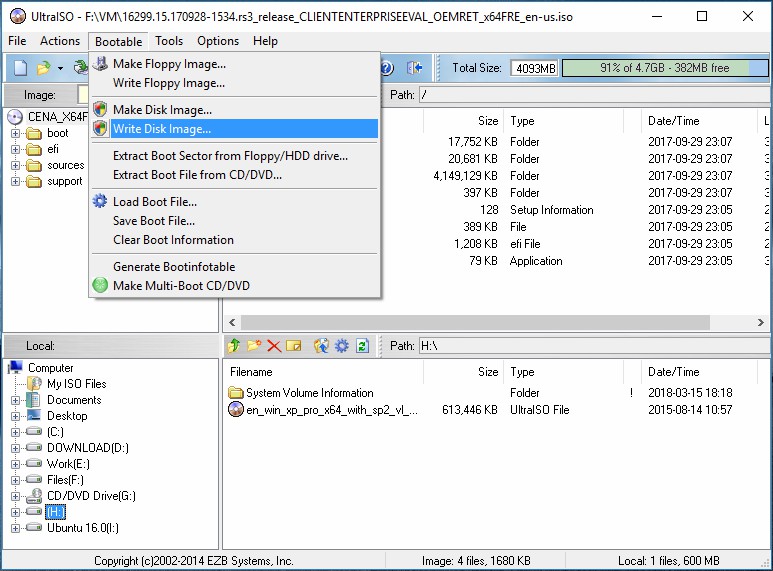
Step 3: Under “Bootable” tab, choose “Write Disk Image…“>
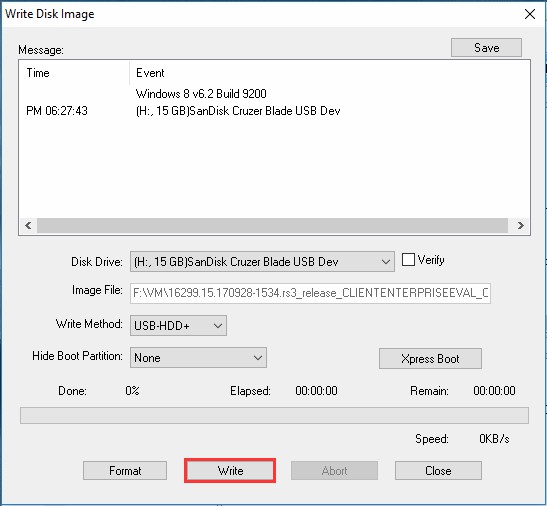
Step 4: In the pop-up window, click “Write“.
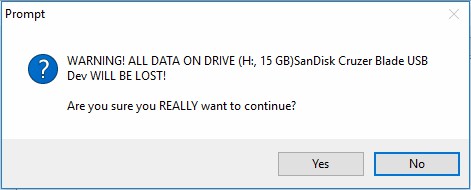
Step 5: UltraISO will remind you of data loss. Click “Yes” to confirm the operation.
Step 6: When the writing process is finished, you can use the USB boot disk to install Windows 10 from USB or fix Windows 10 boot issues.
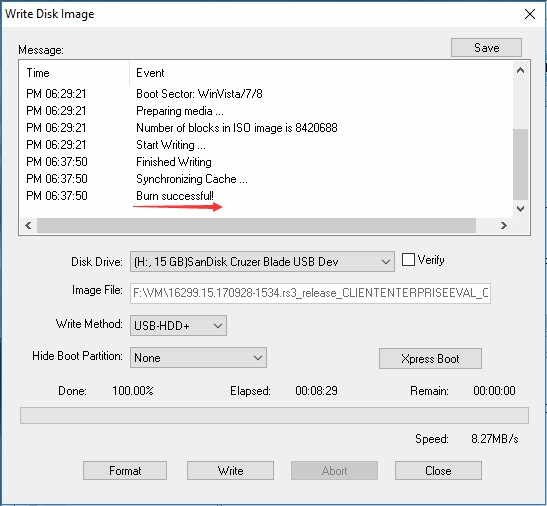
Similarly, you can burn a DOS in a USB flash drive. Just select the DOS system when selecting the image file.
Get Extra Storage on Phones
It is embarrassing that your smartphone always prompts an insufficient memory. Considering the security and beauty, smartphones today do not support memory card extension anymore. However, large-capacity memory phones are very expensive. At this time, you may consider using a USB drive to extend the storage space of your smartphone.
What you need to do:
- Prepare a physical USB OTG (On-The-Go).
- Save files you need to view on phone to the USB flash drive.
- Connect USB flash drive to USB OTG and then connect the OTG to your smartphone (image attached) for immediate usage.
For Android devices, no extra software is needed. You can head to the File Explorer and view the pictures and videos saved on the USB drive. In addition, you can move a batch of files from USB flash drive to the internal storage.
But for iOS devices, you will have to download some third-party software before you can view files on the USB drive. Due to the restrict of iOS, files cannot be copied, pasted and moved to internal iPhone.
Bottom Line
USB drives are closely related to our daily life, bringing us convenience. They not only act as storage devices, but also help resolve some issues. Hope the cool uses for USB drives I introduced in this post will help you make better use of USB flash drives. In addition, more uses of USB flash drives are waiting to be discovered.For any questions towards using MiniTool software, contact us via [email protected].

User Comments :