Some people report that the computer crashes when playing games. This post from MiniTool Partition Wizard tells you why this issue occurs and offers the corresponding solutions.
Why Does My Game Keep Crashing?
Why does my game keep crashing? If you encounter the computer crashing when playing games issue, you may want to ask this question. The reasons why games keep crashing are as follows:
- Your computer’s specs don’t meet the games’ requirements. In general, a game’s requirements include the OS version, CPU, GPU, RAM, storage, network, and sometimes display resolution and input devices (keyboard and mouse).
- You overclocked too high. Overclocking your CPU and GPU too high may make the system unstable and prone to crashes.
- Overheating. When you play games, the computer is operating at high speed and is prone to overheating. This will also cause PC crashes.
- The GPU driver is outdated. The GPU is very important for most games. If the GPU driver is outdated, the GPU may not work normally. This will also cause your PC to crash while gaming.
- Insufficient system resources. If you are running too many programs or open too many browser tabs at the same time, or the game’s settings are set to high, your computer cannot offer sufficient system resources to run the software. Then, a PC crash will happen.
- Digital Rights Management. If DRM detects suspicious activities in the game or account, you are unable to play the game.
- Antivirus. Your antivirus identifies your game files as dangerous files and quarantines them. This will cause the game to crash.
- Bad sectors. If there are bad sectors on the hard drive, the computer cannot load the game properly. Game crashing will occur.
Why do my games keep crashing? The above content has explained that in detail to you. Then, you can take measures to solve this issue.
Upgrade to SSD
Are you using HDDs still? If so, it’s time to upgrade to SSD. After all, nowadays, the price of SSDs is not very high. In addition, upgrading to SSD is beneficial for improving game performance.
How to upgrade to SSD without data loss? MiniTool Partition Wizard can help you. It can clone a hard drive, allowing you to upgrade to SSD without reinstalling the OS and games. Here is the guide:
MiniTool Partition Wizard DemoClick to Download100%Clean & Safe
Step 1: Connect the SSD to your PC via a USB adaptor. Download, install, and launch MiniTool Partition Wizard. Then, click Copy Disk Wizard.
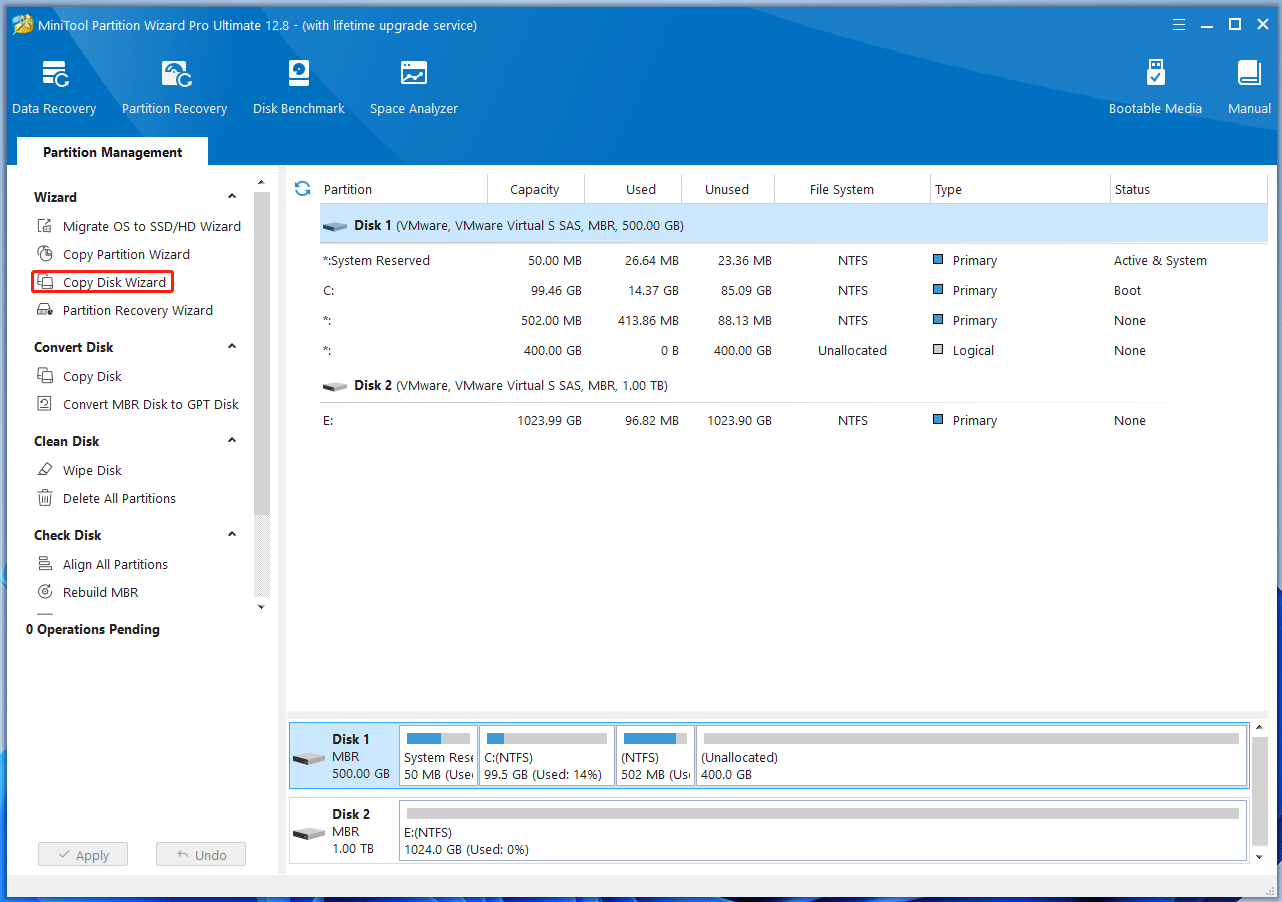
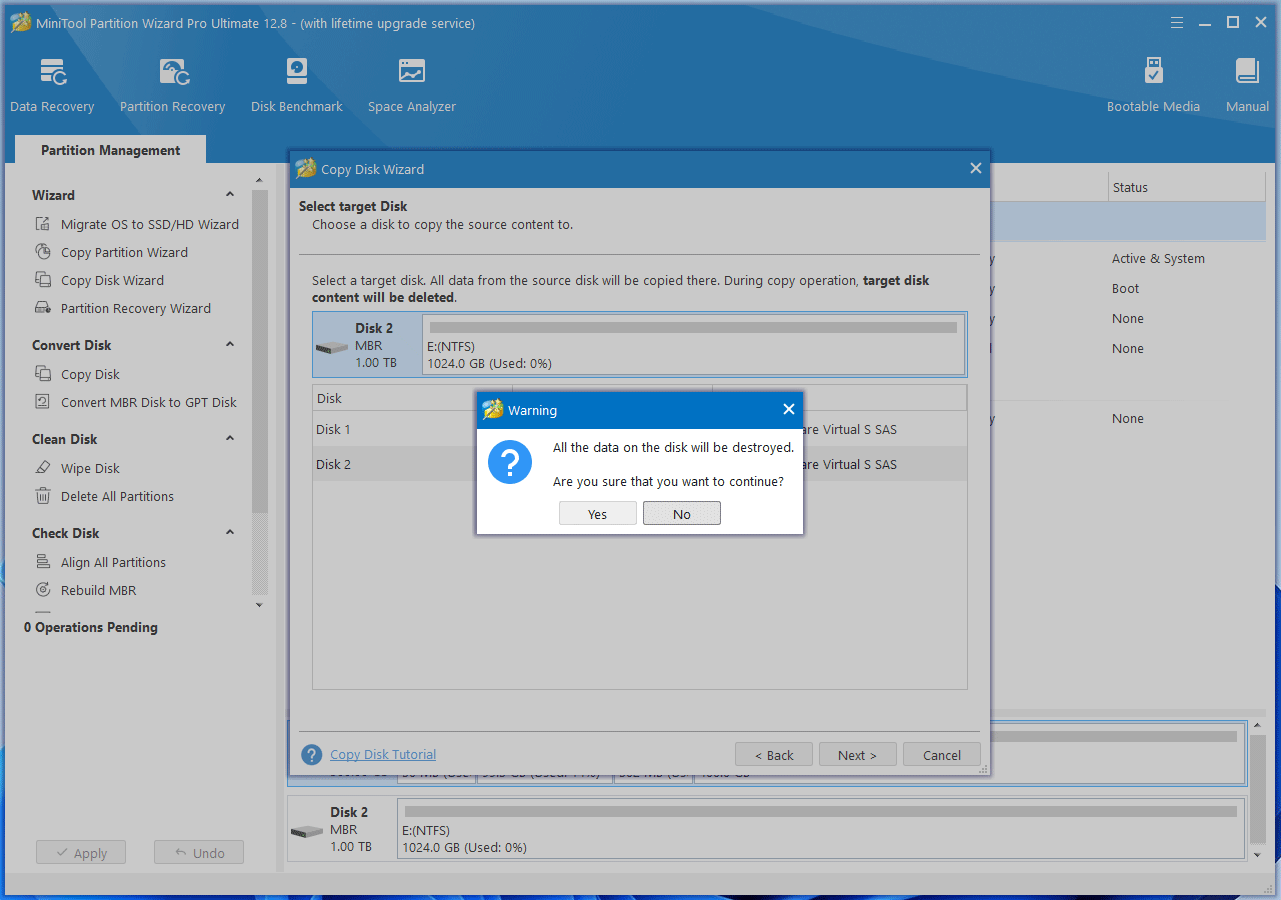
Step 2: Click Next. Select the system disk to copy and click Next. Select the SSD as the target disk and click Next. You are warned that all data on the target disk will be destroyed. Click Yes to continue.
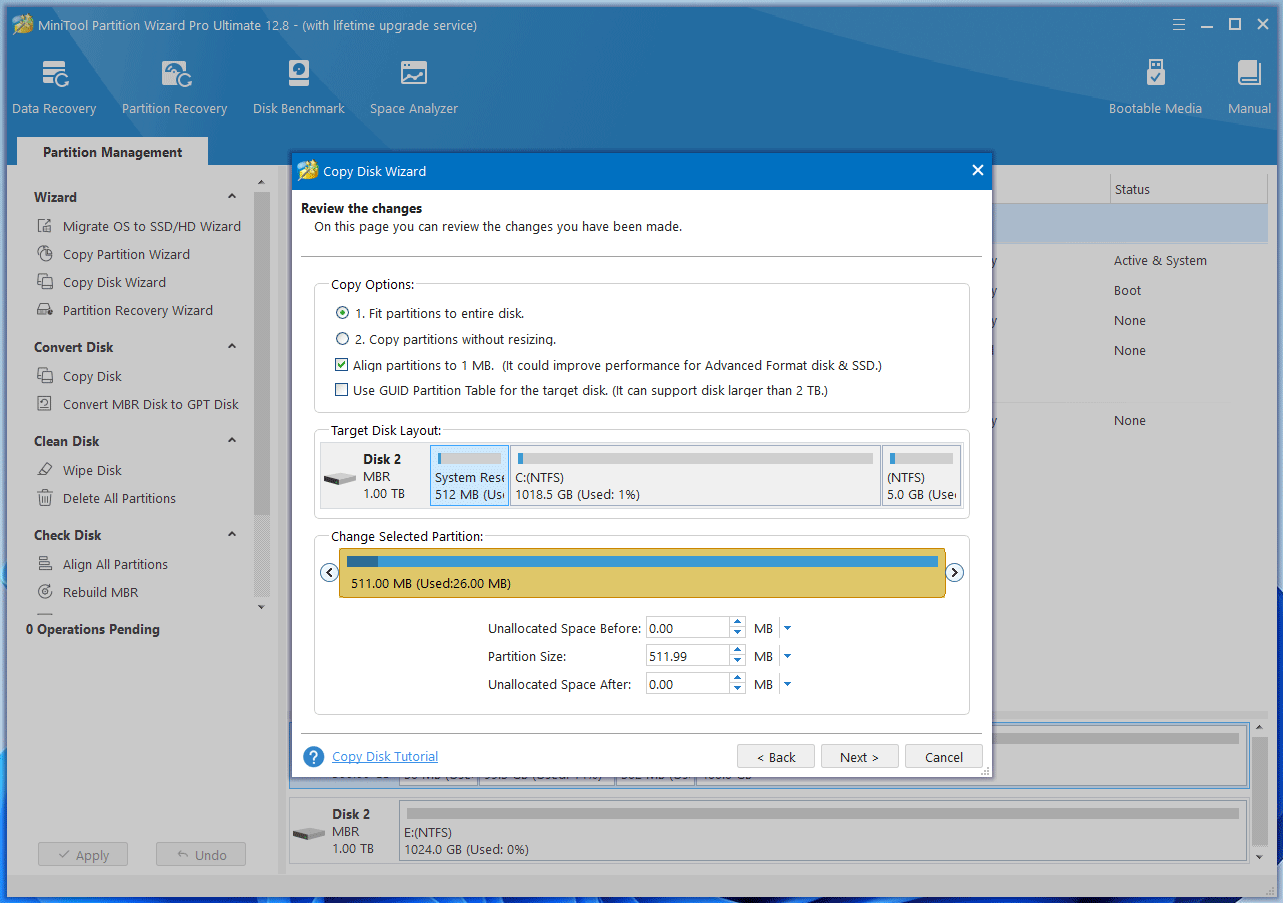
Step 3: Review the changes. You can change the disk layout there. You can also keep all as the default value and click Next.
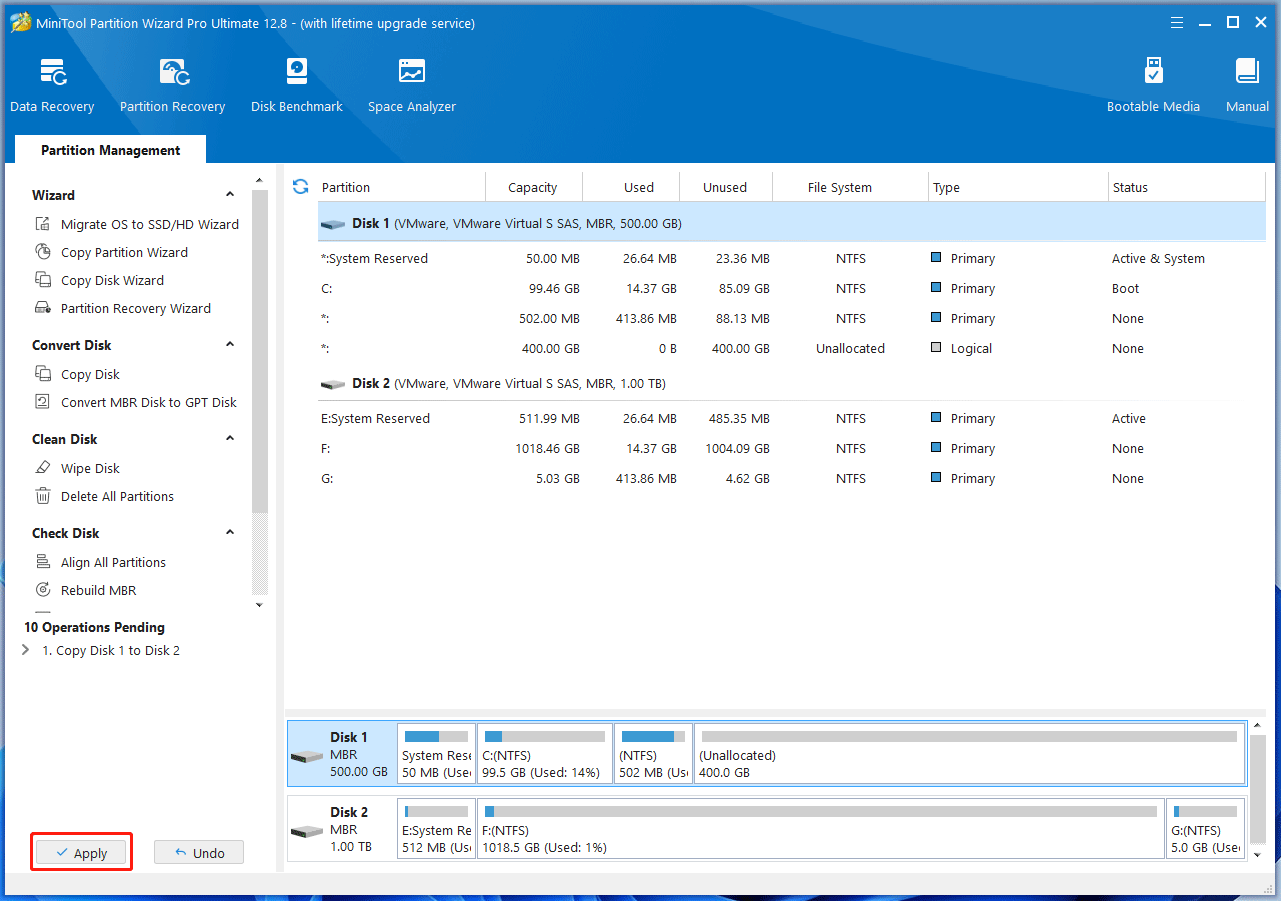
Step 4: Click Finish. Then, click Apply to execute the pending operation.
Step 5: Take out the old HDD from your PC and install the new SSD into your PC.
How to Fix the Computer Crashing When Playing Game Issue
If your games keep crashing Windows 11/10, you can try the following solutions.
Fix 1. Check If Your PC Specs Meet the Game’s System Requirements
If the computer crashes when playing games, check if your computer is capable of running this game.
Step 1: Go to the game’s office website to see the minimum and recommended requirements of the game.
Step 2: Check your PC specs.
- Press the Windows key + R to open the Run box.
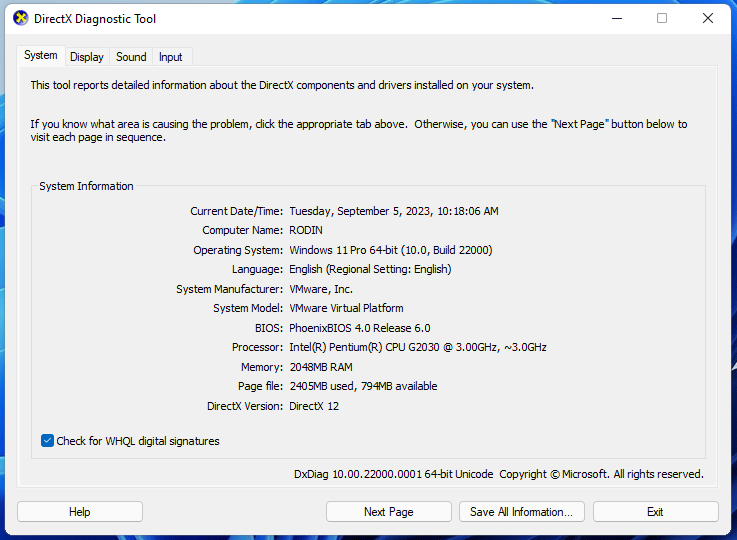
- Type “dxdiag” and press Enter to open DirectX Diagnostic Tool.
- Under the System tab, you can find the Operating System version, the Processor name and frequency, the Memory size, and the DirectX Version.
- Under the Display tab, you can find the Name and VRAM of the graphics card. This information can help you determine whether your computer meets the gaming requirements.
If your PC doesn’t meet the requirements, you need to upgrade your PC hardware. Then, you can refer to the following post:
- How to Upgrade Processor/CPU in a PC? Follow the Full Guide!
- Can You Upgrade GPU | How to Upgrade GPU [Laptop & Desktop]
- How To Upgrade Or Replace The RAM On Your Computer
Fix 2. Stop Overclocking
Overclocking can boost the component to perform better than its factory defaults. However, this will generate more heat and may impair component life. Improper overclocking may cause your PC to crash.
Are you overclocking your CPU or GPU using software or in the BIOS? If games keep crashing Windows 11 after the overclocking, I recommend you stop the overclocking.
Fix 3. Cool Down Your Computer
Playing games will make the computer run at high speed and generate a lot of heat. If your computer becomes overheating, it will automatically shut down to protect itself from major hardware failures. Then, you will see the PC crashes while gaming.
How to solve this issue? If your computer is old, you can clean fans inside the PC and replace the thermal paste on the CPU to renew the cooling function of the PC. If your PC is new, it’s possible that the cooling system design of the PC is not good.
If your computer is a laptop, there is no solution for you. If your computer is a desktop, you can refer to this post to redesign your cooling system: PC Fan Direction: How to Install Fans in PC.
Fix 4. Update the GPU Driver
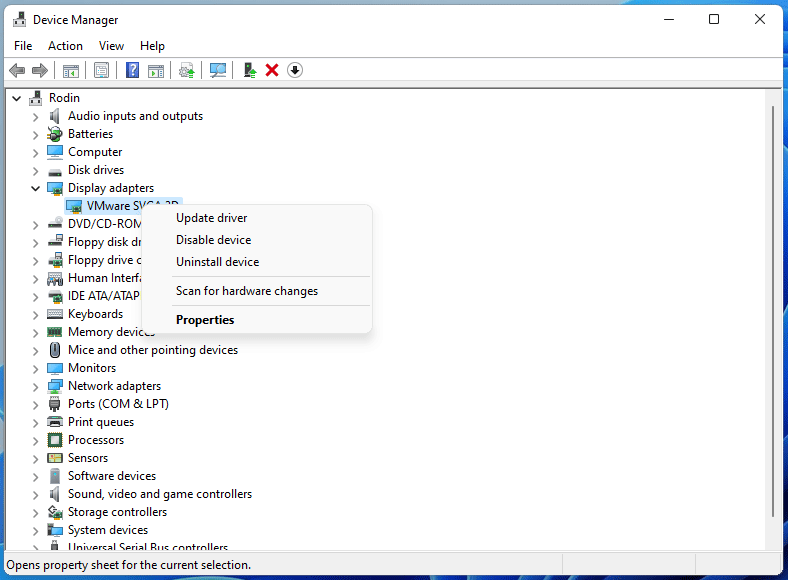
- Open Device Manager using the Windows Search bar.
- Expand Display adapters.
- Right-click on the graphics card and choose Update driver.
- On the pop-up window, click Search automatically for drivers.
Fix 5. Prioritize Computer Resources for the Game
If games keep crashing Windows 11 due to insufficient PC resources, you can consider prioritizing PC resources for the game so that the game can run more smoothly. To do that, you can use the following methods.
Way 1. Close Other Programs
When you play games, don’t open other apps. If you have opened some apps, close them or force quit them from Taskbar.
Way 2. Run Games in Game Mode
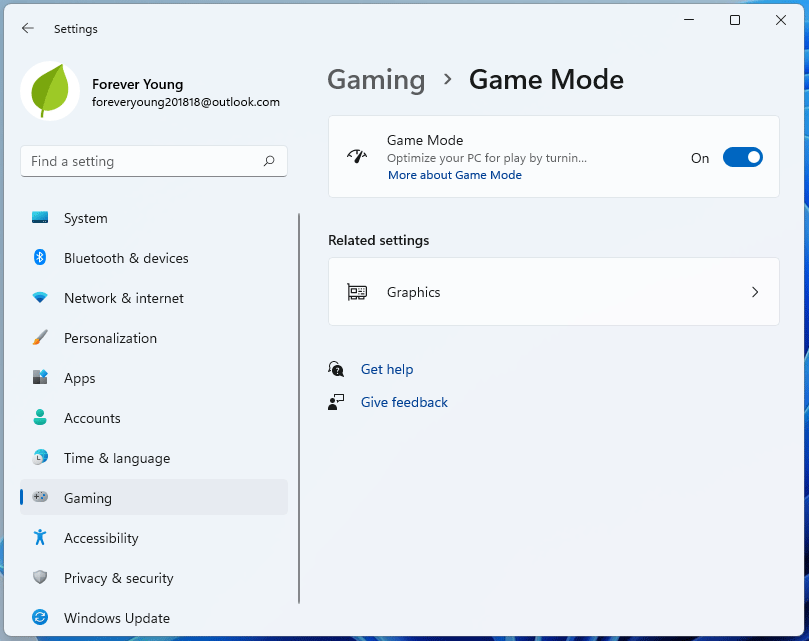
When this mode is enabled, Windows 10 will prioritize processor and graphics card resources for games. Here is the guide on how to enable it.
- Press the Windows key + I to open Settings.
- Go to Gaming > Game Mode.
- Turn on the Game Mode.
Way 3. Set the Game to High Priority
- Launch the game and then open Task Manager.
- Under the Details tab, find the game process and right-click it.
- From the context menu, click Set priority > High.
Fix 6. Lower the Screen Quality of the Game
Lowering the screen quality of the game can also reduce PC resource usage. If your PC keeps crashing while gaming, you can take this measure. You need to launch the game and go to Settings to set most settings to medium or low.
Fix 7. Play the Game Offline
In some cases, network issues can contribute to DRM hitting a game’s performance. If your PC crashes while gaming due to network issues and you can’t fix them, you can play the game offline if this option is offered.
Fix 8. Disable Antivirus or Allow the Game Through the Firewall
If you use third-party antivirus, you can disable them directly. If you are using Windows Defender, you can refer to this post to disable it: [Solution] How to Disable Windows Defender Antivirus on Win 10.
If you don’t want to disable Windows Defender, you can add the game to the whitelist to allow it through the Windows Defender firewall.
Fix 9. Check Bad Sectors
If the above methods don’t work, you should consider that the reason why the PC keeps crashing while gaming is the bad sectors on the hard drive. In this case, you can use MiniTool Partition Wizard to check if there are bad sectors on the hard drive. Here is the guide:
MiniTool Partition Wizard FreeClick to Download100%Clean & Safe
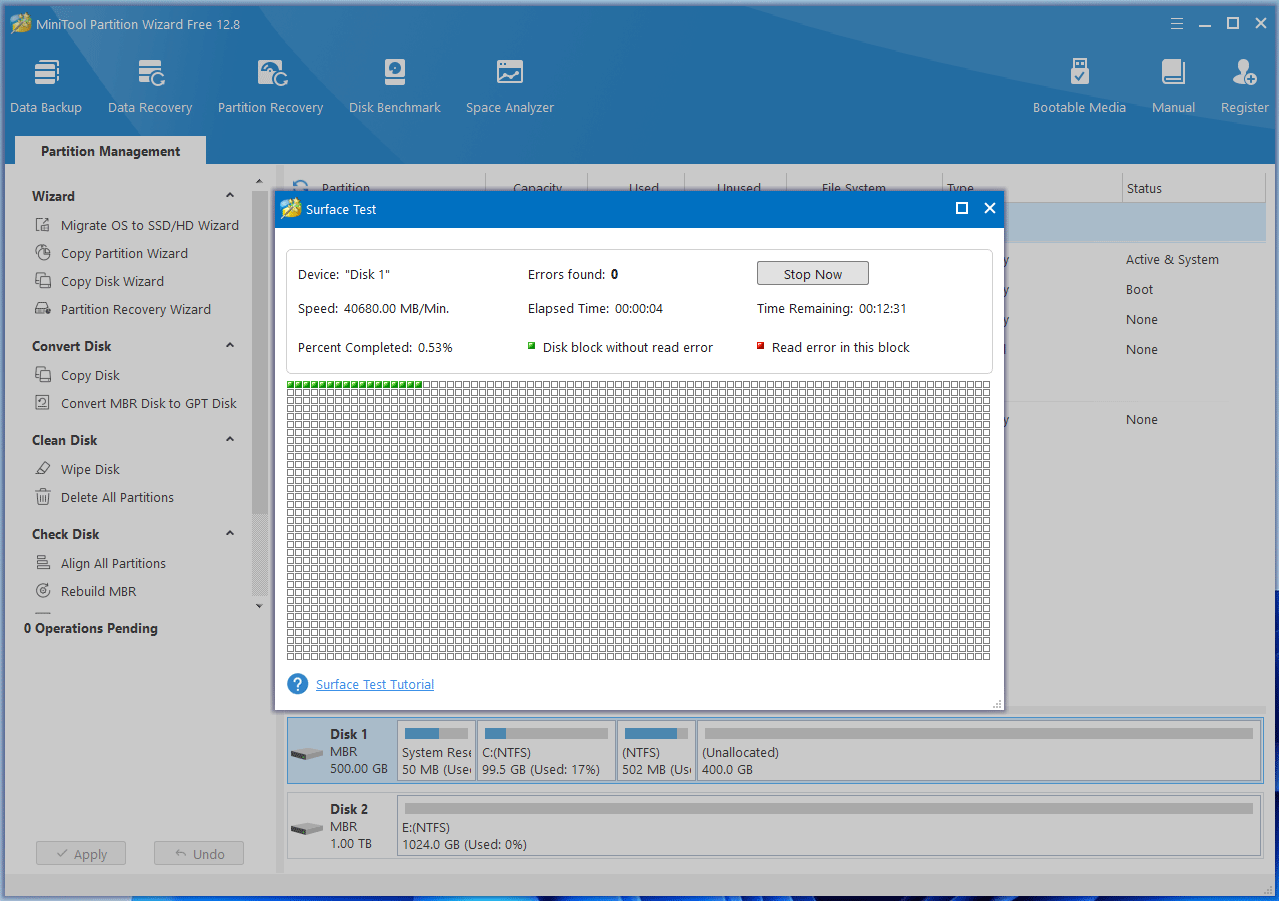
Step 1: Launch MiniTool Partition Wizard. Right-click the disk and choose Surface Test.
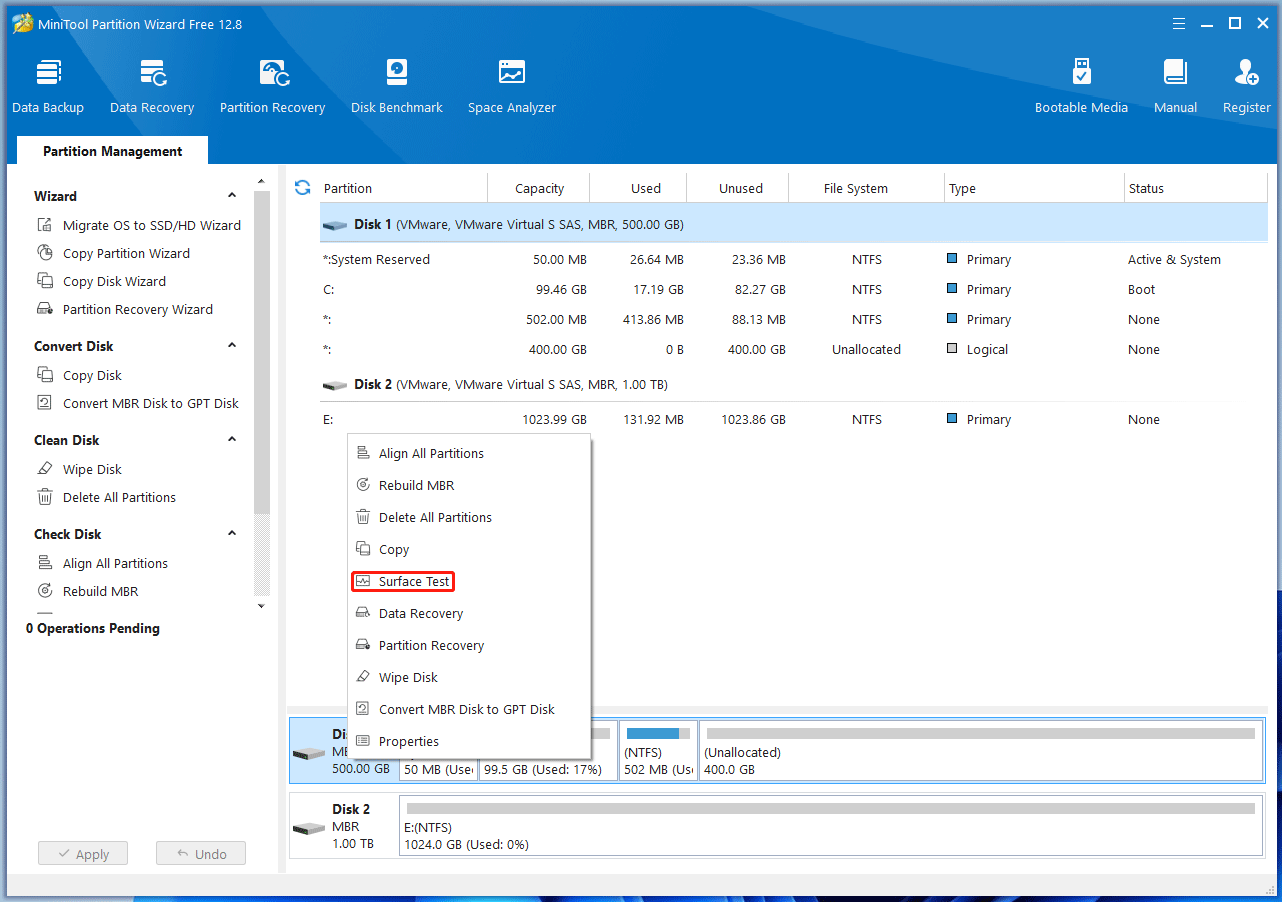
Step 2: On the pop-up window, click Start Now. If bad sectors are found, they will be marked as red blocks. If there are too many bad sectors, you may need to replace the hard drive.
Fix 10. Delete ClientRegistry.Blob
Many people may use Steam to launch games. What to do if Steam games keep crashing? In addition to the above solutions, here is a special solution – deleting the ClientRegistry.Blob file.
The ClientRegistory.Blob is one of the fundamental files for the Steam app. It stores the data related to the logins and cache files of the games you play. Oftentimes, a minute error in this file can lead the whole Steam system down.
Therefore, if Steam games keep crashing, you can delete this file to see if the issue is solved. Deleting this file will not game data loss because these data are stored in the cloud storage of Steam. However, make sure that you’ve noted all the login credentials somewhere else.
Here is how to delete ClientRegistry.Blob:
- Open File Explorer and go to C:\Program Files\Steam. If your Steam is installed in another location, the file path should be changed accordingly.
- Under this folder, look at the file named ClientRegistry.Blob and delete it.
Bottom Line
Is this post useful to you? Do you know other solutions to the computer crashing when playing games issue? Share them with us in the following comment zone. In addition, if you encounter problems when using MiniTool Partition Wizard, please feel free to contact us via [email protected]. We will get back to you as soon as possible.

User Comments :