When you browse in your Google Chrome, you might fail to open webpages and the connection status keeps on showing Waiting for cache. Focus on this problem, MiniTool software provides 4 solutions for you.
According to the report of Windows users, there is an annoying problem while they are using Google Chrome: their Chrome keeps freezing and waiting for cache.
If this issue occurs, the site you are trying to access will load very slowly and the statues will keep for a couple of seconds to a few minutes. This issue is more likely to happen to Windows 10 computer with SSDs rather than hard disk drives.
If you keep getting the message that your Google Chrome is waiting for cache, you can try some simple methods given below.
Fix 1: Clear Chrome Cache
As the error message shows, this issue is very likely to be caused by corrupted cache files or cookies. So, you can surely try removing these data from your Google Chrome. Here’s how to do it.
Step 1: After opening your Chrome, click the three-dot icon in the top right corner to open the Chrome menu.
Step 2: Now, navigate to More tools > Clear browsing data.
Step 3: In the pop-up new window, check the items of Cookies and other site date and Cached images and files. Then, choose All time for the Time range and click Clear data to remove the selected data.
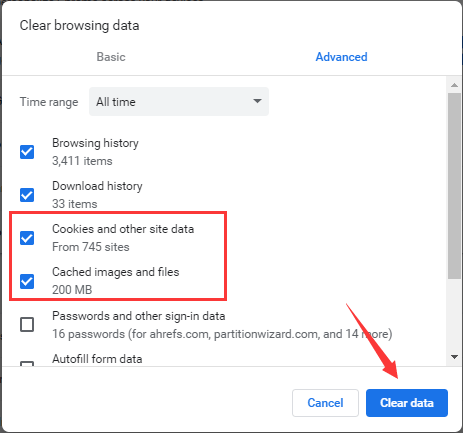
Now, you can restart your Google Chrome to see if you can open the site normally.
Fix 2: Disable Disk Write Caching Feature
To fix Chrome waiting for cache issue, you can also disable the disk write caching feature in your Windows 10 PC. This feature aims to improve your computer performance, allowing data to be initially stored in DRAM or SLC NAND and then written on the drive NAND.
Disabling this feature might slow your drive write speed. But some users have fixed the Chrome waiting for cache issue by disabling it to stop cache from writing to SSD, so you can have a try.
Step 1: Press Windows + R to invoke Run dialog. Type devmgmt.msc and click OK to open Device Manager.
Step 2: Double-click the Disk drives category to expand it. Right-click the SSD on which your Chrome is installed and click Properties.
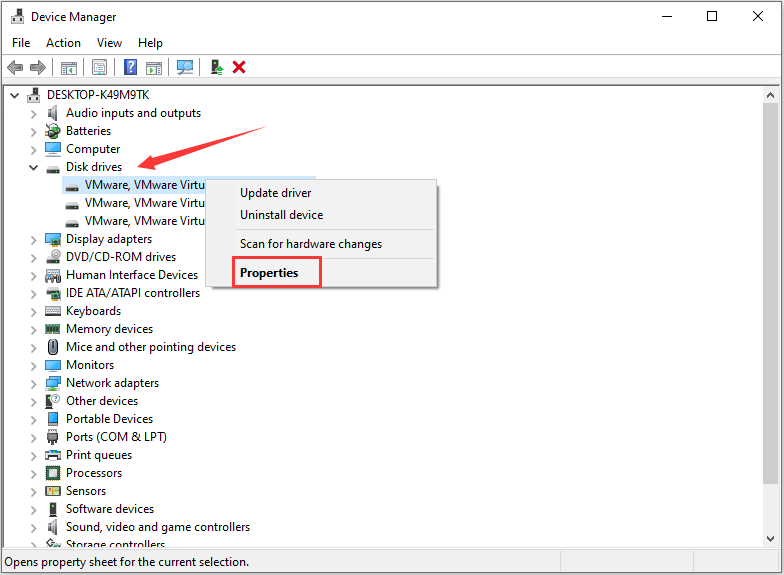
Step 3: In the new window, switch to Policies tab and uncheck Enable write caching on the device option. Then, click OK to exit the window.
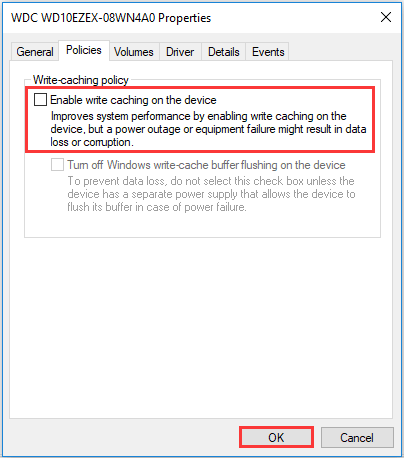
Once it’s done, you can restart your Google Chrome to try access the site again.
Fix 3: Create A New User Profile
Another resolution to this issue is using a new user profile in Google Chrome.
Step 1: Open your Google Chrome again, click the picture icon (next to the three-dot icon) representing your profile and go to Manage people > Add person.
Step 2: In the new page, input a name and choose an icon. Then, click Add to create a new profile for your Chrome.
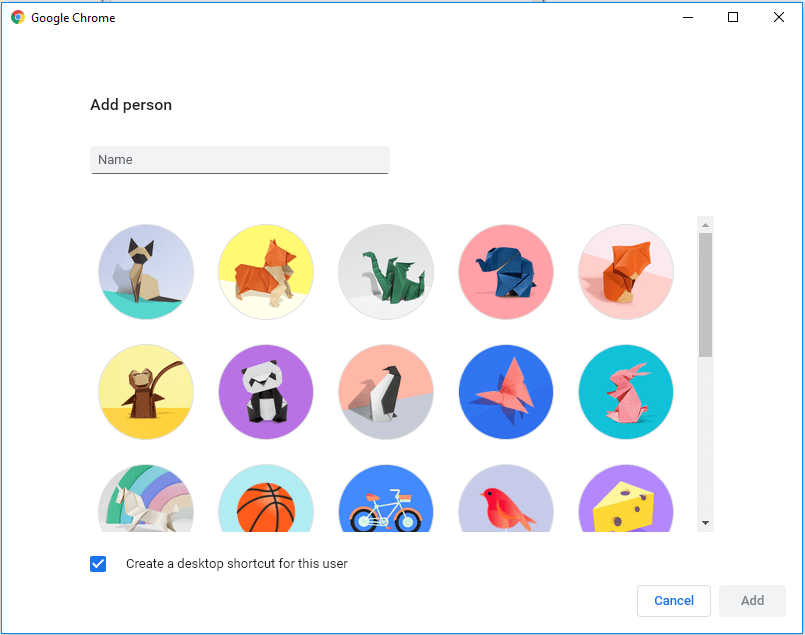
After that, your Chrome will restart with the new profile. You can check if Chrome waiting for cache is resolved. If the issue has been fixed, you can sign in with your Google account to import the saved data to the new profile.
Fix 4: Reset or Reinstall Your Google Chrome
Finally, you can try resetting or reinstall you Google Chrome to fix this issue if all the solutions introduced above fail to work.
To reset Chrome, follow the steps below:
Step 1: Click the three-dot button and choose Settings.
Step 2: Go to Advanced > Reset and clean up > Restore settings to their original defaults.
Step 3: When you get the following window, click Reset settings to confirm the operation.
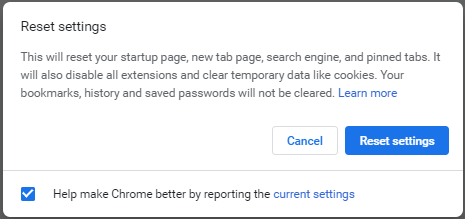
This will roll your Chrome settings to the default, but won’t affect your bookmarks, history and saved passwords. Then, restart your browser and it should work smoothly again.
If resetting Chrome cannot fix the error either, you might need to reinstall it. Just uninstall this program fully from your computer. Then, download the latest version of Google Chrome from the official website and reinstall it to your PC.
Have you fixed Chrome waiting for cache issue now?

User Comments :