What to do if CHKDSK cannot run on your computer? This post from MiniTool Partition Wizard discusses “CHKDSK won’t run” in different cases and enumerates possible solutions to these cases. Start reading!
CHKDSK Won’t Run Windows 7/10
CHKDSK, short for Check Disk, is a built-in utility in Windows operating systems for verifying the file system integrity of a volume and fixing logical file system errors as well as scanning disk surface for bad sectors and marking them.
The utility is super useful. However, plenty of people find that it doesn’t work on Windows 7 and Windows 10 and receive an error message, such as:
- CHKDSK cannot continue in read-only mode.
- The type of the file system is RAW. CHKDSK is not available for RAW drives.
- Windows cannot run disk checking on this volume because it is write-protected.
- CHKDSK cannot open volume for direct access.
- CHKDSK cannot run because the volume is in use by another process.
- …
If you receive one of the first four error messages, you can click the corresponding link to seek the solutions. If you are in the last case or other cases, please scroll down as they are discussed below.
CHKDSK Won’t Run: Chkdsk Cannot Run Because the Volume Is in Use by Another Process
My computer was working fine until last night. Now when I go to log in, I receive a blue screen… So, then I go to run the CHKDSK utility and I get the error: Chkdsk cannot run because the volume is in the use by another process…answers.microsoft.com
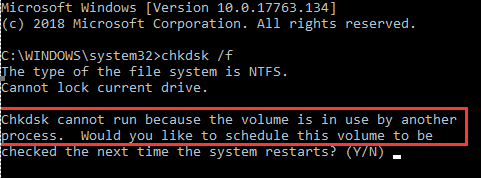
“Chkdsk cannot run because the volume is in use by another process” means that to fix your hard drive, CHKDSK needs to be the only program accessing it. To stop the error message, you can try the following two solutions.
Solution 1: Allow CHKDSK to Run Automatically After Reboot
Windows has a built-in resolution to the issue: Once the computer restarts, Windows will automatically run CHKDSK before the system boots.
To activate the resolution, type Y and hit the Enter key when you are asked whether to check the volume on the next reboot. Then you will immediately receive confirmation that volume will be checked on reboot. End the current session and restart your computer to let CHKDSK run.
Solution 2: Run CHKDSK in Pre-Boot Environment
If the above solution does not work for you, you can try running CHKDSK in Pre-Boot Environment. For this, perform the following steps:
Step 1: Boot to Advanced Recovery options.
- Start your computer (running Windows 10), and quickly shut it down before it is at the boot screen. Repeat this two times.
- On the third time, your computer will automatically enter the recovery mode. Once inside the Recovery window, press the Esc key for recovery options.
- Wait for Windows to prepare for recovery options.
- Inside the Choose an option window, choose the Troubleshoot option.
- Finally, choose the Advanced options option on the Troubleshoot window.
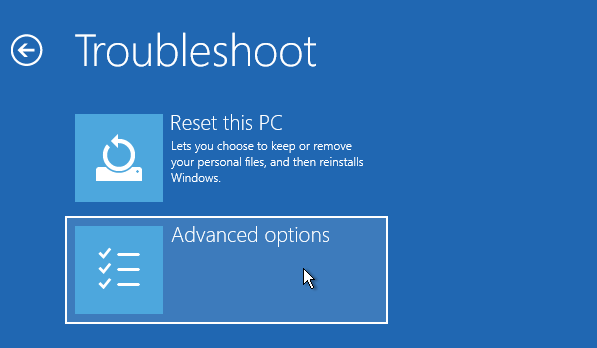
Step 2: Choose Command Prompt option on the Advanced options window.
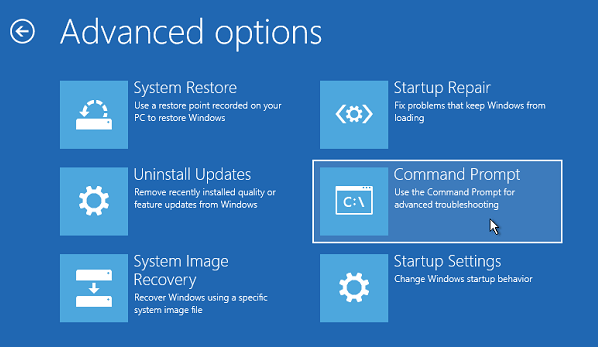
Step 3: Once inside the Command Prompt window, type chkdsk with valid parameters, for example, chkdsk C: /r /x, and then press the Enter key.

CHKDSK Won’t Run: Other Cases
I have a Dell Inspiron 1545 with Windows 7. I started to receive an error message on startup that I have a corrupt file and that I should run Chkdsk. I went through the Start Menu to tools under my Computer. I checked the boxes and it said that I could only run the check disk after a reboot. When I reboot, nothing happens.answers.microsoft.com
If you are stuck in another case, there are three general troubleshooting methods. Please try them one by one.
Solution 1: Modify the Value Data via Registry Editor
Modifying the value data for the BootExecute string might help you solve “CHKDSK won’t run”, and the detailed operations are:
Step 1: Open Registry Editor.
- Press Windows + R to launch the Run dialogue box.
- Type regedit.exe in the Run dialogue box and then hit the Enter key.
Step 2: Once Registry Editor opens, paste the following path on the top bar on the window.
ComputerHKEY_LOCAL_MACHINESYSTEMCurrentControlSetControlSession Manager
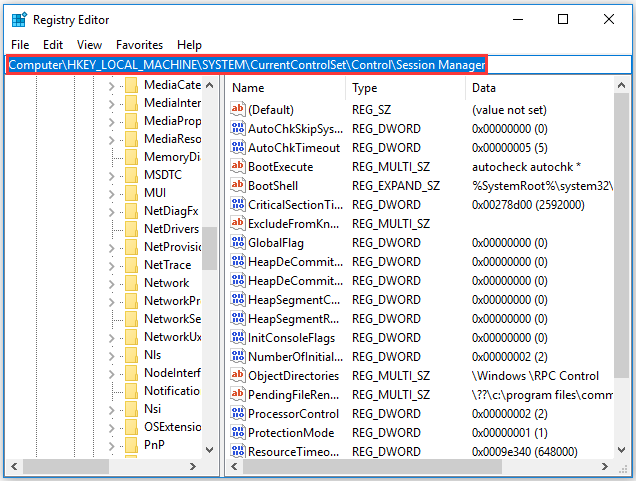
Step 3: Double-click the BootExecute string on the right pane. Then, on the window called Edit Multi-String, set the value data to autocheck autochk*. Finally, click the OK button to save the change.
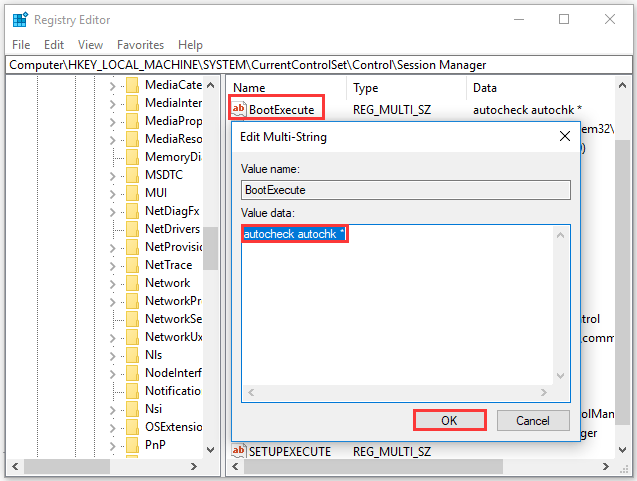
Well now run CHKDSK again and see if the issue persists. If it still exists, move to the next solution.
Solution 2: Disable Hybrid Boot
Are you using the hybrid boot in Windows 10? If yes, you need to disable it because enabling it may cause CHKDSK commands to fail to work. To disable it, you need to:
Step 1: Launch Run dialogue box, type cmd, and hit the Enter key to open Command Prompt.
Step 2: On the Command Prompt window, type powercfg /h off and hit the Enter key to run the command.
Step 3: Restart your computer to keep all changes.
Solution 3: Restore your System to a Previous Point
Try the solution to “CHKDSK won’t run Windows 10”. For this, perform the steps below:
Step 1: Type Control Panel into the Windows search bar and then hit the Enter key to open the Control Panel window.
Step 2: Switch the view mode to Category on the Control Panel and then choose the System and Security option
Step 3: Once inside the System and Security window, choose the System option on the right side.
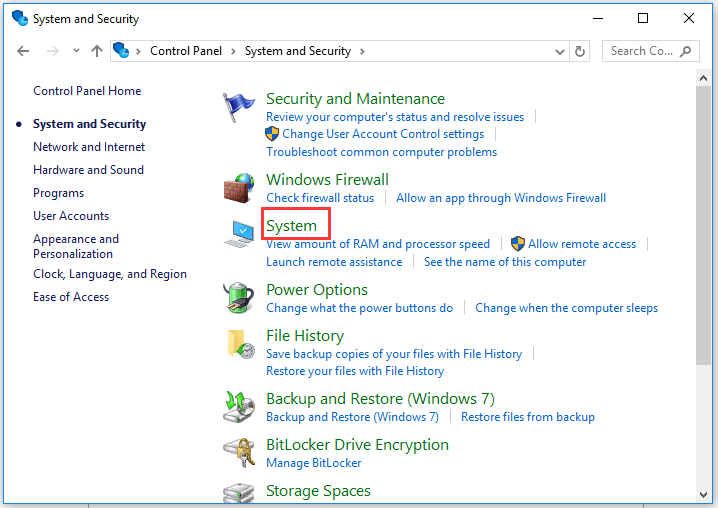
Step 4: Now choose the System protection option on the left side of the new window.
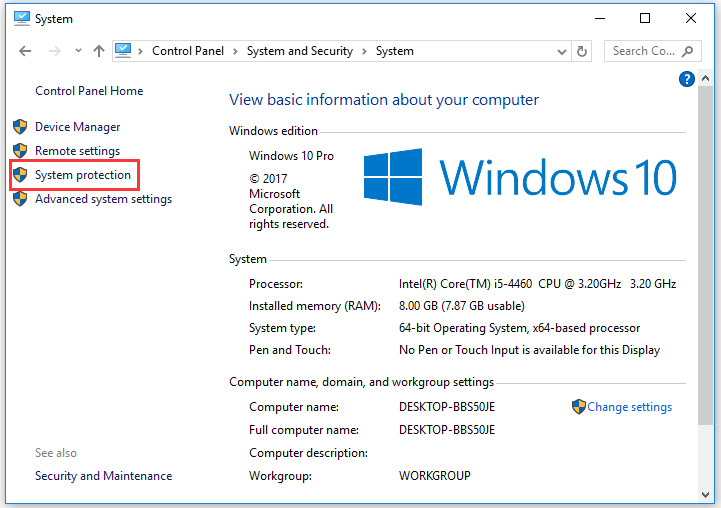
Step 5: Click the System Restore button in the System properties window.
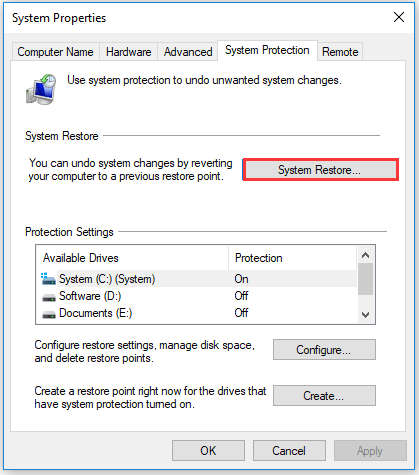
Step 6: Click the Next button when the System Restore window shows up. Then, select the restore point you want to use to fix CHKDSK not working.
Step 7: Confirm the restore point on the Confirm your restore point window and then click the Finish button.
Step 8: Click the Yes button to start the system restore now. When the System Restore process ends, restart your computer to keep all changes.
Hope the three fixes have helped you solve your issue.
This post discusses “CHKDSK won’t run”. It is worth reading.Click to Tweet
Suggestion: Try CHKDSK Alternative When CHKDSK Won’t Run
CHKDSK is a top choice for checking file systems errors and scanning bad sectors but it is not the only choice. When the utility does not work, you can try its alternative and it is highly recommended to use MiniTool Partition Wizard that is a safe and reliable program with a friendly and concise graphical user interface.
Like the CHKDSK utility, MiniTool Partition Wizard allows you to check file system errors and fix the logical ones as well as scan bad sectors.
Check & Fix File System Errors with MiniTool Partition Wizard
MiniTool Partition Wizard has the feature called Check File System that can do what chkdsk and chkdsk /f do.
If you want to try this feature, you can follow the guide below.
Step 1: Download MiniTool Partition Wizard, follow the on-screen wizard to install and launch it to access its interface.
MiniTool Partition Wizard FreeClick to Download100%Clean & Safe
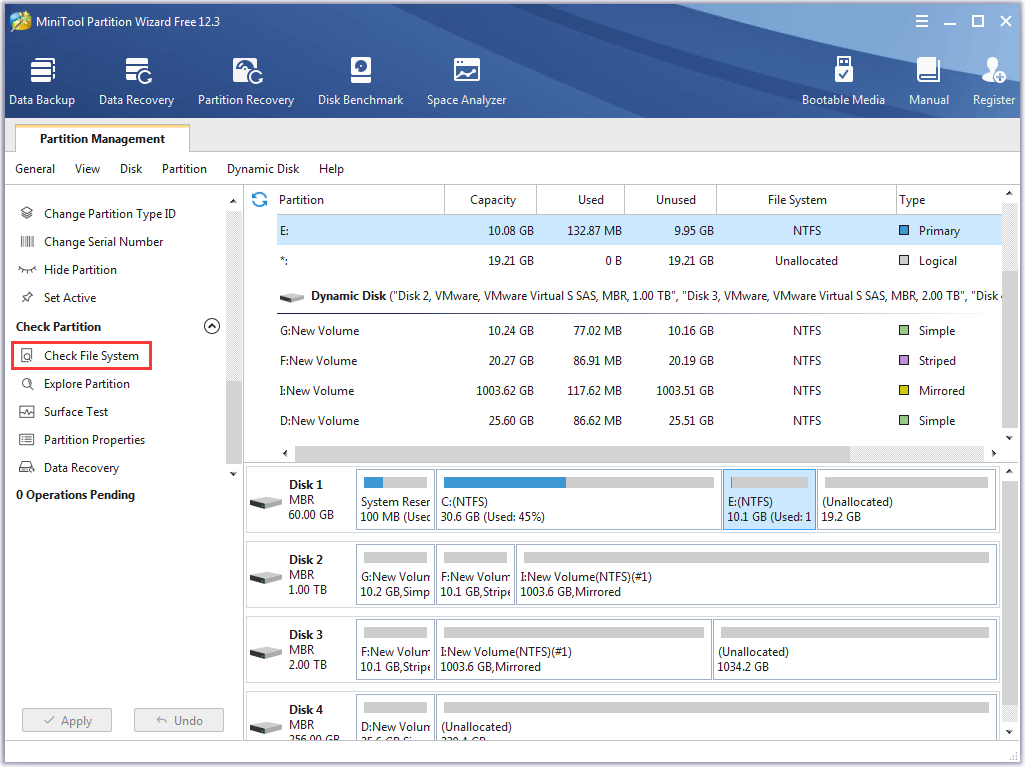
Step 2: Select the partition to be checked and click the Check File System feature on the left side.
Step 3: A window called Check File System appears, on which you will see two options: Check only and Check & fix detected errors. Choose the option based on your needs and then click the Start button.
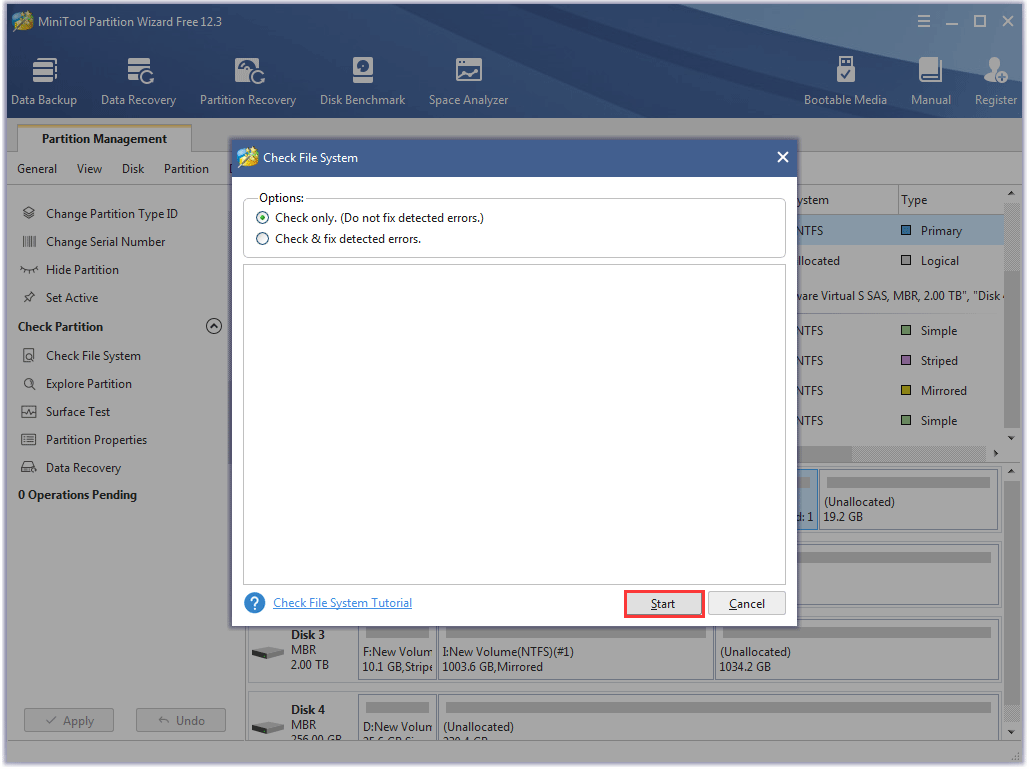
MiniTool Partition Wizard will start its task. When the task ends, you can click the Cancel button to close the Check File System window.
Scan Hard Drive Bad Sectors with MiniTool Partition Wizard
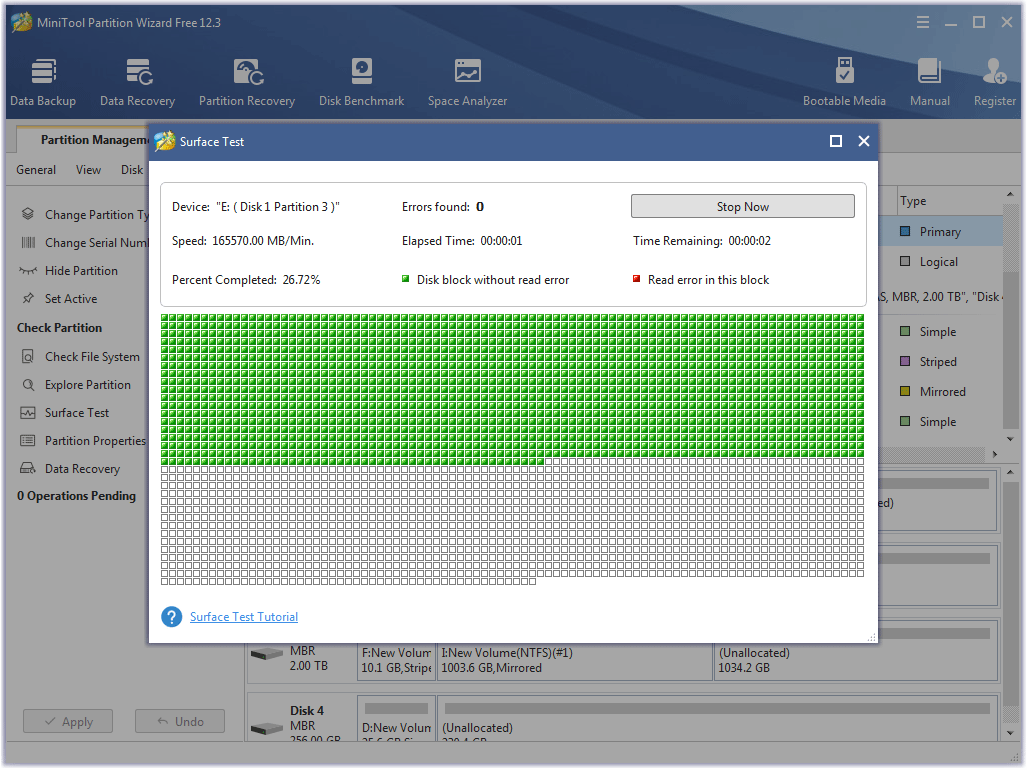
The Surface Test feature of MiniTool Partition Wizard can check bad sectors and off an intuitive result.
Here are steps to check bad sectors using the program.
Step 1: Download MiniTool Partition Wizard, follow the on-screen wizard to install it and launch it to access its interface.
MiniTool Partition Wizard FreeClick to Download100%Clean & Safe
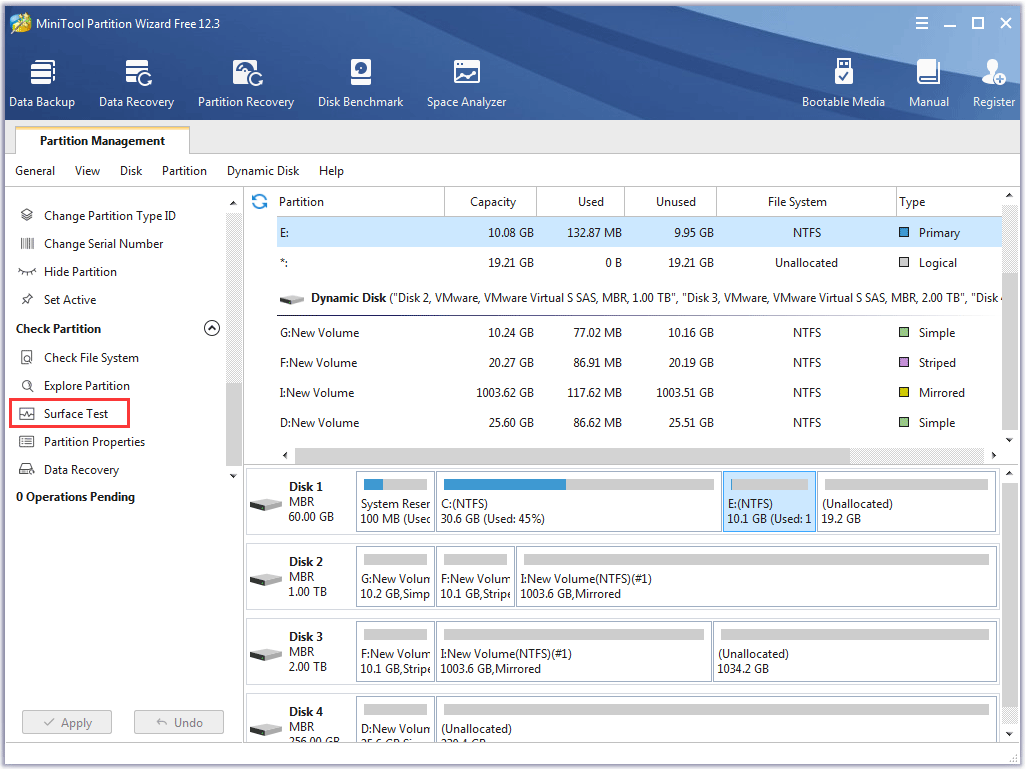
Step 2: If you want to check the whole disk, highlight it and then choose the Surface Test feature on the left side. If you want to check a partition, highlight it and then choose the feature.
Step 3: Click the Start Now button on the window called Surface Test.
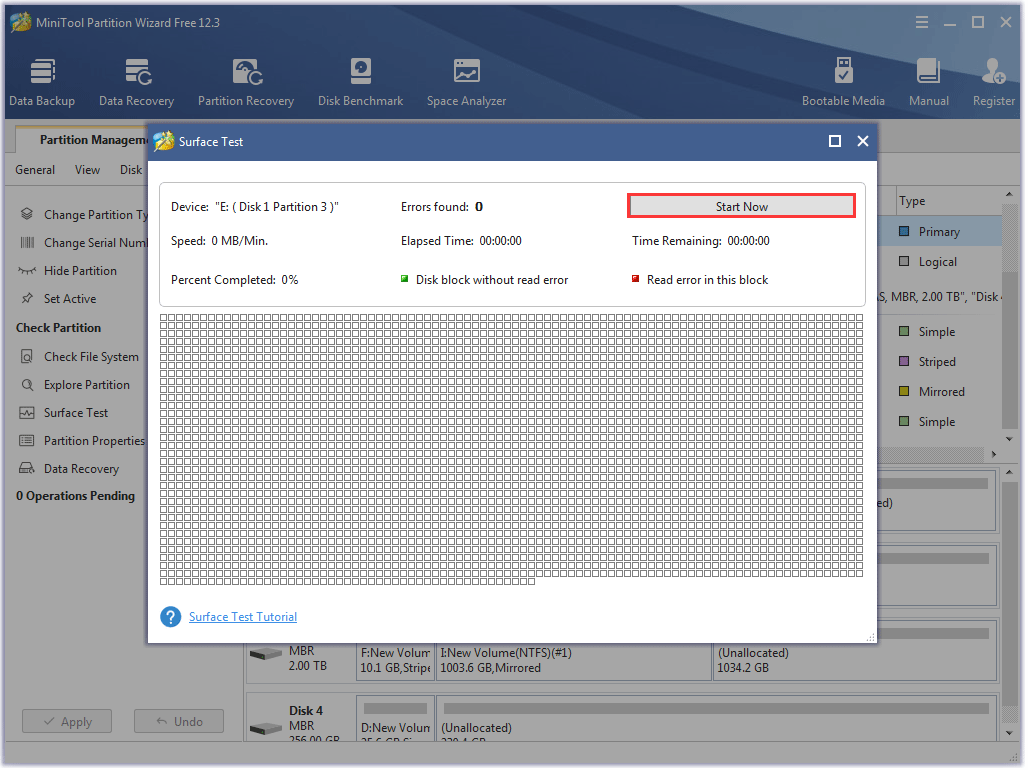
The program will start scanning the partition or disk for bad sectors and show the process at the same time. When the process ends, view the result. If you see some red blocks, it means that there are bad sectors; if not, the disk or partition you selected for checking is healthy.
MiniTool Partition Wizard is a great alternative to the CHKDSK utility.Click to Tweet
Bottom Line
CHKDSK is a robust utility for checking file system errors and scanning bad sectors. However, when it does not work, give the mentioned solutions a try. Or, you can try a CHKDSK alternative like MiniTool Partition Wizard.
If you have some doubts after reading, please let us know in the comment zone and we will reply to you as soon as possible.
If you have some problems with the operations on MiniTool Partition Wizard, please send us an email to [email protected].
CHKDSK Won’t Boot FAQ
You can run CHKDSK through partition property or Command Prompt when your computer boots successfully. If your system won’t start, you can run CHKDSK in Pre-Boot Environment.
For the details about running CHKDSK, please refer to Windows 10 CHKDSK.
The utility may cause some troubles and risks when it is misused in some cases and the cases are listed below:
- Run CHKDSK after data loss. For example, if you have mistakenly deleted a file, the sector of the file will be marked as available and free. After that, if you run CHKDSK and it finds bad sectors, it will remap the files on bad sectors to spare sectors like the sector where the deleted file was located and this makes it is impossible to recover the deleted files.
- Run CHKDSK after virus attack. In this case, running CHKDSK may locate and delete the infected files straightforward.
- Run CHKDSK after physical damage. Running CHKDSK at this point may result that a hard drive will be hard forced to run and the drive components are further damaged.
- Run CHKDSK to scan large hard drives. CHKDSK has a limit that will arise when scanning the hard drive in large size.


User Comments :