CHKDSK is commonly used to check and fix hard drive errors. However, you sometimes will encounter the CHKDSK taking forever issue. What causes it and how to troubleshoot it? Well, MiniTool Partition Wizard tells you the answers to these questions in this post.
About CHKDSK Taking Forever
CHKDSK, known as check disk, is a system utility that examines disk space and disk use and offers a status report specific to each file system. By running CHKDSK commands, you can scan and fix hard drive errors. Most time, this utility runs smoothly without errors.
However, it sometimes prompts errors like CHKDSK not working, CHKDSK write protected error, CHKDSK is not available for RAW drives, CHKDSK cannot open volume for direct access, and so on. Among them, CHKDSK taking forever is one of the most confusing errors.
You may be stuck at this error and can’t boot into the computer normally, which is rather troubleshooting. Then you will be in a dilemma. Here’s a true example on the forum Reddit.com.
“I have an external drive with a lot of personal stuff on it. Sadly, most of the stuff is not backed up for the sole reason that I do not have the capacity of storage to store everything on 2 drives. However, I do now have another drive I ripped out of a machine I could technically image it to. However, the issue is the CHKDSK has been running now for about 24 hours and I have no idea when it might complete. So, I cannot even use that computer right now as it is stuck on the startup screen waiting on it to complete. I am wondering if it would be better to let it finish, or if I should unplug the drive to error CHKDSK out and try and image the drive.”
Causes of CHKDSK Taking Forever
The CHKDSK taking forever issue can be caused by multiple reasons, such as power failures during writing, not shutting down the computer properly, removing USB flash drives without using Safely Remove, etc. Besides, CHKDSK frozen can also result from the factors below.
- There are too many fragmented files on the disk.
- System files are missing or corrupted.
- The disk has bad sectors.
Further reading:
How long does CHKDSK take? Generally speaking, the disk checking process takes from 20 minutes to 6 hours. The larger the drive, the longer time it will take. On Windows 7 and earlier systems, the disk checking process can take hours and even days.
Also read: CHKDSK Not Working with Vanguard Installed (Reasons and Fixes)
CHKDSK Taking Forever Fix
CHKDSK is taking forever on your computer? If you are suffering from this issue, resolve it with the following methods. Detailed steps of each method are provided and you just need to follow them to finish the operation.
Here are some issues that are similar to CHKDSK taking forever. If you are bothered by them, troubleshoot them with the given tutorials.
Method 1: Clean Boot the Computer
According to user reports, performing a clean boot is helpful for solving CHKDSK frozen. You can also have a try!
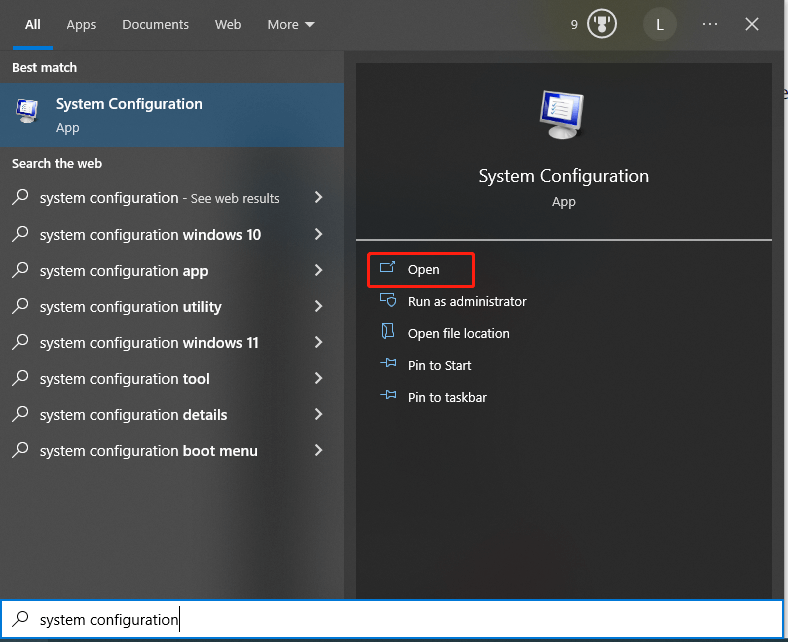
Step 1: Type system configuration in the search box and then click the Open option in the right panel.
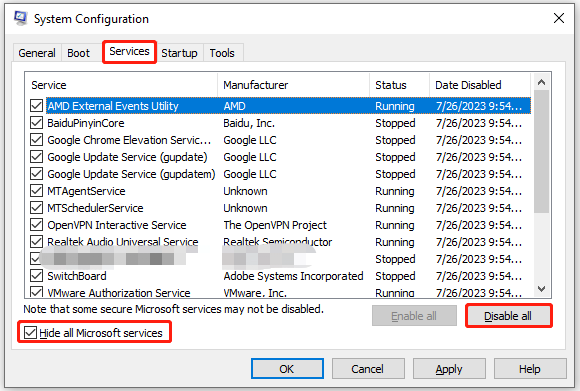
Step 2: Navigate to the Services tab, check the Hide all Microsoft services option, and then click Disable all.
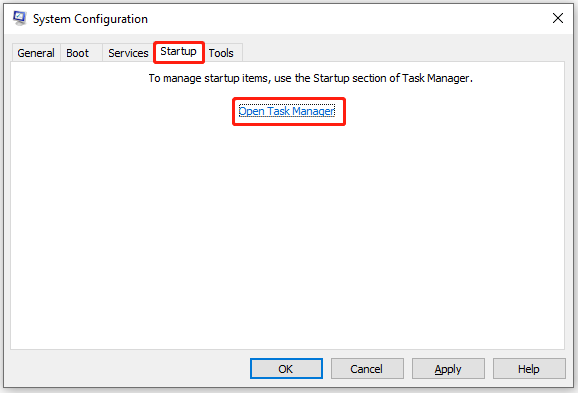
Step 3: Switch to the Startup tab and click Open Task Manager.
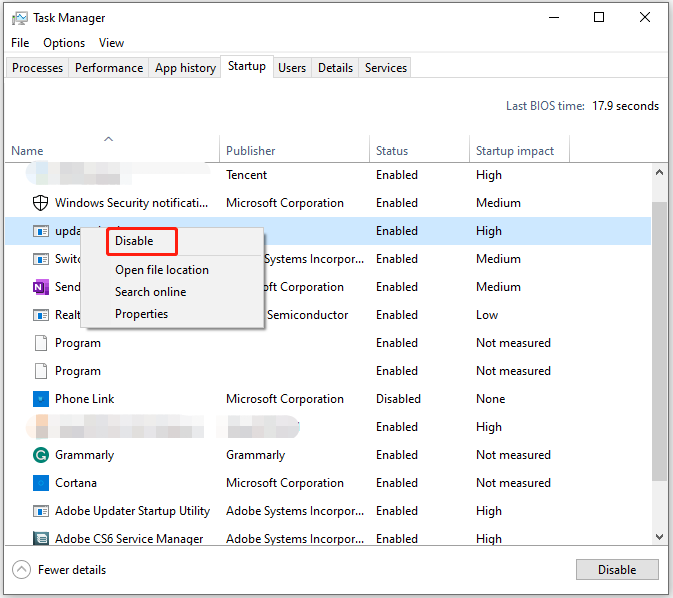
Step 4: In the Task Manager window, right-click on the item under the Startup tab and click the Disable option. Then repeat this operation until all the items on the list are disabled.
Step 5: Click OK under the Startup tab of the System Configuration window. After that, restart your computer to see if CHKDSK is taking forever still.
You may also like this: Windows Can’t Check the Disk While It’s in Use [Solved]
Method 2: Clear Temporary Files on the C Drive
Windows saves all types of temporary files on the computer. Given that fact, CHKDSK can get stuck while scanning those files. If check disk stuck at 10, try deleting temporary files on the computer with the following steps.
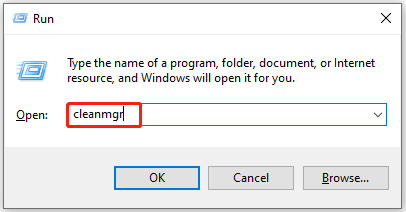
Step 1: Press Windows and R keys to open the Run window. Then type cleanmgr and hit Enter.
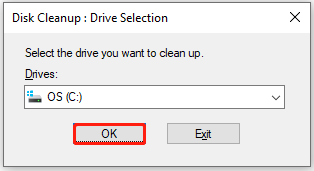
Step 2: The C drive is selected by default in the Drive Selection window. If you confirm that, click OK to continue.
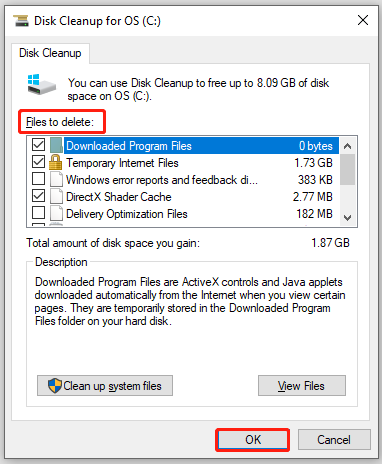
Step 3: In the prompted window, select specific files that you want to delete under the Files to delete section. Then click OK to execute the operation.
Try using MiniTool Partition Wizard to check disk usage and delete space-consuming files when you encounter errors like Windows 11 Disk Cleanup not working, Disk Cleanup won’t open/work, Windows Update Cleanup stuck happens on Disk Cleanup, and something like that.
MiniTool Partition Wizard FreeClick to Download100%Clean & Safe
Related article: How to Clean up Your Computer? Top 8 Methods for You
Method 3: Scan Hard Drive for Errors
Bad sectors and damaged/corrupted file systems on the hard drive can result in CHKDSK taking forever as well. So, an available solution to the CHKDSK frozen issue is to scan hard drive for errors. The Surface Test and Check File System features of MiniTool Partition Wizard enable you to do that with ease.
Download and install MiniTool Partition Wizard on your computer. Then follow the steps below to check hard drive error with the two features.
MiniTool Partition Wizard FreeClick to Download100%Clean & Safe
Step 1: Launch the software to enter its main interface.
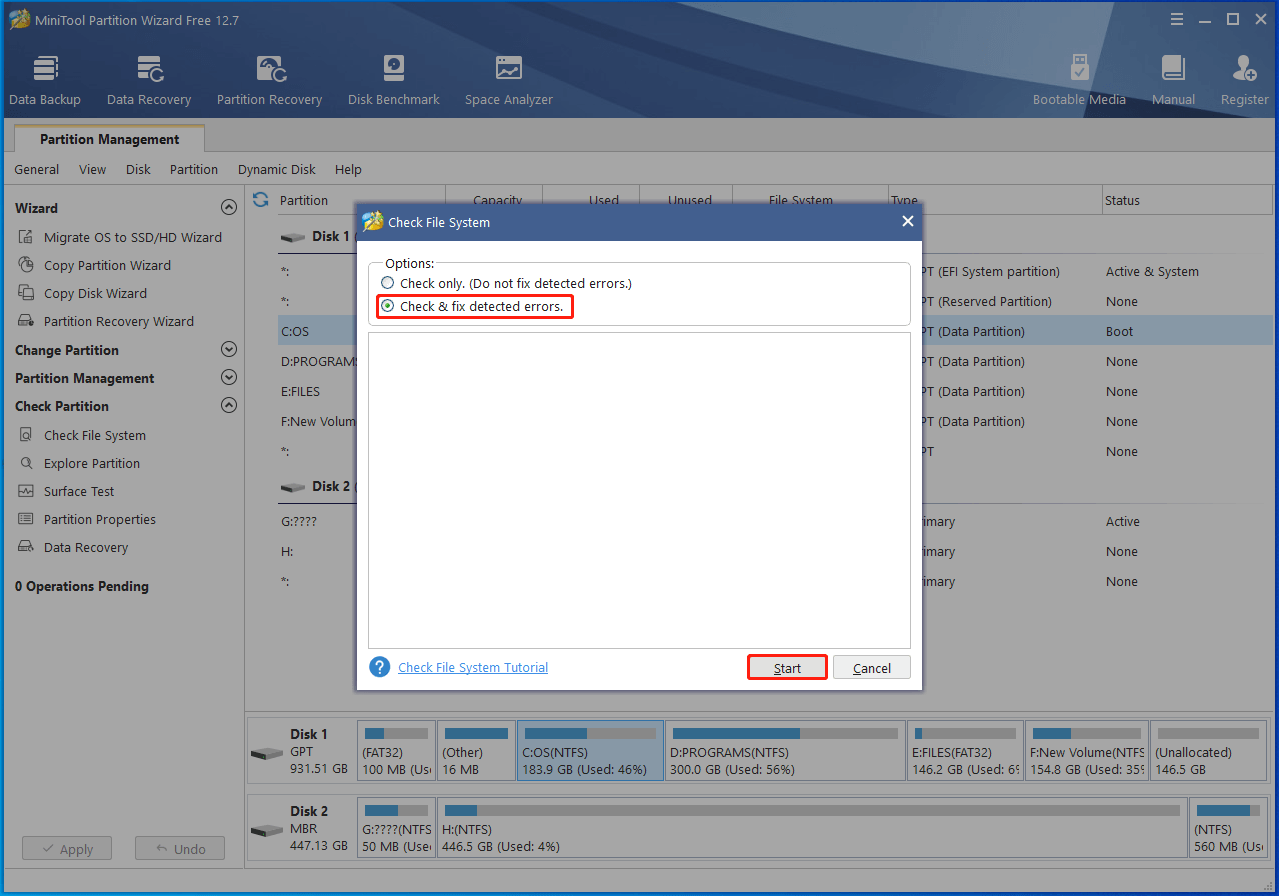
Step 2: Right-click on the C drive and then click the Check File System option. Alternatively, highlight the C drive and tap Check File System in the left panel.
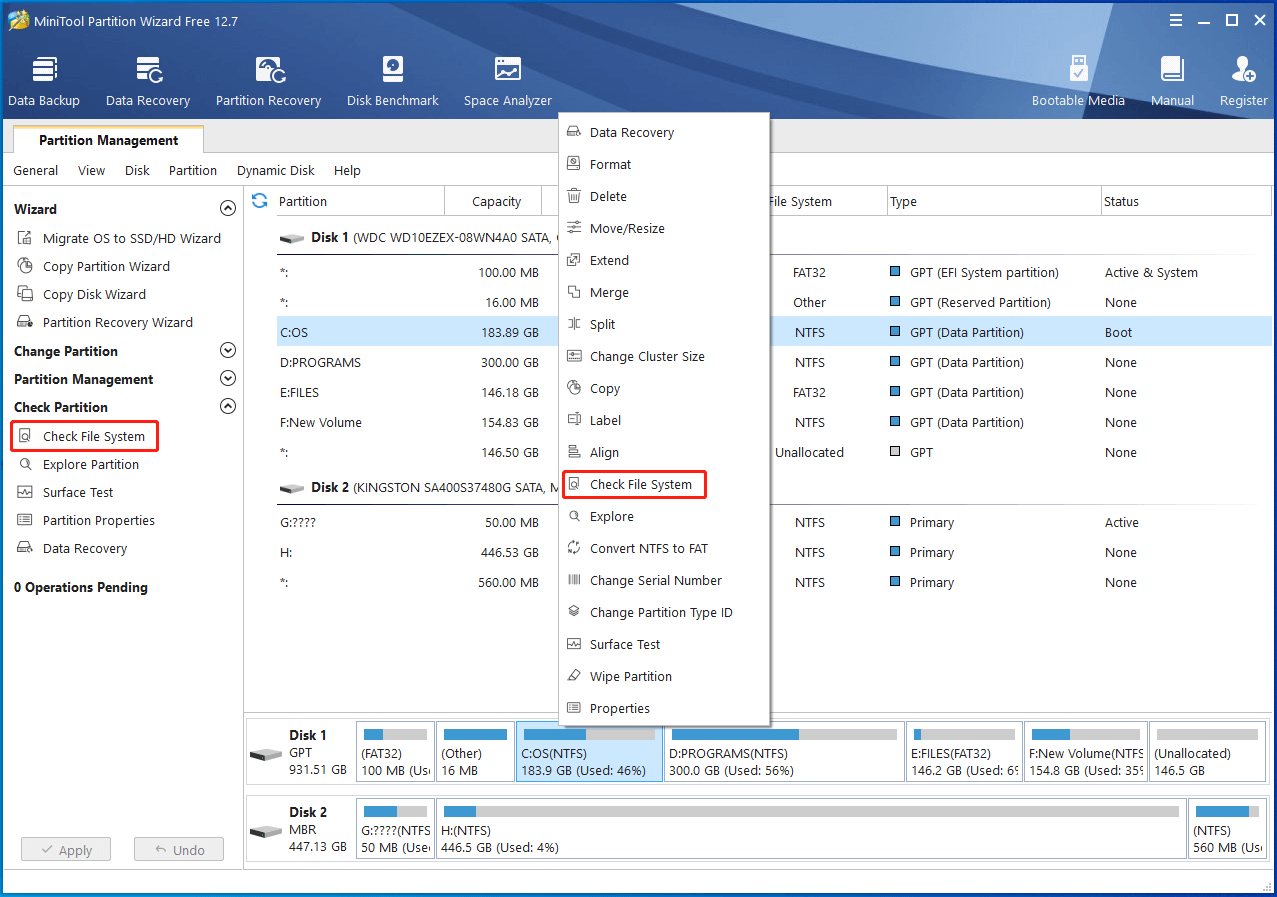
Step 3: In the elevated window, pick the “Check & fix detected errors” option and click the Start button to execute the operation. This partition manager will fix any detected file system errors on the selected drive.
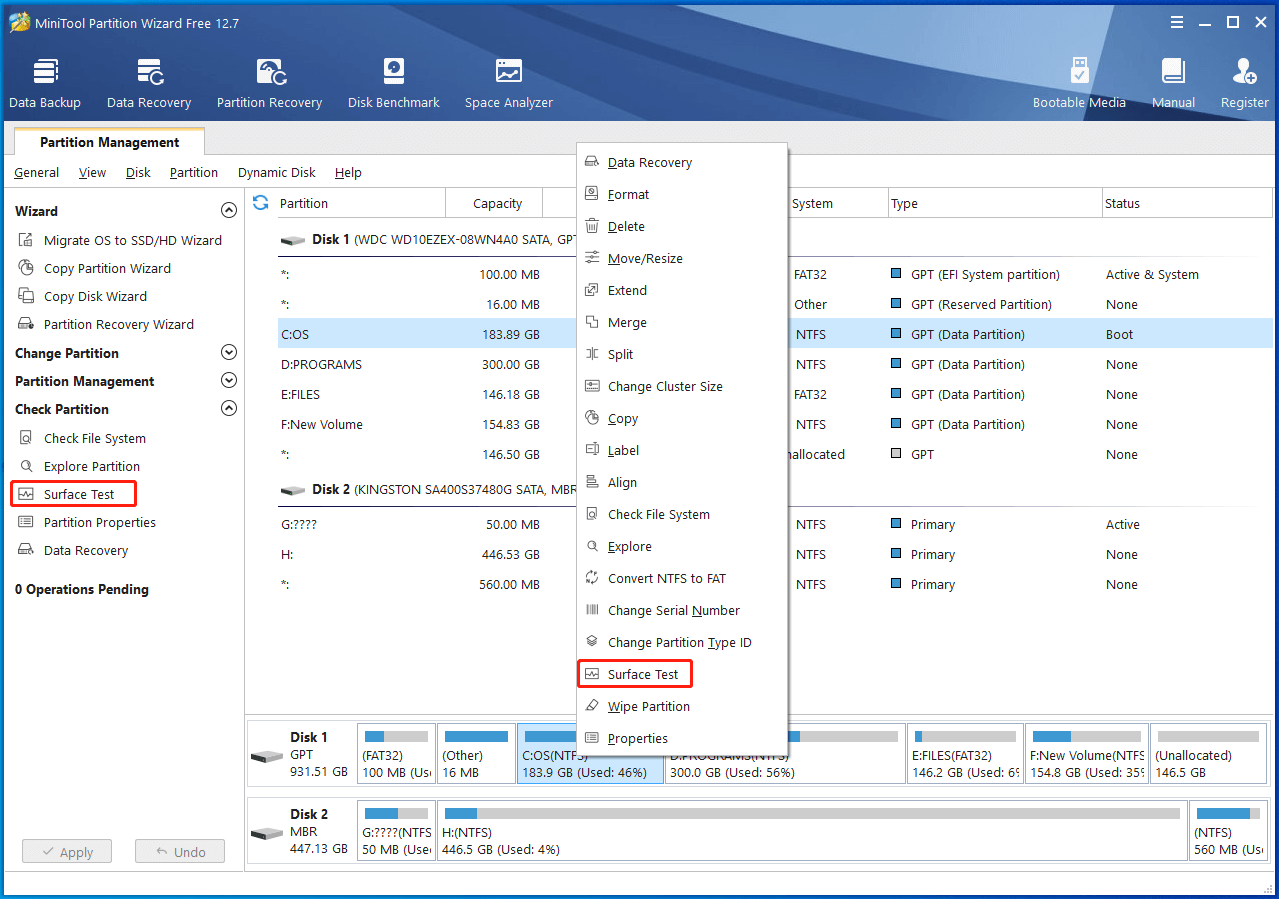
Step 4: Then scan the C drive to see if it includes bad sectors. Right-click on the C drive and tap on Surface Test.
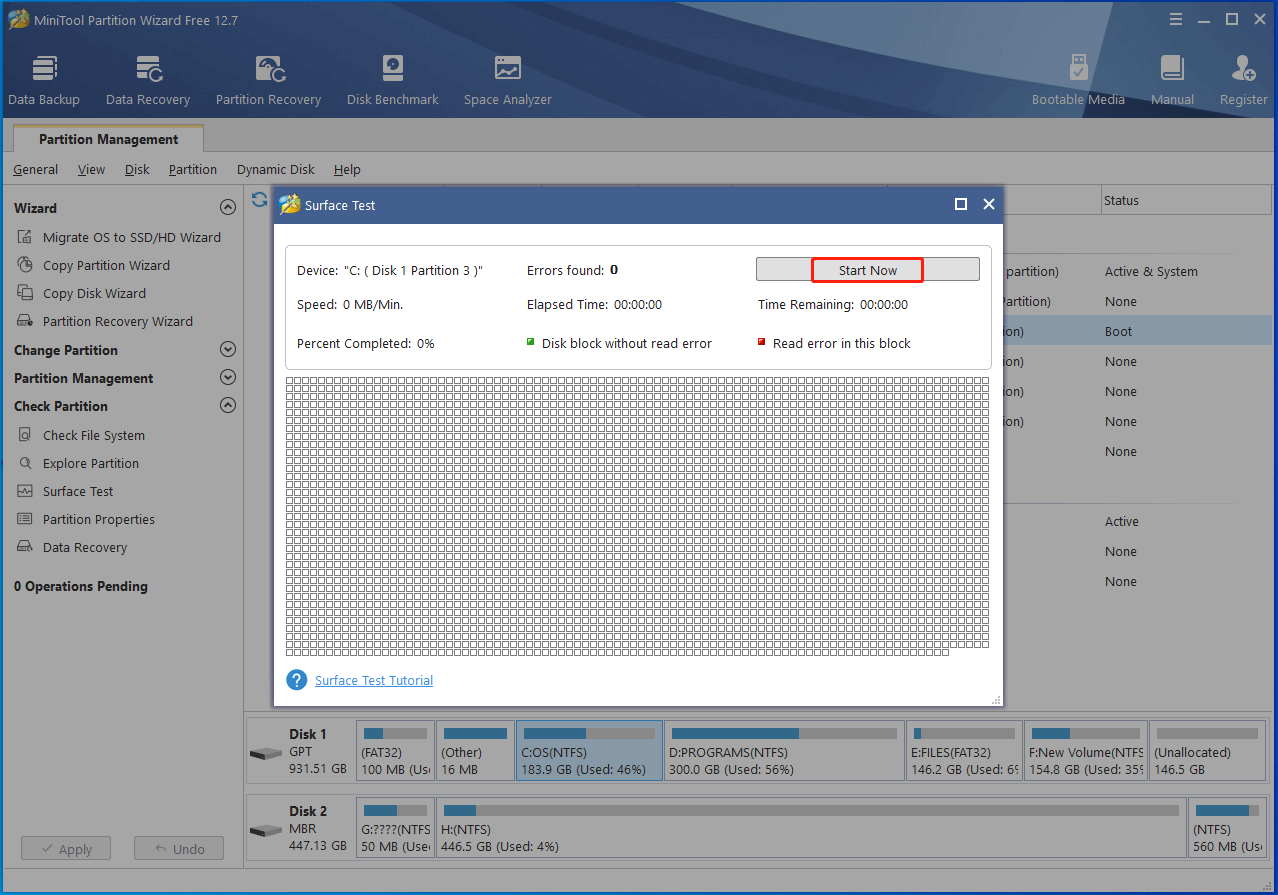
Step 5: In the pop-up window, click the Start Now button to execute the operation. Then MiniTool Partition Wizard will scan the C drive sector by sector to find if there are bad sectors. You will see the entire result after the scan process ends. If any blocks in the scan area are marked with red, it means that the scanned drive has bad sectors. If so, refer to this bad sector repair guide fix them.
You may also be interested in this: Guide on How to Clone a Hard Drive Without Third-Party Software
Method 4: Defragment Hard Drive
Fragment files on the hard drive is another possible reason for the CHKDSK taking forever issue. If you want to get rid of CHKDSK frozen issue, try defragmenting your hard drive with these steps.
Step 1: Type defrag in the search box and then click Defragment and Optimize Drives under Best match.
Step 2: In the Optimize Drives window, click on the drive you want to defrag and click the Optimize button to start the process.
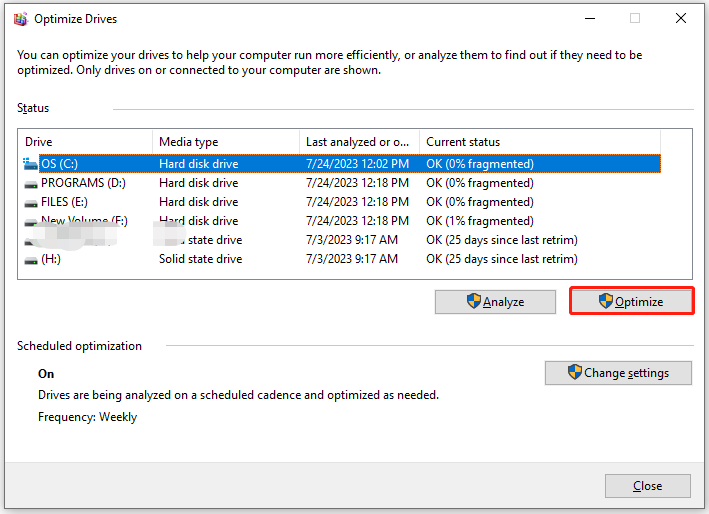
Step 3: Then wait for the finish of the defragmenting process.
Method 5: Run Startup Repair
If CHKDSK is taking forever and you can’t boot into Windows, perform a startup repair to troubleshoot the issue. For doing that, follow the steps below.
Step 1: Shut down your computer and then power it on. Repeat this operation two or three times to access the Startup/Automatic Repair screen.
Step 2: Tap Troubleshoot > Advanced options > Startup Repair.
Step 3: Select your account, enter the password, and then click Continue to start the process.
Step 4: After the repair process ends, restart your PC and run CHKDSK to see if it runs smoothly.
Method 6: Perform an SFC & DISM Scan
Once your system files are corrupted, you will encounter various errors. CHKDSK taking forever is one of them. To get this error solved, you need to fix corruption with your system files. SFC and DISM are embedded utilities on the Windows computer, which can repair corrupted system files.
Step 1: Run Command Prompt as administrator from the Run window.
- Open the Run dialog window by pressing Windows and R keys.
- Type cmd in the Run window and hit Ctrl + Shift + Enter keys simultaneously.
Step 2: In the Command Prompt window, type sfc /scannow and press the Enter key to begin the process. The whole process may take you some time. You need to wait patiently and don’t interrupt it.
Step 3: Restart your computer and check if the issue is solved. If not, run Command Prompt as administrator again and run the following commands. Type them one by one and hit Enter after each.
- DISM.exe /Online /cleanup-image /scanhealth
- DISM.exe /Online /cleanup-image /restorehealth
- DISM /Online /cleanup-Image /startcomponentcleanup
Make a Comment
This post tells you how long does CHKDSK take in normal cases and what to do if CHDKSK taking forever. If you receive other issues while running CHKDSK utility, leave your words in the following comment area for discussion. Besides, we will try our best to help you work them out. For any issues related to MiniTool Partition Wizard, contact us by sending an email to [email protected]. We will make a reply as soon as possible.

User Comments :