If you don’t know how to find the best WiFi channel and change WiFi channel, you come to the right place. This post of MiniTool would show you how to do that. Explore the detailed information now!
What Is WiFi Channel
Nowadays, most WiFi routers broadcast data through the 2.4GHz and 5GHz frequency bands. Each of these bands is divided up into channels to send and receive data over the WiFi network.
If we compare the 2.4Ghz and 5GHz frequency bands like two highways, then the WiFi channels are like lanes on these highways. To choose the fastest lanes on either highway, you should choose the one that has the least traffic.
By default, many routers use the same channel. If you don’t change the WiFi channel, it is likely that your router uses the identical channels as all your neighbours. This could slow down your WiFi signal. Hence, it is necessary to change WiFi channel.
Which WiFi channel is the best one? Well, keep reading the post to check the answer.
What Is the Best WiFi Channel
A proper WiFi channel can improve your WiFi coverage and performance obviously. In the 2.4GHz band, 1/6/11 are the only non-overlapping channels. As for the 5GHz band, there are 24 non-overlapping channels that you can choose.
Simply put, the 2.4GHz channels are very suitable for general browsing, watching videos, or using social media. If you like streaming high-definition video, the 5GHz channels are recommended as they offer better throughout capability.
Choosing one or more of these channels is an important step to set up your network properly. You can select one channel based on your need.
How to Change WiFi Channel
After selecting a channel, you can change WiFi channels by following these steps. Here are two common ways to change your routers’ channels.
Way 1: Use the Admin Interface of the Router
You can change WiFi channel on the router with ease through the admin interface. Here’s how to change WiFi channel by using the admin interface.
Step 1: Find the IP address of the router.
- Open the Run window by pressing Windows and R keys.
- Type cmd in the Run window and click OK.
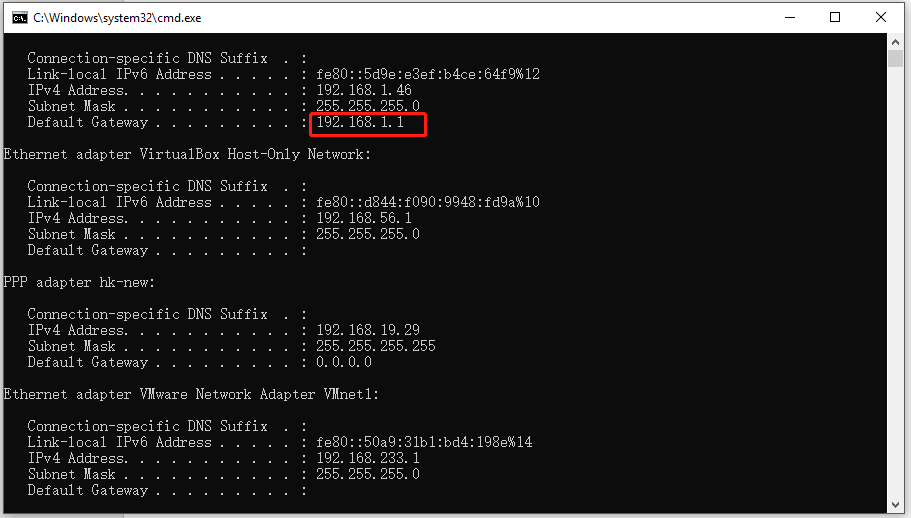
- Type ipconfig in the elevated window and hit Enter.
- The content behind Default gateway is the IP address of the router.

Step 2: Type the IP address of the router into a browser and press Enter. After that, you will see a prompt where you should enter your router admin credentials to log into the router manually.
Step 3: Open the wireless settings and switch each of your channels manually.
Step 4: Choose the target Wi-Fi channel from the drop-down menu. Then click Save and Apply to make the changes take into effect.
Way 2: Use a WiFi Channel Scanner Program
To change WiFi channel more efficiently, you can use a WiFi scanner app. A Wi-Fi scanning app can help you analyse channels and ensure that your router only broadcasts on a non-interfering channel.
The following steps show you how to change WiFi channel via a Wi-Fi scanner.
Step 1: Launch the Wi-Fi scanner and choose your Wi-Fi network from the list.
Step 2: After locating the channel name under the SSID panel, observe the Channels column to see which channel your Wi-Fi network is using.
Step 3: You can view the different frequency bands and their available channels after clicking the Details option.
Step 4: Choose the least-crowded channel and save your settings.


User Comments :