What Is BitLocker To Go
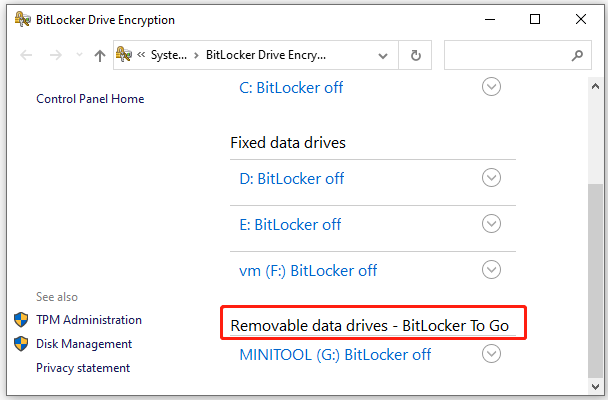
BitLocker To Go is an effective drive encryption feature that is mainly used to protect your data stored on removable data drives, including USB flash drives, SD cards, External hard disk drives, and other portable drives formatted by NTFS, FAT16/FAT32, or exFAT file system.
Like BitLocker, the BitLocker To Go can also easily encrypt a removable drive and prevent unauthorized access without the password or recovery key. However, it is restricted to Windows 10/11 Pro, Enterprise, or Education version. That is to say, if you want to use the BitLocker encryption feature on Windows 10 Home, you need to upgrade from Home to Pro first.
In addition, some people are confused about whether they can encrypt a USB drive using the tool on Windows 10 Pro and then connect it to other Windows systems to use this drive. Of course, the answer is “Yes”. As long as you encrypted the drive with BitLocker To Go Windows 10, then any new data or changes will be encrypted as well even though you use it on other systems.
If we use Bitlocker to Go on Windows 10 Pro to encrypt a USB stick, when we connect it to a Windows 7 Pro machine it prompts to unlock and allows read/write access. New stuff put on the stick is still encrypted even though it’s Windows 7 Pro, right?https://community.spiceworks.com/topic/1894339-bitlocker-to-go-question
What’s the Difference Between BitLocker and BitLocker To Go
Another frequently asked question is what’s the difference between BitLocker and BitLocker To Go. The main difference between BitLocker vs BitLocker to Go is their usage. BitLocker To Go is used for removable data drives such as USB sticks, SD cards, TF cards, pen drives, and external hard drives. Moreover, it is safe to use on Symantec Encrypted Desktop Whole Disk Drives.
Further reading: Symantec Encrypted Desktop is a security tool that uses cryptography to encrypt and protect your data drive against unauthorized access. It can be used on Laptops, PCs, or removable media.
However, BitLocker is mainly used to encrypt the whole disk drive and will modify the boot sector. This encryption method is not suitable for multiple whole disks. If you have encrypted a system drive with Symantec Encryption Desktop, make sure that you don’t enable BitLocker on that drive. Otherwise, an attempted change of the boot sector by BitLocker will lead to an unbootable system.
Here we summarize the main differences between BitLocker and BitLocker To Go as follows:
- Storage drive: BitLocker is more suitable for encrypting the whole internal drive, while BitLocker To Go is used for encrypting removable data drive.
- Boot sectors: BitLocker will modify the boot sector once you encrypted, while BitLocker To Go won’t.
- Compatibility: BitLocker can’t be used on a drive that has been encrypted with the Symantec Encryption method, while BitLocker To Go won’t conflict with that.
- Operation mode: BitLocker To Go only runs when your removable drive is accessed by the OS, while BitLocker can run directly. In other words, the BitLocker To Go service will stop when the removable drive is ejected from your system.
BitLocker To Go Requirements
Before encrypting your removable drive, you need to meet the BitLocker To Go requirements. Here we listed them as follows:
- Make sure the removable data drive is the file system of NTFS, FAT16, FAT32, or exFAT. If not, you need to format it to Windows-supported file systems.
- Make sure that it has at least 250MB of free space.
- Must be configured as the active partition.
- Cannot be encrypted or used to store user files.
According to a survey, we find some people used the BitLocker USB/External drive on Mac or Linux, but now they want to encrypt the drive using BitLocker To Go Windows 10. However, as it’s known to us, a USB drive is often formatted to EXT file system on Linux or HFS+ on Mac. So, Windows can’t recognize the drive. In this case, you need to format it to a Windows-supported file system first.
You may also be interested in “How to Access Linux Files from Windows 10”.
How to format a USB/external drive to NTFS/FAT32? MiniTool Partition Wizard can help you do that easily. It is a powerful partition manager that can format a drive especially when the Windows disk management tools can’t do. In addition, it can convert NTFS to FAT without data loss, recover data, migrate OS, perform disk benchmarks, etc.
Here’s how to format your drive with the MiniTool software.
MiniTool Partition Wizard FreeClick to Download100%Clean & Safe
Step 1. Connect your USB drive or other types of external drive to the Windows system.
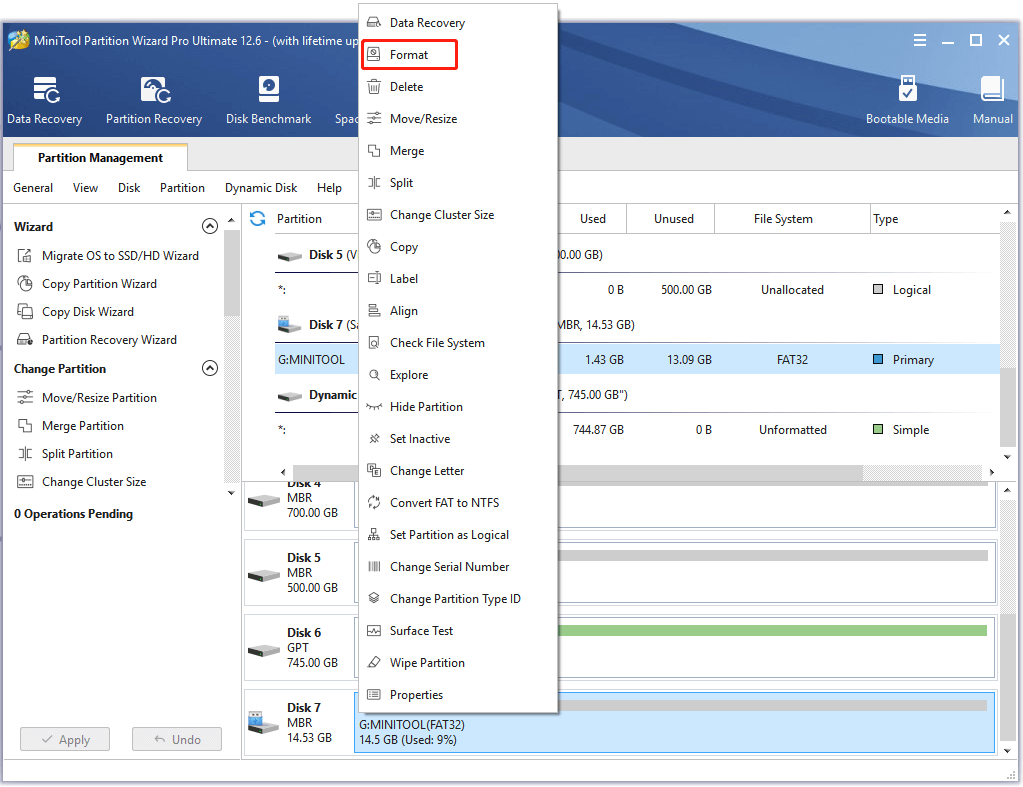
Step 2. Launch the MiniTool software to get its main interface, and then select the USB drive from the disk map and click on Format Partition from the left action panel. Alternatively, you can right-click the drive and select Format from the pop-up menu.
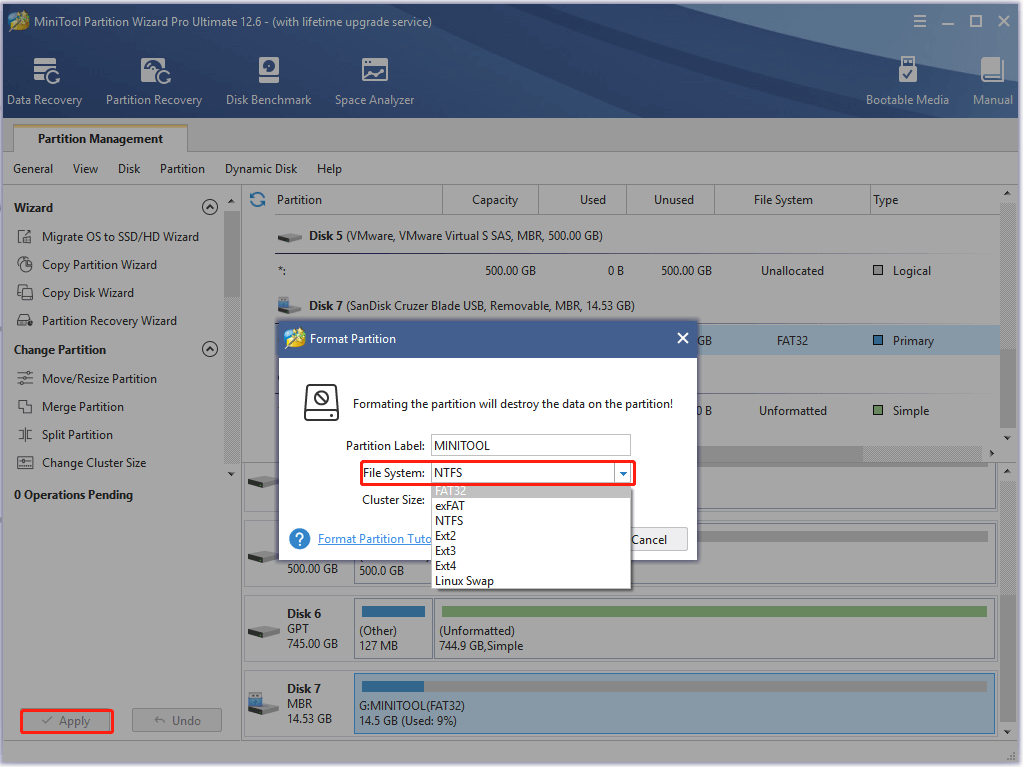
Step 2. In the pop-up window, select NTFS/FAT32/exFAT from the File System drop-down menu according to your demands and click on OK to save the change. Also, you can set a Partition Label or change Cluster Size from here.
Step 3. Then click on Apply to execute the formatting process.
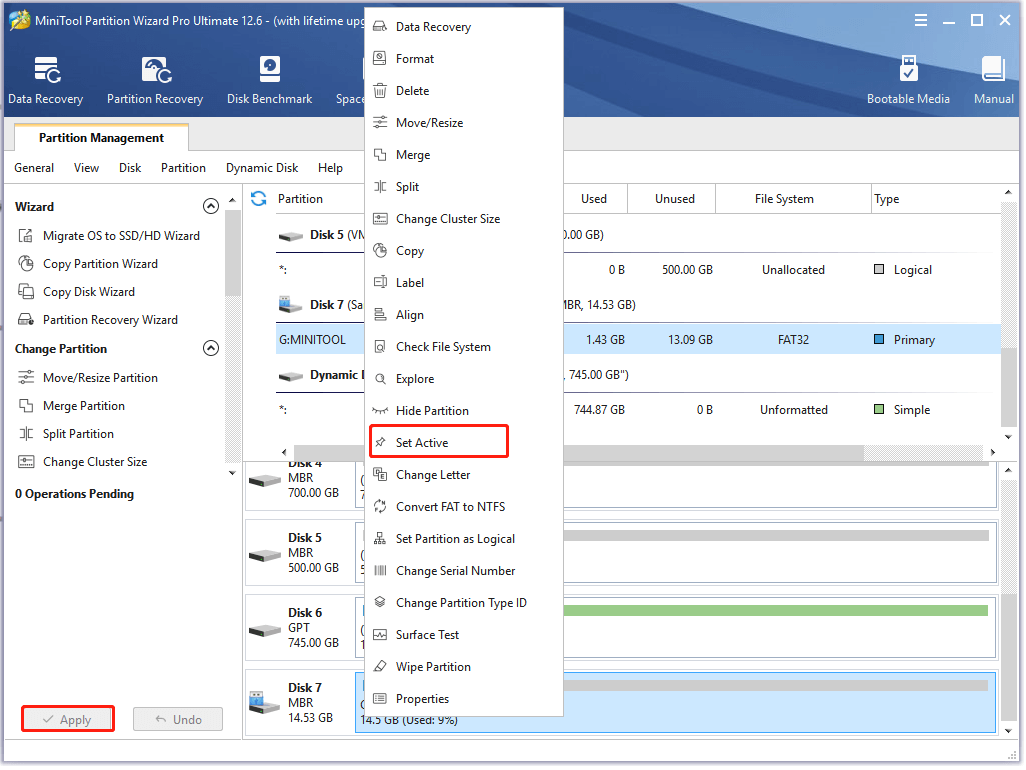
Step 4. If the drive is still in inactive status, this program can help you set the partition as active easily. To do so, right-click the USB drive and select Set Active from the pop-up window, and then click on Apply.
Now, you should prepare the USB/removable storage drive well. Let’s see how to make the BitLocker USB drive.
How to Use BitLocker To Go to Encrypt Your USB Drive
How to make a BitLocker external drive? Here we will explain it in the following 2 parts. The first is to encrypt the drive with the feature and the other is how to unlock/access the drive.
How to Encrypt Your USB Flash Drive with BitLocker To Go
To encrypt a USB/external drive in Windows 10, you can need to start the BitLocker drive encryption wizard either from File Explorer or Control Panel. Here’s how to do that:
Step 1. Make sure you insert the USB flash drive into your system properly.
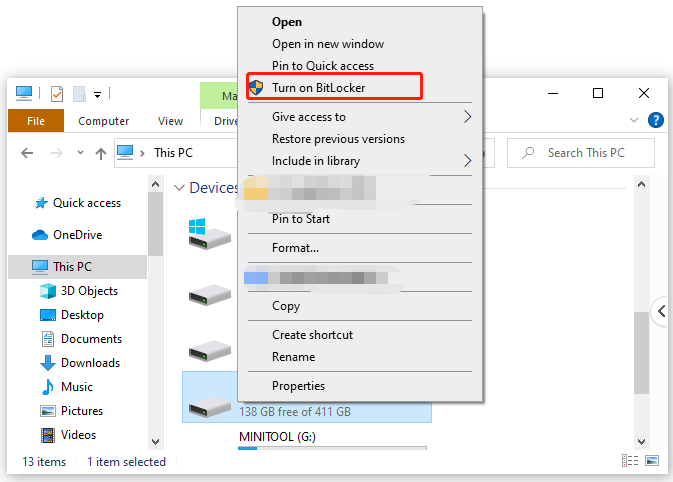
Step 2. Press the Win + E keys to open the Windows File Explorer, and then navigate to This PC from the left panel, right-click the USB drive, and select Turn on BitLocker.
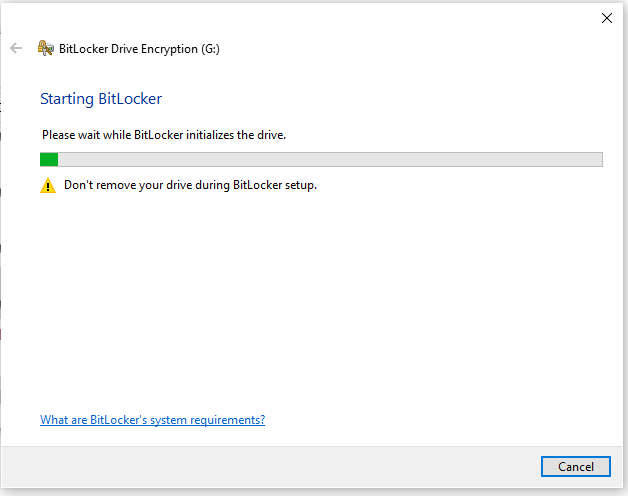
Step 3. Wait for the BitLocker to initialize your USB drive. This process may take you a while depending on how fast your Windows 10 PC is and how large your USB drive is. Don’t unplug the removable drive during the initializing. Otherwise, the data on it may be corrupted.
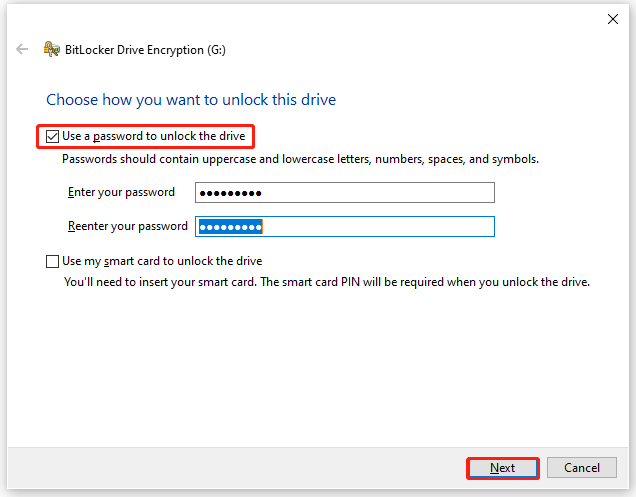
Step 4. After the USB is initialized, you can choose how you want to unlock the drive after it is encrypted. The first option is to use a password to unlock the drive, and the second option is to use smart card to unlock the drive smart card. Since most people don’t have a smart card, so here we take the first option for example.
Step 5. Enter and re-enter the password in the fields and click on Next to continue. Note that the passwords should contain uppercase and lowercase letters, numbers, spaces, and symbols.
Step 6. Now, BitLocker To Go asks you where do you want to back up your recovery key for the encrypted drive. This recovery key is very important that’s used to recover the data on your removable drive. Your data will forever get lost without it. Here you can store the recovery key to:
- Save to your Microsoft account: It will upload the backup of the BitLocker recovery key to your Microsoft account.
- Save to a file: It will generate a text file named like BitLocker Recovery key and ask you to select a location to store on your local computer.
- Print the recovery key: it will print a page with a unique identifier to a paper.
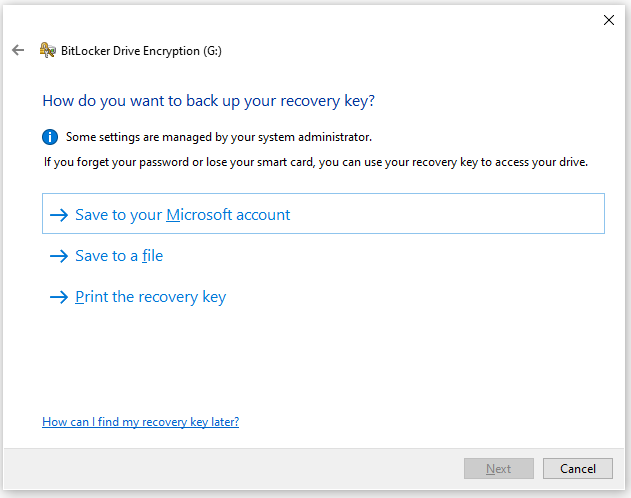
Since the vital importance of the recovery key, we highly recommend you execute all these options to make sure you don’t lose the recovery key and click on Next to continue. However, if you forgot your BitLocker password or recovery key accidentally, don’t be alarmed. This post provides you with 6 effective ways to deal with it.
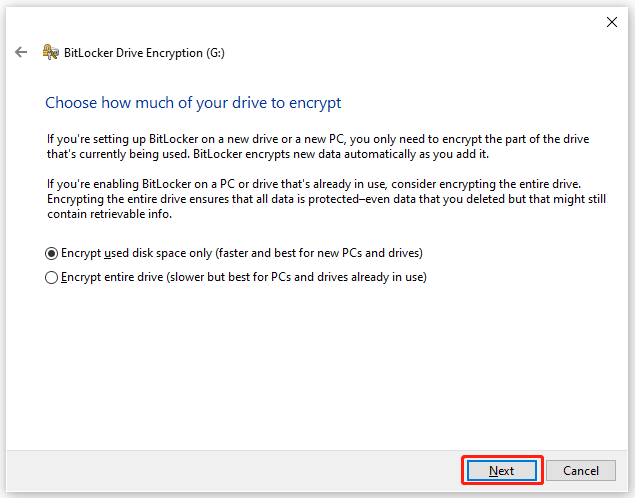
Step 7. After you saved the recovery key, choose how much of your drive to encrypt. Select one according to your preference and click on Next to continue.
If you are using a new USB drive without data on it, we recommend you select the Encrypt used disk space only option. If you already have data stored on the drive, select the Encrypt entire drive option.
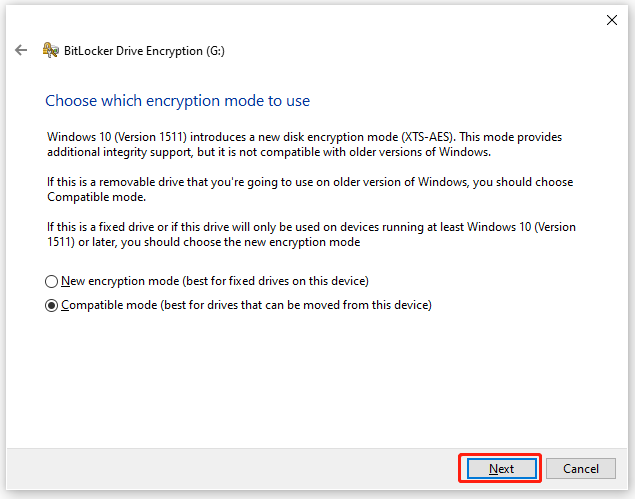
Step 8. Choose which encryption mode to use and click on Next. Here you can choose New encryption mode or Compatible mode.
Step 9. Now, all things you need to do is to click on Start encrypting and wait for BitLocker To Go Windows 10 to complete the encryption.
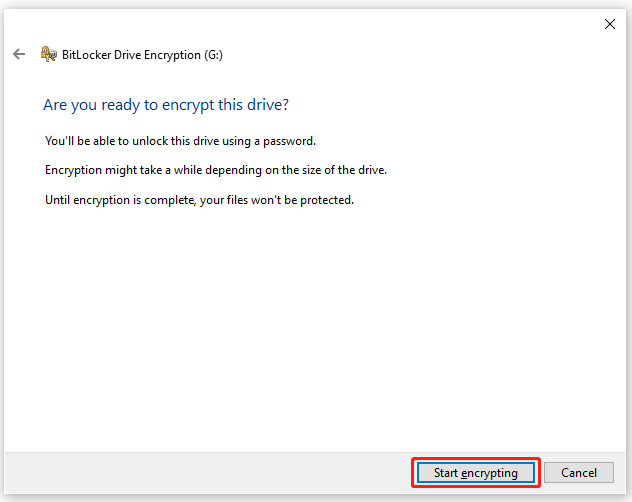
Once the drive is fully encrypted, you should find a small lock on the drive.
How to Unlock the BitLocker USB drive
If you don’t know how to unlock the BitLocker external drive and access its data, you can refer to the following guide.
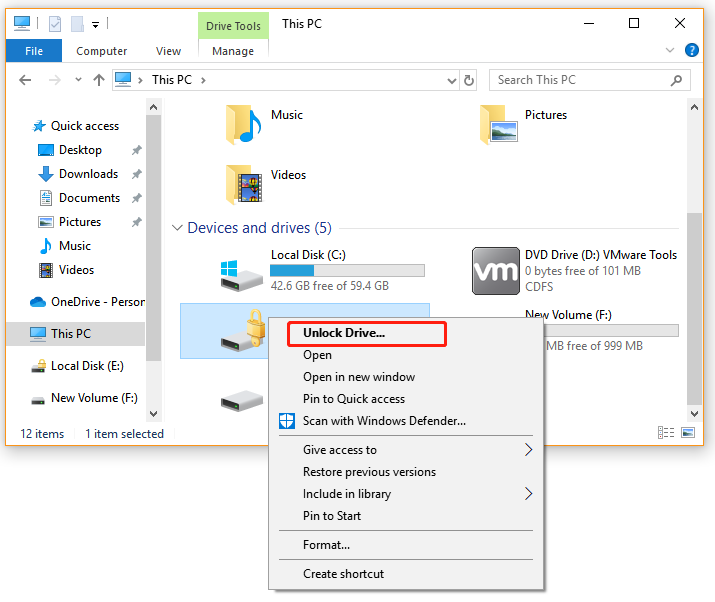
Step 1. Open the File Explorer, and then right-click the BitLocker encrypted drive and select Unlock Drive.
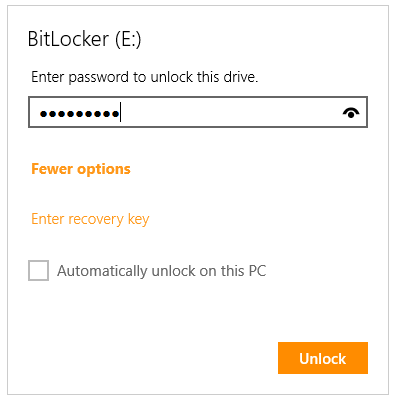
Step 2. In the pop-up window, enter your password and click on Unlock to unlock the drive. Alternatively, you can click on More options and enter the Recovery key to unlock the drive.
Have a Try Now
What is BitLocker To Go? What’s the difference between BitLocker vs BitLocker To Go? How to use it to encrypt a USB drive? After reading this post, I believe that you already have known all the answers.
If you have other opinions on this topic, write them down in the comment area. Of course, you can send us an email via [email protected] when you have difficulty using the MiniTool software.

![A Volume with BitLocker Waiting for Activation? [Fixed]](https://images.minitool.com/partitionwizard.com/images/uploads/2023/03/bitlocker-waiting-for-activation-thumbnail.jpg)
![BitLocker Not Showing for USB/External Hard Drive? [Fixed]](https://images.minitool.com/partitionwizard.com/images/uploads/2023/06/bitlocker-not-showing-for-usb-external-hard-drive-thumbnail.jpg)
User Comments :