Bambu Lab is a 3D printer brand. Most Bambu Lab 3D printers allow you to print from a microSD card when there is no network. This post from Partition Magic offers you a detailed Bambu Lab SD card format and printing guide.
Overview of Bambu Lab
Bambu Lab is a consumer tech company that designs and manufactures desktop 3D printers. It also manufactures filament, and accessories for personal, commercial, and educational use. Its main 3D printer products are as follows.
- Bambu Lab X1: Bambu Lab X1 is an advanced CoreXY printer with high-end features, including a built-in lidar scanner, targeted at professionals. However, it was eventually phased out, being replaced by the X1C/X1E for higher-end users.
- Bambu Lab X1C: It includes higher-end features such as a hardened nozzle, hardened extruder gears, H12 HEPA filtration, activated carbon odor filtration, and an aluminum enclosure. Thanks to the hardened nozzle and gears, it can print carbon-composite-based materials.
- Bambu Lab X1E: It is an upgraded, enterprise-ready version of the X1C that is marketed for manufacturing and educational use, shipping with additional privacy measures for businesses such as support for fully isolated local networking, and some performance upgrades over the X1C such as a dedicated chamber heater.
- Bambu Lab P1 Series: The P1S model is a closed-case CoreXY printer with advanced features for professionals. It is functionally similar to the X1 printer, with some omissions or downgrades. The P1P model is a cheaper, non-enclosed version of the P1S.
- Bambu Lab A1: It is a Prusa i3 style printer for personal use, that supports multi-color printing via an Automatic Material System (AMS) called “AMS Lite”.
- Bambu Lab A1 Mini: It is a smaller and less expensive version of the A1, for beginners printing small objects.

How to Print on Bambu Lab
In general, on Bambu Lab 3D printers, you can print from Bambu Studio (a desktop app), Bambu Handy (a phone app), and a microSD card.
How to Print from SD Card:
Step 1: Eject the microSD card from the Bambu Lab 3D printer because some models don’t have the hot-swap function. To do that, on the 3D printer, go to Settings > SD Card and select Eject. Then, confirm the selection with Eject.
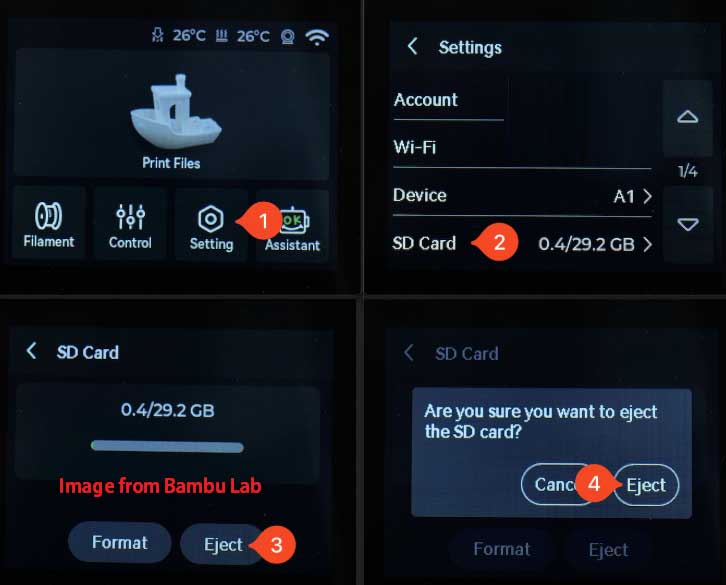
Step 2: Press on the microSD card and then release it. Now, you can remove it from the printer. Then, connect the microSD card to your computer via an adapter.
Step 3: On your computer, open Bambu Studio and import the model you wish to print. Select the Printer Type, Plate Type, and the type of filament you wish to print with. Then, click on Slice Plate.
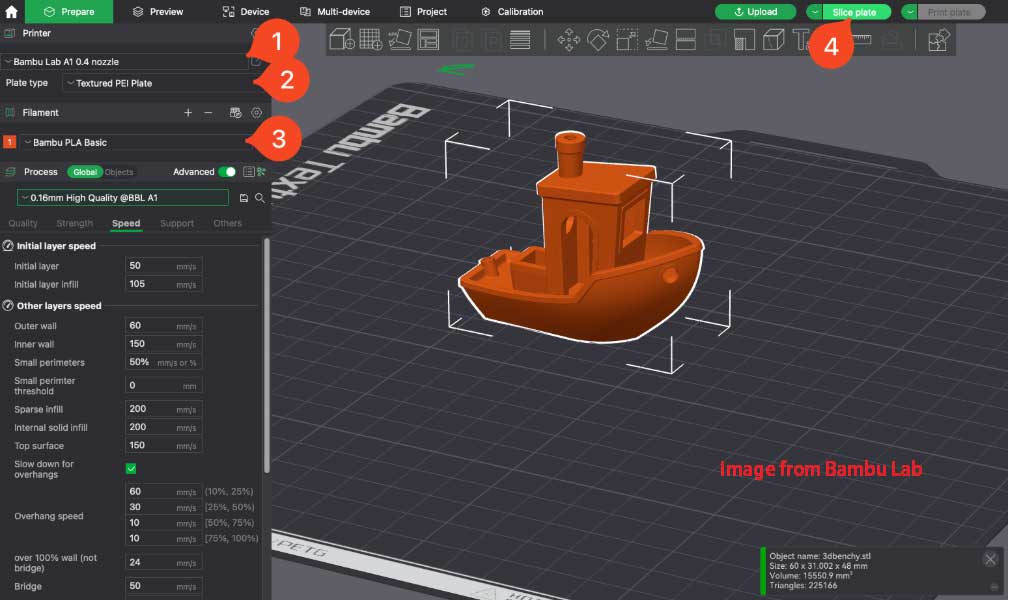
Step 4: Once the file has been sliced, the model preview will be shown. You need to select the small arrow next to Print Plate, click on the Export plate sliced file option, and then click again on the main Export plate sliced file option.
Step 5: A prompt will show up allowing you to select where to save the file. Set a file name for your model, select the microSD card as the save location, and then click on Save. Do not save the sliced file in any of the folders seen on the microSD card. It should be on the root of the SD card.
Step 6: Insert the microSD card into the Bambu Lab 3D printer and then tap on Print Files. Select the file you have previously saved and then click Start Printing.
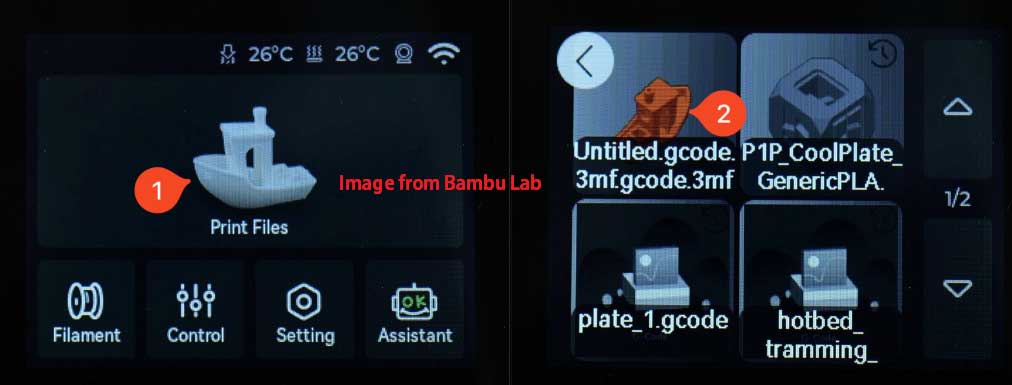
How to Print from Bambu Studio:
- Import the 3D model you want to slice, and after adjusting the settings, click on the Slice button.
- After the model has been sliced, click on the Print button. A window will show up where the printer can be selected, and the calibration options can be enabled or disabled.
- When ready to print, simply click the Send button, and the file will be sent to the printer via Wi-Fi. The printing process will start.
How to Print from Bambu Handy:
- On the app, you can browse through the model list or use the search function to find the models you like.
- After finding the model that you like, click Prepare to Print, select your printer type and a print profile, and then click Print.
Bambu Lab SD Card Format
The supported Bambu Lab SD card format is FAT32 only and the supported Bambu Lab SD card size can be up to 2TB. Besides, at least Class 10 or U1 (minimum write speed of 10M/S) SD cards are recommended.
How to format Bambu Lab SD card? You can do the Bambu Lab SD card format in the Bambu Lab 3D printer. To do that, you just need to go to Settings > SD Card and then click Format.
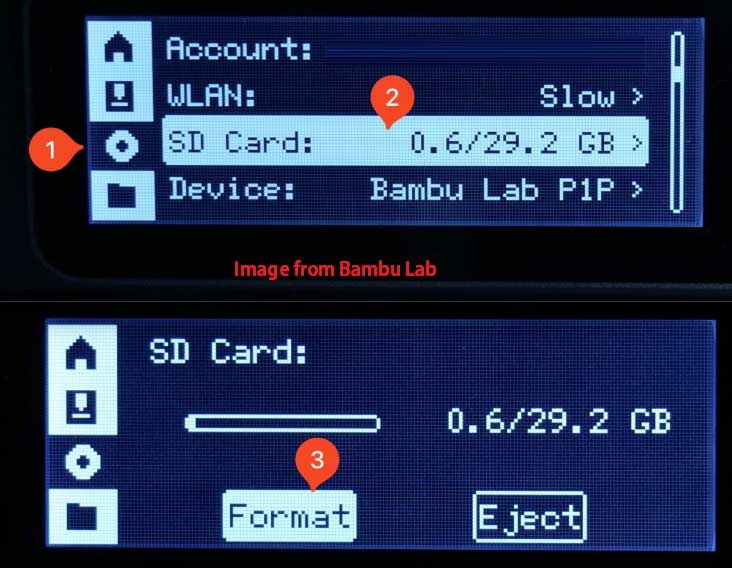
In addition to the above way, you can also format Bambu Lab SD card on a PC. If the SD card is not larger than 32GB, you can do that easily via Windows File Explorer. However, if the SD card is larger than 32GB, you need to use third-party software like MiniTool Partition Wizard.
MiniTool Partition Wizard is a free FAT32 formatter. It can format SD card FAT32 easily. In addition, this software can also convert MBR to GPT without data loss, migrate OS, clone hard drives, move or resize partitions, recover lost partitions or data, etc.
How to format Bambu Lab SD card via MiniTool Partition Wizard? Here is the guide:
MiniTool Partition Wizard FreeClick to Download100%Clean & Safe
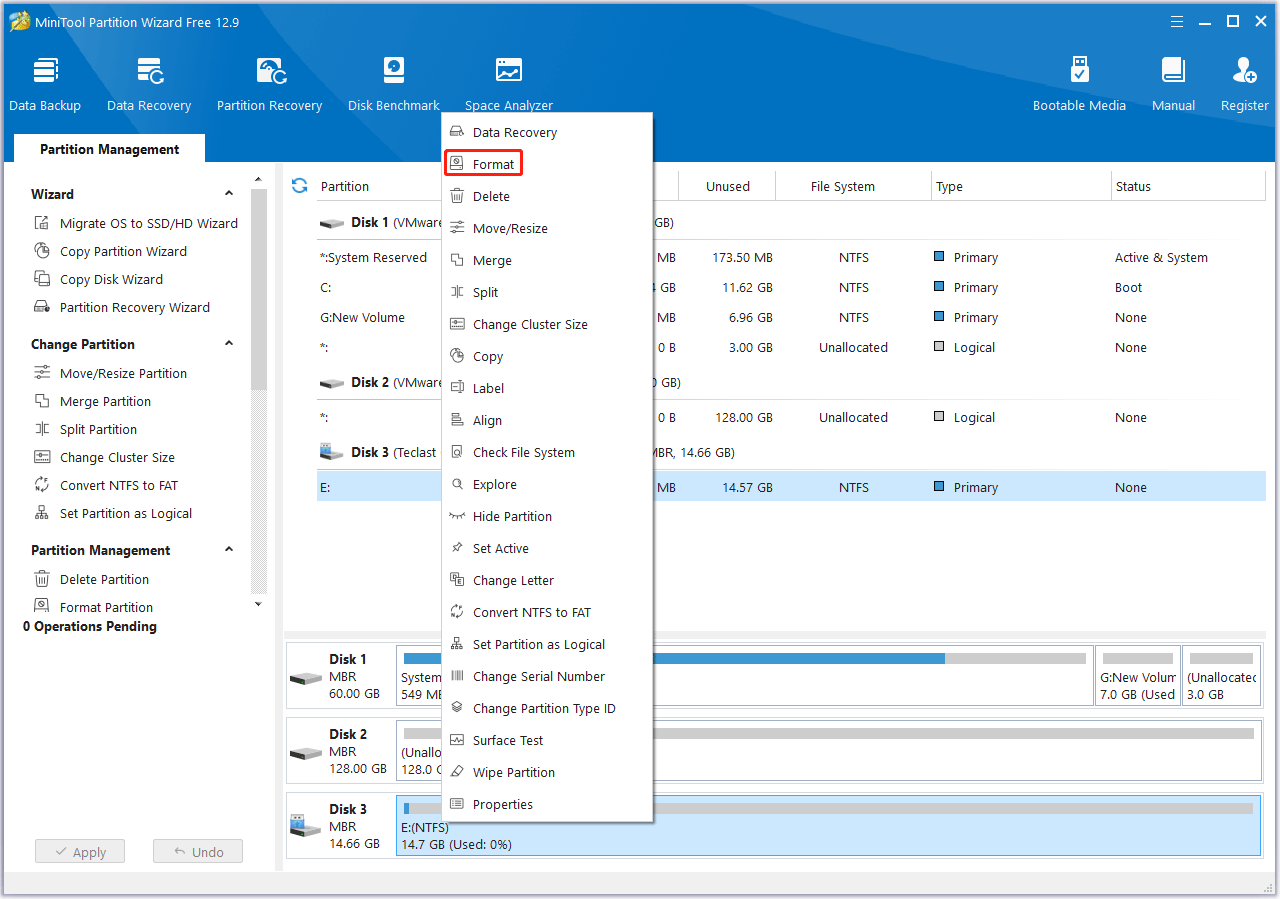
Step 1: Connect the SD card to your computer. Launch MiniTool Partition Wizard and right-click the partition on the SD card. Then, choose Format from the context menu.
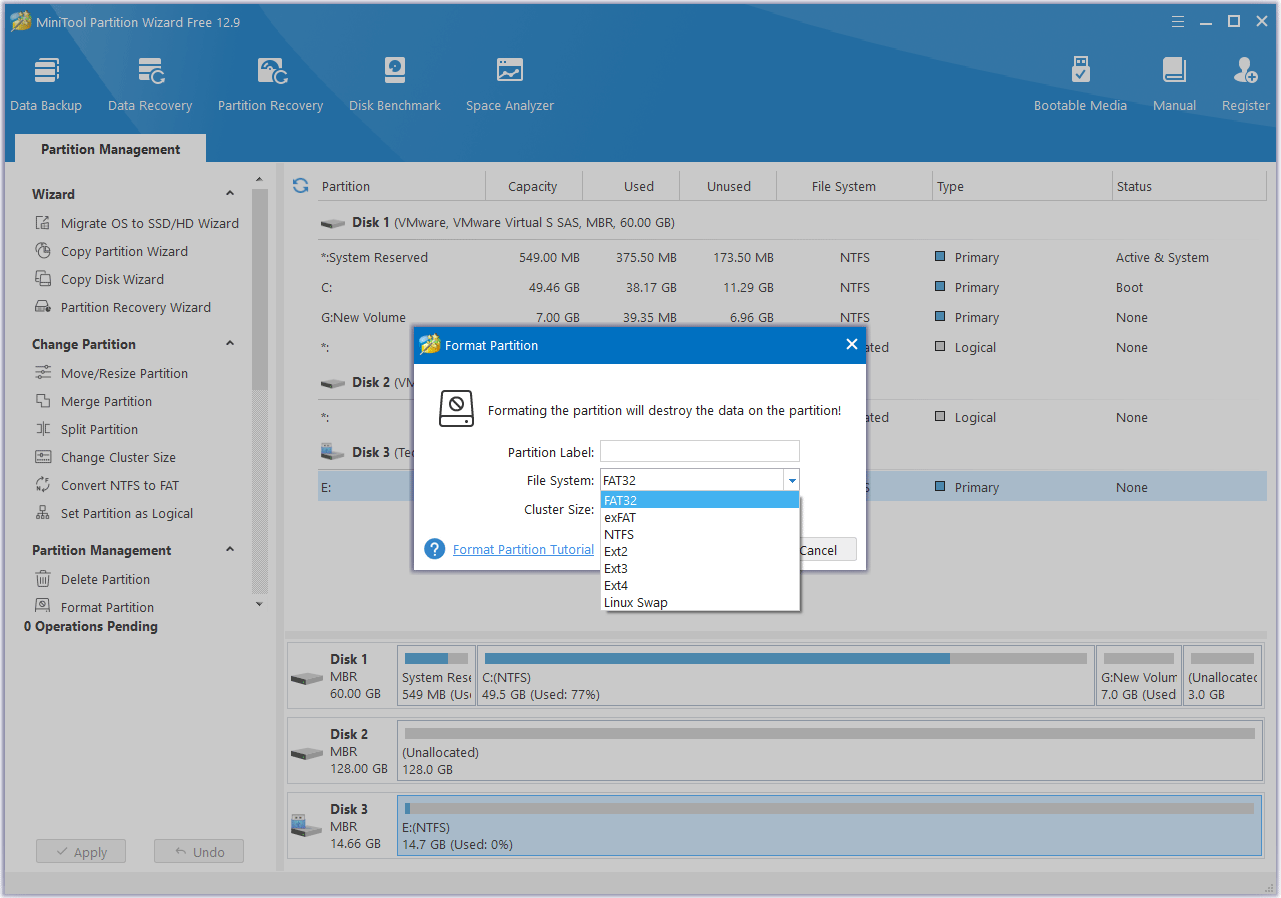
Step 2: On the pop-up window, choose FAT32 File System. Keep other parameters to the default option and then click OK.
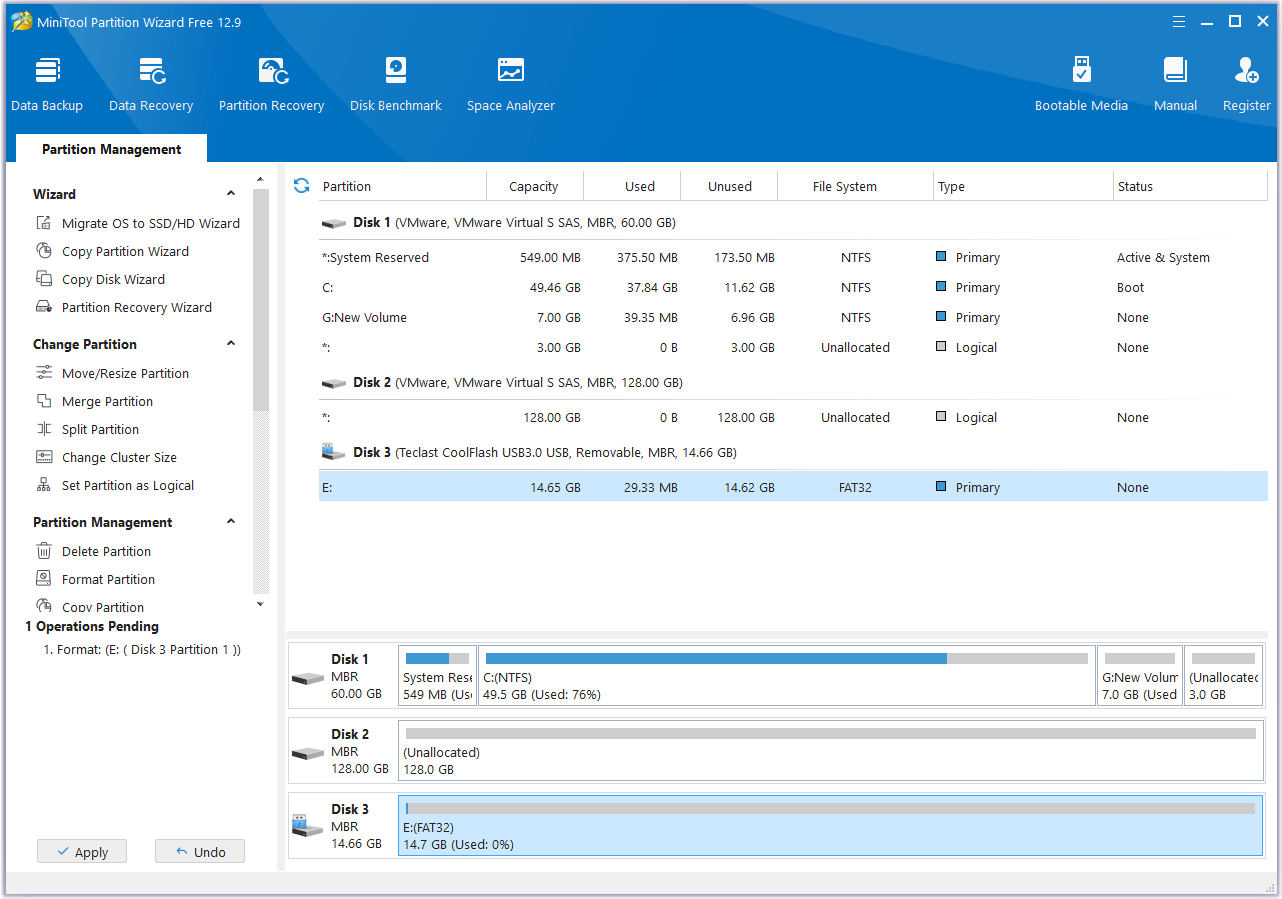
Step 3: Click the Apply button to carry out the pending operations.
Further Reading:
Some people may encounter the Bambu Lab SD card not found issue. In general, the reasons for this issue include incorrect file system, loose SD card connection, SD card failure, Bambu Lab 3D printer hardware issue, etc.
Bottom Line
This post offers you a detailed Bambu Lab SD card format guide, tells you the maximum Bambu Lab SD card size, and gives some reasons for the Bambu Lab SD card not found issue. If you encounter issues when using MiniTool Partition Wizard to format Bambu Lab SD card, contact us via [email protected]. We will get back to you as soon as possible.

User Comments :