Many users encounter the selected file is not a UEFI BIOS error in ASUS when updating BIOS. How to fix the “ASUS selected file is not a UEFI BIOS” error? This post from Partition Magic summarizes 8 proven solutions.
BIOS is a firmware in a computer that is used to perform hardware initialization when the PC is powered on. It is important to keep BIOS updated to avoid some unexpected issues. However, the updating process might be accompanied by different issues, such as BIOS recovery mode has been detected, BIOS update failed not enough free disk space, ASUS EZ-Flash BIOS not working, and the one discussed here.
The “ASUS selected file is not a UEFI BIOS error” has been heatedly discussed on different forums and communities. Here is a true example from the ASUS forum:
ASUS selected file is not a UEFI BIOS. HI, my BIOS is 0602 and I want to update it to 0701. I downloaded the file from the ASUS website and ran the EZ -Flash 2. When I select the file, it says the selected file is not a UEFI BIOS. Any thoughts? Thx.https://rog-forum.asus.com/t5/other-motherboards/r4be-bios-update-saying-not-a-uefi-bios/td-p/552378
About The Selected File Is Not a UEFI BIOS Error in ASUS
According to user reports, the “selected file is not a UEFI BIOS error in ASUS” can occur when running the BIOS update from the local drive or a USB flash drive. The error can be caused by different reasons. Here we summarize them as follows:
- The USB drive is not formatted with a compatible file system.
- The BIOS update file you downloaded doesn’t match the actual motherboard model.
- The file name of the BIOS update has been changed properly.
- Extracting the BIOS file improperly.
- Some options, like fast boot and secure boot are interfering with the BIOS update.
How to Fix the “ASUS Selected File Is Not a UEFI BIOS” Error on Windows 10/11
What to do to fix the ASUS selected file is not UEFI BIOS error on Windows 10/11? After investigating almost all user messages on forums and communities, we found 8 effective ways to fix the problem.
Fix 1. Make Sure the File Matches Your Motherboard Model
A lot of users reported that they downloaded the wrong BIOS file, which can trigger “the selected file is not a UEFI BIOS error in ASUS” when updating BIOS. So, make sure the downloaded file that matches your motherboard model.

You can check the motherboard model on the case box or follow the guide below.
Step 1. Press the Win + R keys to open the Run dialog box, type cmd in the box, and hit Enter.
Step 2. Type the following command and press Enter. Then note down the motherboard model and serial number.
wmic baseboard get product,manufacturer,version,serialnumber
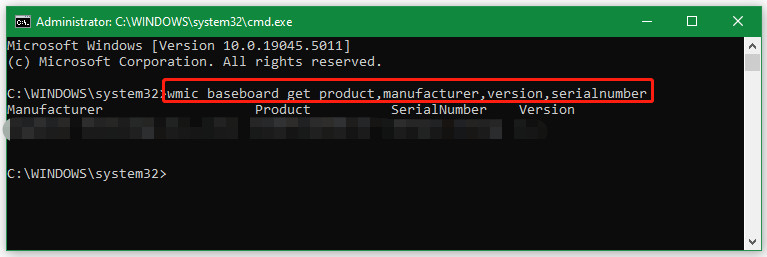
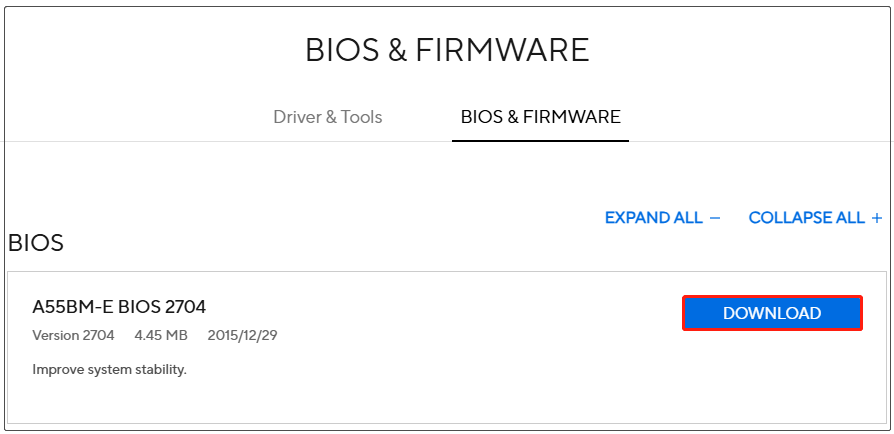
Step 3. Visit the official website of ASUS Download Center, enter your motherboard model, navigate to Driver & Utility > BIOS & Firmware, and click on Download to get the correct BIOS file. After that, you can update BIOS again and see if the “BIOS update select file is not a UEFI BIOS” error disappears.
Fix 2. Disable Secure Boot Before Using ASUS EZ-Flash
If you have the Secure Boot option enabled on Windows 10/11, you may encounter the EZ-Flash error Rom file is not an EFI BIOS when using a USB flash drive. In this case, you need to disable Secure Boot before updating BIOS with ASUS EZ-Flash.
Step 1. Completely turn off your laptop.
Step 2. Start up your computer and immediately press the F2 or Delete key when the motherboard log screen appears. Then you will enter BIOS.
Step 3. Navigate to the Security or Boot tab, select Secure Boot using the arrow key, and change its status to Disabled. Then press F10 to save the change and restart your computer to check if the “ASUS selected file is not UEFI BIOS” error gets solved.
Fix 3. Fully Format the USB Drive
According to a survey, the “ASUS selected file is not a UEFI BIOS” error mainly occurs due to an incompatible USB flash drive. The error can be solved by fully reformatting the USB drive to an appropriate file system. After analyzing lots of user comments, we found that the file system varies depending on the actual situation. Here we summarize them as follows:
- A 16GB or less USB drive: format it to FAT16
- A 32GB or 120GB USB drive: format it to FAT32
- A 120GB or larger USB drive: format it to exFAT
- A local SSD or HDD: If you want to update BIOS from a local drive, format it to NTFS.
How to fully format a USB drive on Windows 10/11? You can choose one of the following 2 methods according to your needs.
Way 1. Use Disk Management
The Windows built-in tool – Disk Management can format a drive of less than 32GB to FAT32/exFAT or 4GB to FAT16. If you have a small USB drive, you can try this method.
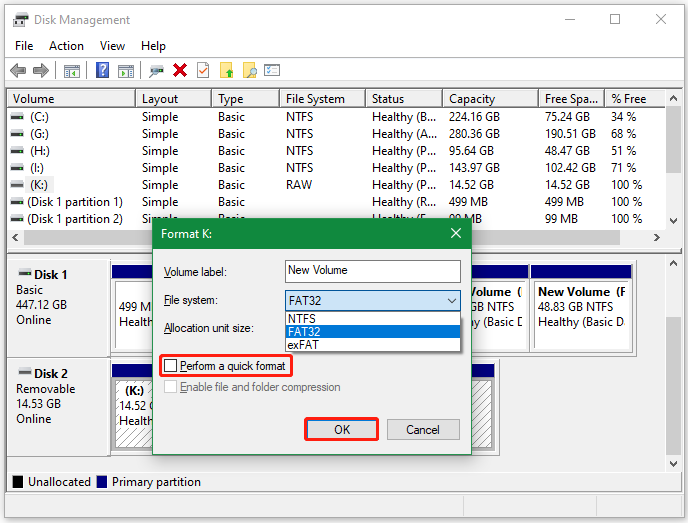
- Press the Win + X keys to open the context menu and select Disk Management.
- Right-click the USB and select Format.
- Select FAT32/exFAT from the File System drop-down menu, untick the box of Perform a quick format, and click on OK. Then wait for the process to complete.
Way 2. Use MiniTool Partition Wizard
If you have a USB drive larger than 32GB, we highly recommend you use MiniTool Partition Wizard. It’s a free USB formatter that can format the drive to FAT16/FAT32/exFAT/NTFS/Ext easily on Windows. Moreover, it can partition hard drive, change cluster size, recover data, clone hard drive, rebuild MBR, etc.
Here’s how to fully format the USB with MiniTool Partition Wizard:
MiniTool Partition Wizard FreeClick to Download100%Clean & Safe
Step 1. Run this program to enter its main interface, select the USB drive from the disk map, and click on Wipe Disk from the left action panel.
Step 2. In the pop-up window, you will see a list of 5 wiping levels. Please select one from them and click on OK to continue. Then click Apply to execute the operation.
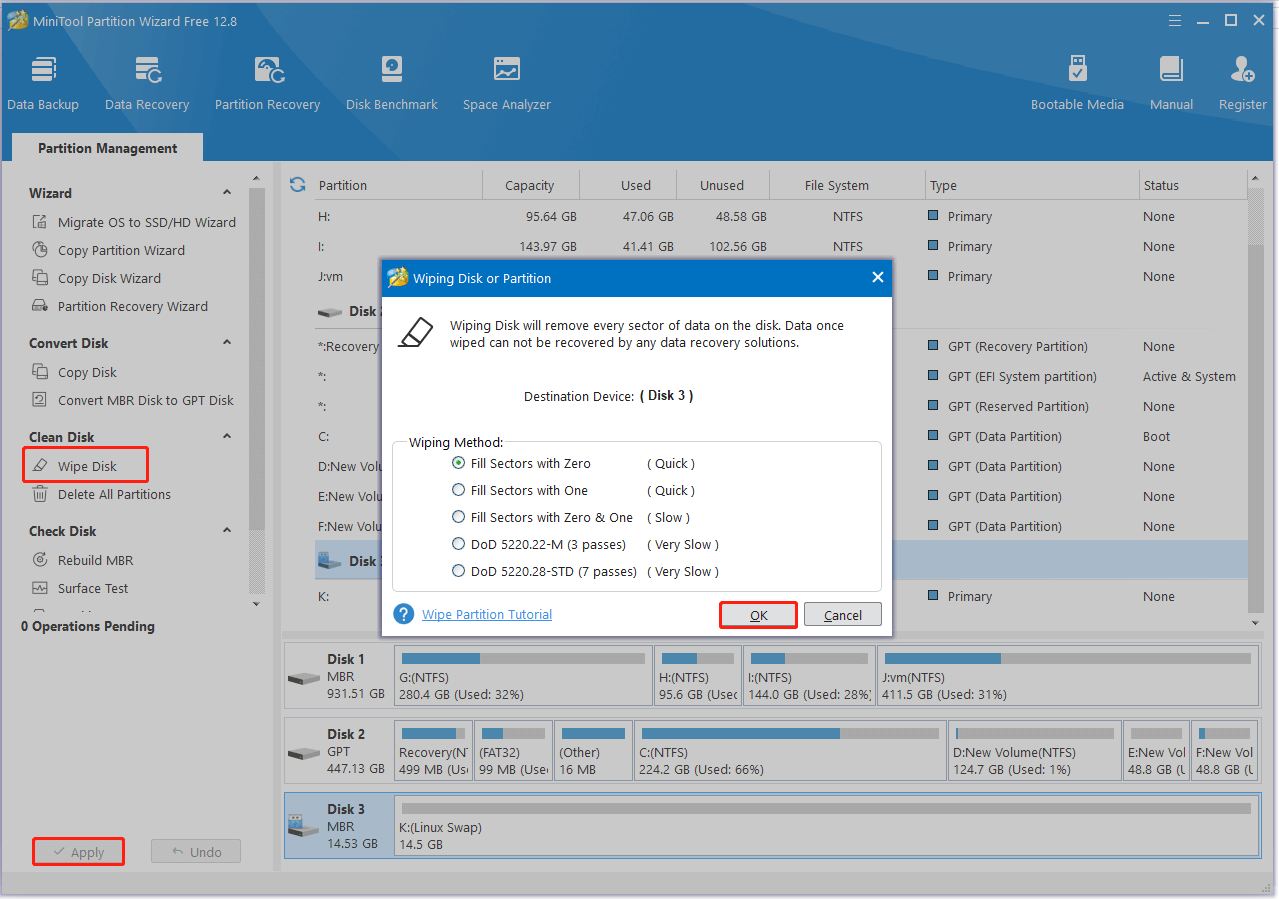
Step 3. Once wiped, select the unallocated space on the USB, click Create Partition, select your needed File System, set other parameters, and click OK. After that, click Apply.
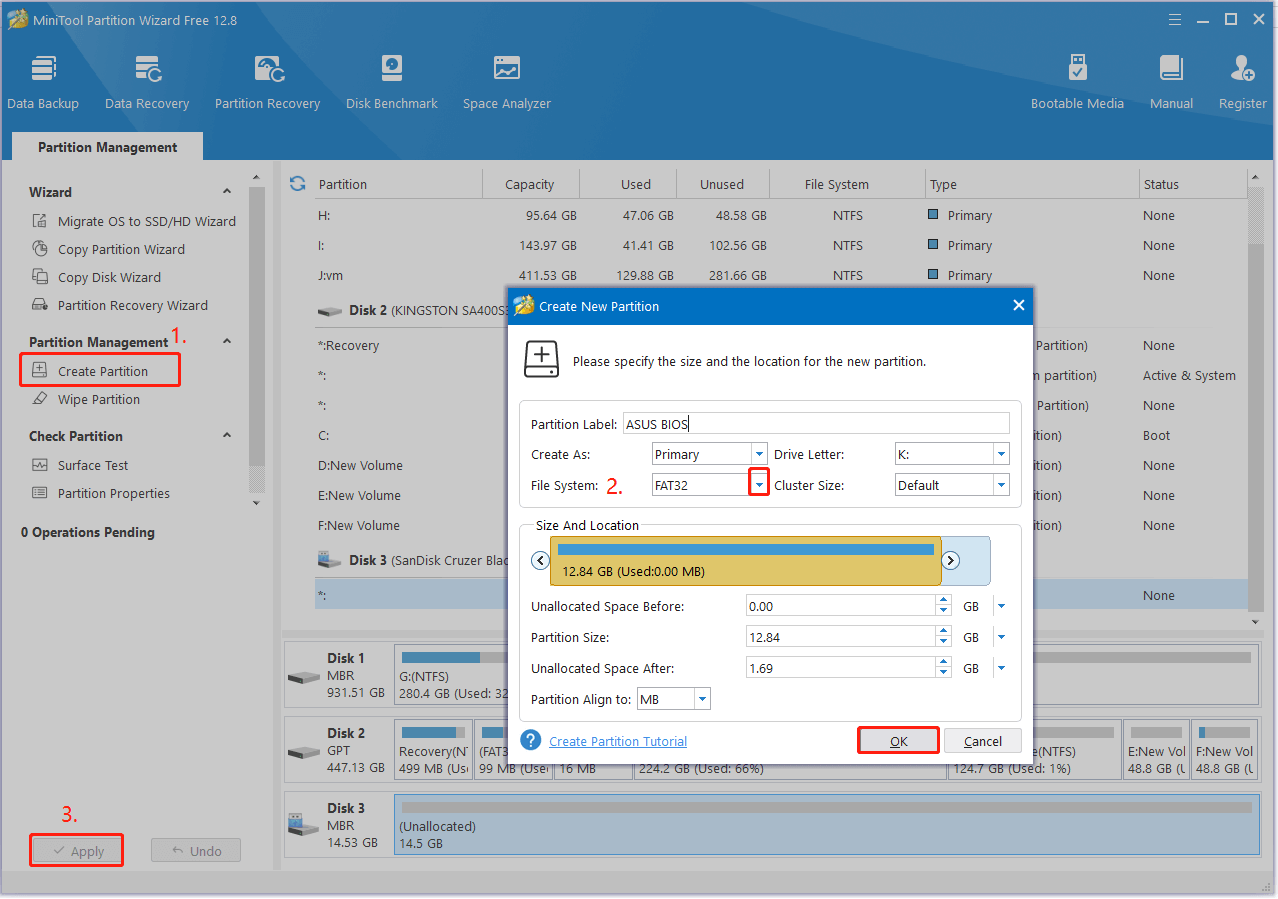
Fix 4. Create a FAT32 Partition for the BIOS Update
If you get the “BIOS update select file is not a UEFI BIOS” error when updating from a local drive, you can shrink an existing partition to create a small space and format it to FAT32. This has been proven by many users to be useful. You may have a try.

However, you may encounter some issues like “shrink volume is greyed out”, “volume shrinking takes forever”, etc. It’s strongly recommended you use a professional partition manager – MiniTool Partition Wizard. It can extend/move/resize partitions, change partition labels, change serial numbers, and more.
MiniTool Partition Wizard FreeClick to Download100%Clean & Safe
Step 1. In the main interface, select the partition that you want to shrink, and click Move/Resize Partition.
Step 2. Drag the handle to move or resize the partition and click on OK > Apply to execute the operation. Here you need to create at least 100 MB of free space.
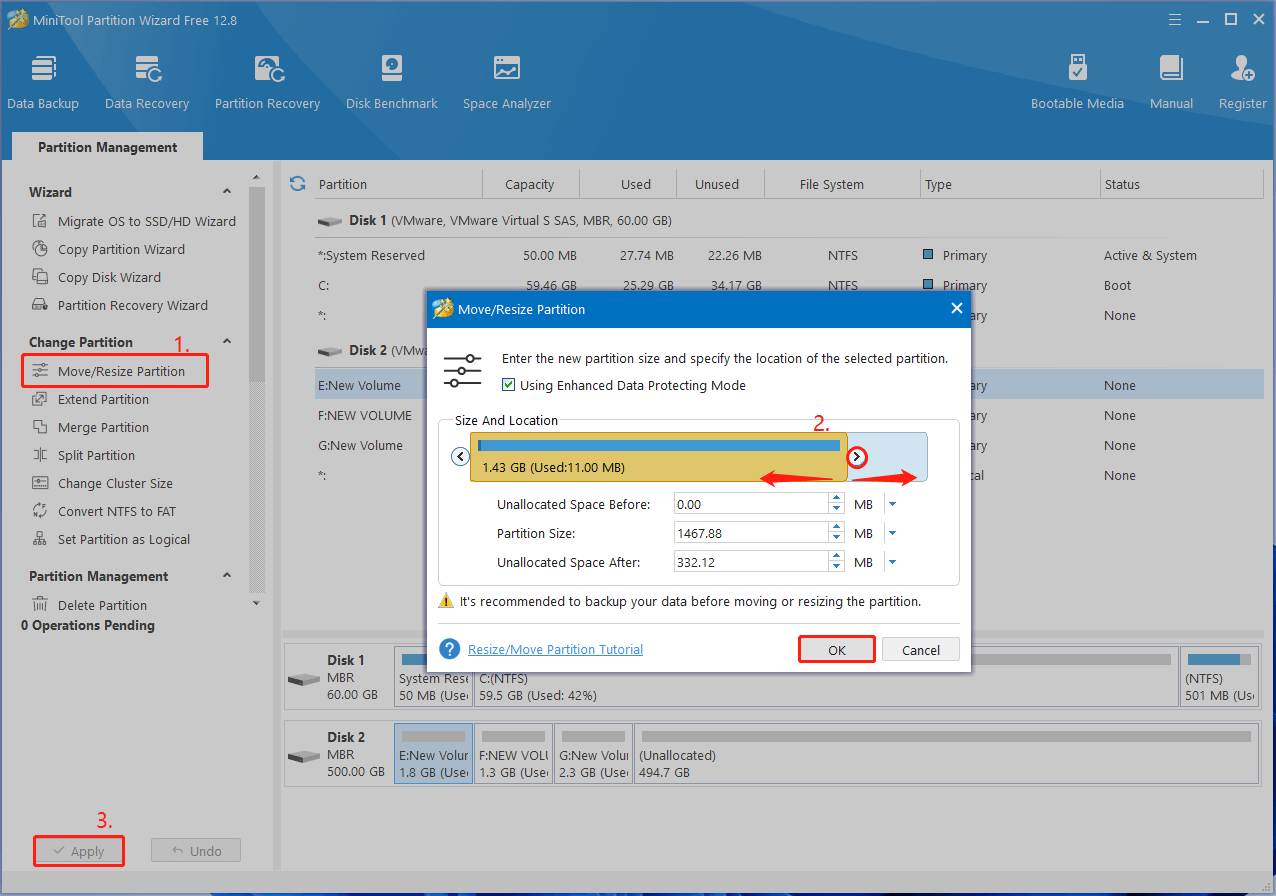
Step 3. After shrinking, right-click the unallocated space, select Create, and create a FAT32 partition as we showed in Fix 3.
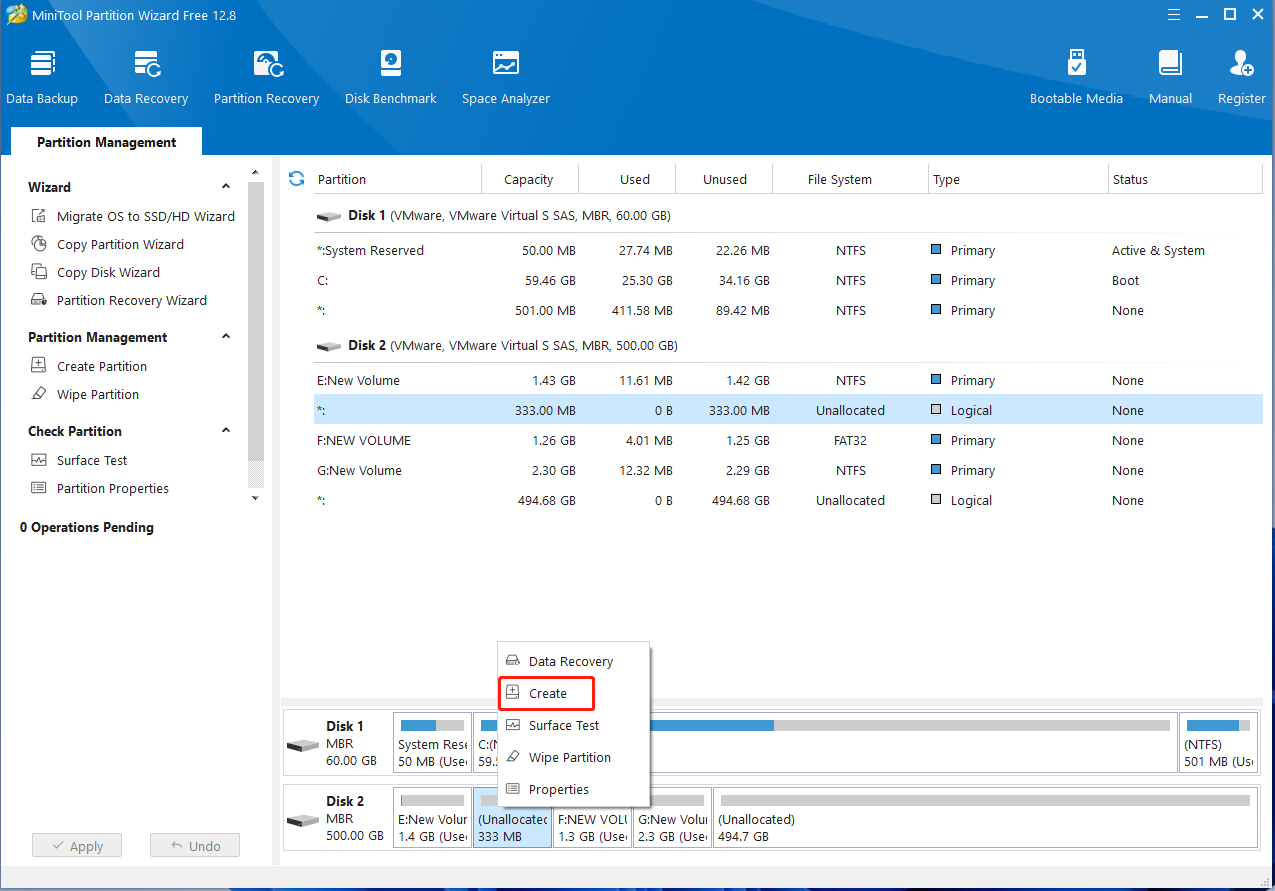
Step 4. Copy the BIOS file into the partition and update the BIOS from it. Then check if the ASUS selected file is not UEFI BIOS error disappears.
Fix 5. Update the ASUS BIOS Regularly
The “ASUS BIOS update file not UEFI” error can be caused by improper updating methods. For example, if you have a 2018 version of BIOS and want to upgrade to 2020, you first need to upgrade from 2018 to 2019, then to 2020. Don’t upgrade from BIOS version 2018 to version 2020 directly.
Fix 6. Disable Fast Boot
Fast boot is also a common reason for the ASUS EZ-Flash error Rom file is not an EFI BIOS. If you are updating BIOS with a USB, make sure the option is disabled. Here’s how to do that:
Step 1. Type control in the search box, and then select Control Panel from the context menu.
Step 2. Change View by to the Large icons, and click on Power Options in the new window.
Step 3. Navigate to Choose what the power buttons does > Change settings that are currently unavailable.
Step 4. Uncheck the box of Turn on fast startup and click Save changes button to confirm. Once done, update again and see if the “ASUS EZ-Flash error Rom file is not an EFI BIOS” issue gets solved.
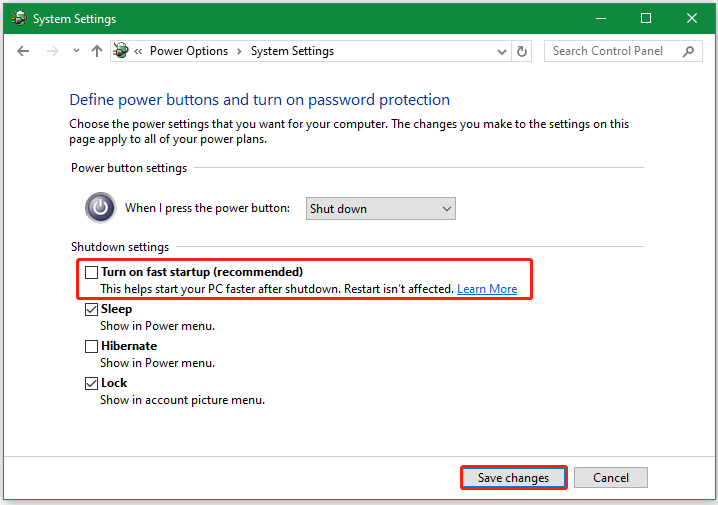
Fix 7. Extract the BIOS File Properly Using an Unzip Tool
Some users found that the ASUS BIOS update file not UEFI error can occur after extracting the BIOS file with the Windows zip tool. In this case, you can try using a professional zip tool like 7-Zip, WinRAR, etc. To extract the file properly, make sure you right-click the BIOS files, select Extract all, click Browser, and select the USB flash drive to extract the BIOS file. Besides, make sure the file is extracted to the root directory of the USB.

Fix 8. Don’t Rename the BIOS File
The “ASUS selected file is not a UEFI BIOS error” can happen after changing the BIOS file (.CAP BIOS). Don’t modify the file name if you find it is too long or has special characters. If necessary, you need to use the BIOSRenamer checker in the BIOS folder, which can change the file name to match your motherboard.
Have a Try Now
Here comes the end of this post. You can try the above 8 methods to fix the “ASUS EZ-Flash error Rom file is not an EFI BIOS” on Windows. If you have difficulty using MiniTool Partition Wizard, contact us via [email protected] and our technical support will help you as soon as possible.

User Comments :