ASUS is a well-known multinational computer technology company that has released a variety of products such as desktop computers, laptops, motherboards, monitors, graphics cards, etc. In addition, ASUS also introduced many specified apps and drivers to its products like ASUS Battery Health Charging, ASUS monitor drivers, ASUS PC Diagnostics, and the one discussed here.
What Is ASUS Aura Sync
What is ASUS Aura Sync? It is an ASUS RGB control app that can manage and control anything RGB on both laptops and desktops. With this tool, you can control your keyboard, monitor, motherboard, GPU, case lights, and other compatible components from other manufacturers.
All features of the ASUS RGB software are now part of the Armoury Crate software, which means it can work with other system utilities like fan controls and system monitoring on ROG laptops. So, you will be asked to install Armoury Crate first when installing the ASUS Aura Sync software.
ASUS Aura Sync Download & Install for Windows 10/11
How to get ASUS Aura Sync downloaded/installed for Windows 10/11? This process can be divided into the following 2 parts.
Part 1. Check Your Windows Version
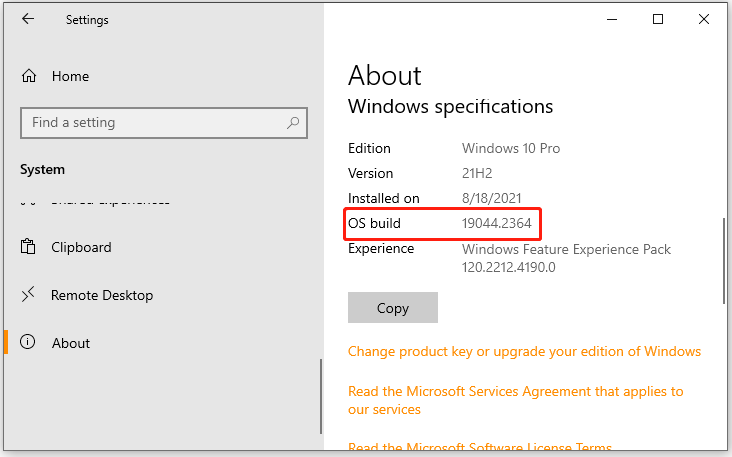
According to the official website, the ASUS Aura Sync installation requires your computer to have Windows 10 v1903 (or later) or Windows 11 installed. So, you’d better check your Windows version first.
Step 1. Press Win + I keys to open the Settings window and select System.
Step 2. Select About from the left panel, and scroll down the right sidebar to Windows specifications. Then you can check the OS build and Version section.

Step 3. If the Windows OS version is not the required one, you can refer to the guides below to update the version.
- [Tutorial] How to Download & Install Windows 10 Updates Manually
- How to Upgrade Windows 10 to Windows 11? See a Detailed Guide!
Part 2. ASUS Aura Sync Download & Install
Once you have updated the Windows version, you can follow the steps below to download ASUS Aura Sync and install it for Windows 10/11.
Step 1. Press here to open the official ASUS Aura Sync download website and click on Download. Then select a location to save the download package.

Step 2. Once downloaded, unzip the ArmouryCrateInstaller.zip file, double-click the ArmouryCrateInstaller.exe file and click on Yes to confirm it.
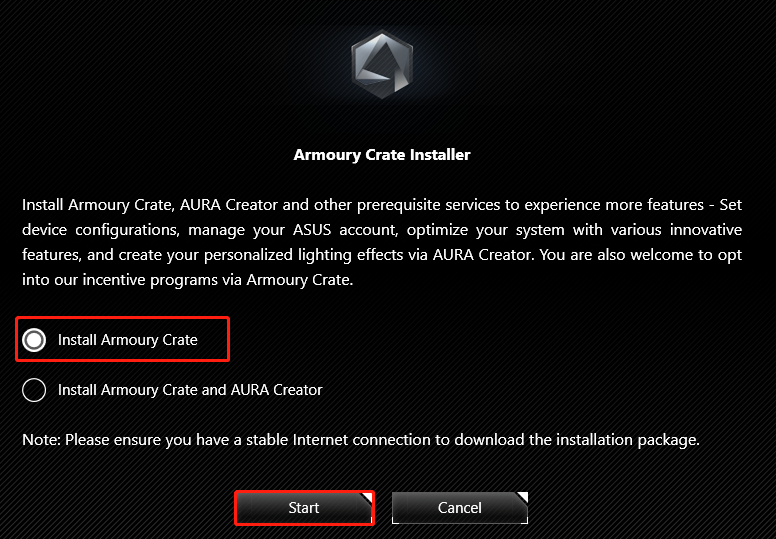
Step 3. Select the Install Armoury Crate and click on Start. Then follow the on-screen prompts to complete the installation. During the process, the ASUS Aura Sync software will be automatically downloaded and installed.

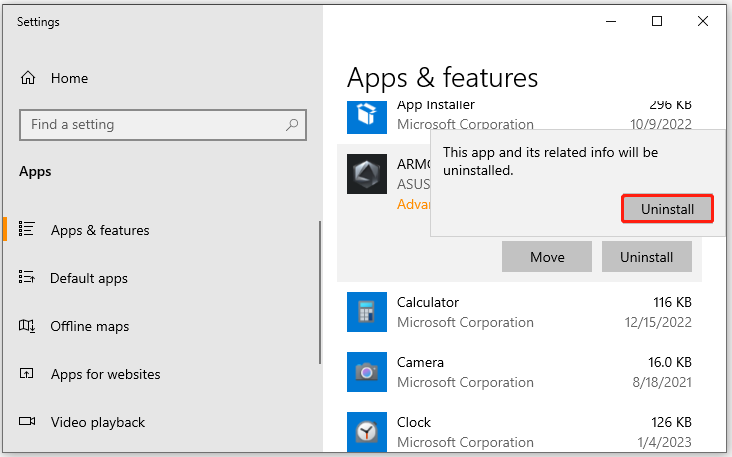
Sometimes, you may want to uninstall the ASUS RGB software due to some reasons like low disk space. In this case, you can open the Settings app, select Apps > Apps & Features, locate Armoury Crate, and click Uninstall. Then, confirm the operation by clicking Remove/Uninstall.

How to Fix ASUS Aura Sync Not Working
However, many users encounter the ASUS Aura Sync not working issue on Windows 10/11. If you are also troubled by this problem, you can try disabling Fast Start, uninstalling other lighting software on your PC, and reinstalling the ASUS Aura software. To know more details, you can refer to this post “Fixed: ASUS AURA Has Stopped Working”.
Further Reading: If you can’t install the software for Windows 10/11 due to insufficient disk space, don’t worry. MiniTool Partition Wizard can help you fix it easily by analyzing disk space, extending partitions, upgrading to a larger hard drive, etc.

![VirtualBox Download & Install for Windows/Mac/Linux [Full Guide]](https://images.minitool.com/partitionwizard.com/images/uploads/2022/12/virtualbox-download-install-thumbnail.jpg)

User Comments :