You may get the “ASUS AURA has stopped working” error message when using the software. How to fix it? This post from MiniTool will show you some ASUS AURA has stopped working fixes.
ASUS Aura is a program available for Windows 10. It enables users to control the RGB lighting of ASUS RGB products, such as your motherboard, graphic card and desktop. With ASUS Aura, you can set colorful LED lights according to your preferences.
However, some Windows users reported that they encountered “ASUS AURA has stopped working “error message after launching the software. Why does it say ASUS AURA has stopped working? How to fix “ASUS AURA has stopped working” issue?
After analyzing several post on how to “ASUS AURA has stopped working” issue, here I have summarized some top solutions. If you get the same ASUS Aura error and don’t know how to fix it, you can try the following solutions one by one.
Solution 1. Disable Fast Startup
Fast Startup is a Windows 10 feature which is used to reduce the boot time. When the Fast Startup is enabled, Windows saves some of your computer’s system files to a hibernation file upon shutdown. So when next time you start up your computer, Windows can use these saved files to achieve a fast startup.
Enabling Fast Startup can make your PC boot up quicker, but sometimes this may lead to problems such as ASUS AURA not working issue. The fast startup feature may conflict with ASUS AURA. Some users reported that after disabling the fast startup, they fixed the “ASUS AURA has stopped working” issue.
If you have the same issue, you can try disabling Fast Startup. Here are the detailed steps.
Step 1. Type control in the Windows Cortana search box and click the best match Control Panel to open it.
Step 2. In the Control Panel window, set View by Large icons and choose Power Options.
Step 3. On the left side of the screen of the Power Options window, click Choose what the power button do.
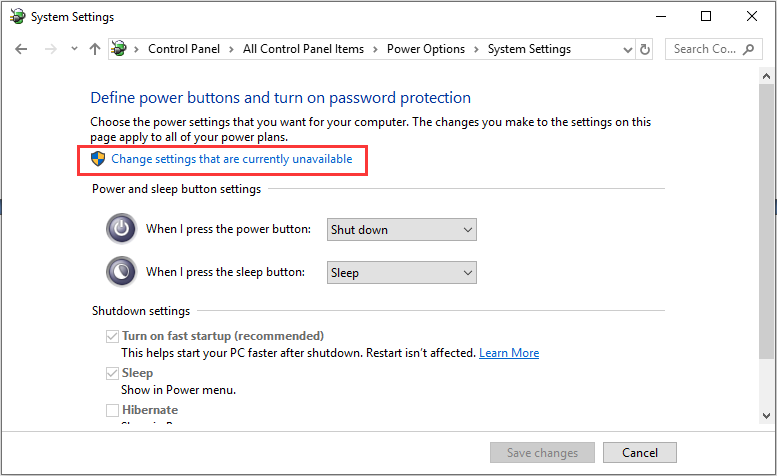
Step 4. Click the Change settings that are currently unavailable option on the new window.

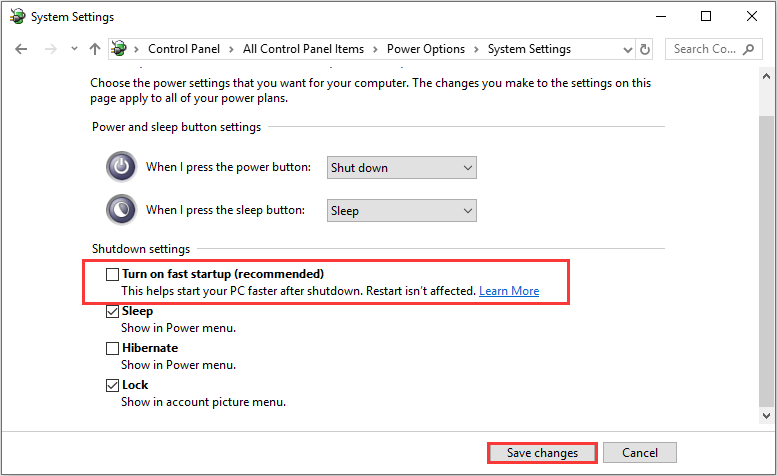
Step 5. Under Shutdown settings, uncheck the box next to the option Turn on fast startup (recommended). Then click the Save changes button to save it.

Step 6. Restart your computer and check to see if the ASUS AURA has stopped working issue gets fixed.
Solution 2. Reinstall ASUS AURA
The “ASUS AURA has stopped working” problem could be caused by damaged or corrupted installation files. To remove the error message, you can try reinstalling the software.
Here are the detailed steps.
Step 1. Press Windows log key and R key together on the keyboard to bring up the Run box. Type appwiz.cpl in the Run box and hit Enter.
Step 2. Select the ASUS AURA software from the programs list. Right-click on the software and choose Uninstall.
Step 3. Then follow the on-screen prompts to uninstall ASUS AURA and then restart the system.
Step 4. Download the ASUS AURA software from its official website. Install the AURA software on your computer. Do not change the default installation directory on your PC.
After installation, restart your PC and check to see if the “ASUS AURA has stopped working” error disappears.
Solution 3. Uninstall Other Lighting Software on Your PC
If you have installed other RGB lighting software on your PC such as Corsair and Cooler master, they may conflict with ASUS Aura, causing the “ASUS AURA has stopped working” error message. If this is the case, you should uninstall other lighting software on your PC.
After uninstalling other lighting software, you can check if ASUS Aura can work properly.

![Pros and Cons of Windows 10 Fast Startup [Quick Guide]](https://images.minitool.com/partitionwizard.com/images/uploads/2020/03/pros-and-cons-of-win10-fast-startup-thumbnail.jpg)

User Comments :