Bypassing the synchronization to save data directly to your OneDrive can make automatic backups and data transfers more convenient. This post will tell you how to do that by assigning a specific drive letter to the OneDrive. In addition, with MiniTool Partition Wizard, you can back up data and manage partition easily.
Microsoft OneDrive allows you to access and edit your files on all devices, protect your files in the cloud, and share documents or photos or collaborate in Office. With these powerful features, storing files and other vital data by using OneDrive has become one of the best choices for many Microsoft Windows 10 users to protect data and work anywhere.
Once the application is installed, all a Microsoft Windows 10 user has to do is to save a file to a folder on a hard drive and then allow the OneDrive to automatically replicate the data to the cloud.
Some of you may think that the synchronization step is complicated and may cause your computer to run slow. If so, you can take measures to bypass the synchronization.
There are ways to skip the synchronization step and save your data directly to the cloud. The first way is to log into the OneDrive through a web browser and manually perform an upload of the file or data.
Another more efficient way is to assign a drive letter to the OneDrive using the Windows 10 mapping system of File Explorer so that you can access the cloud directly and use the cloud storage like any other drive on your system.
How to Assign a Drive Letter to OneDrive
Unlike the normal folders or network drives on your system, mapping a drive letter to OneDrive is more complicated because the following facts: firstly, your cloud storage under the OneDrive system is locked behind a user login and password; secondly, the drive is referenced by a specific identification number (CID) and not by a wieldy network name.
Then, follow the tutorial below to assign a drive letter to Microsoft OneDrive.
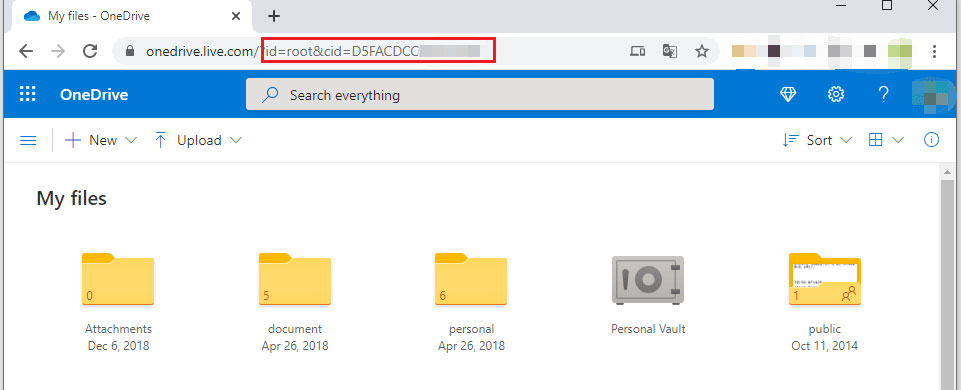
Step 1: Log into your Microsoft OneDrive on a browser. In this step, you may have to provide the appropriate credentials.
Step 2: Look at the URL address once you have logged in and at the home page. You will see a CID number at the end. Copy that number to your Windows 10 clipboard.
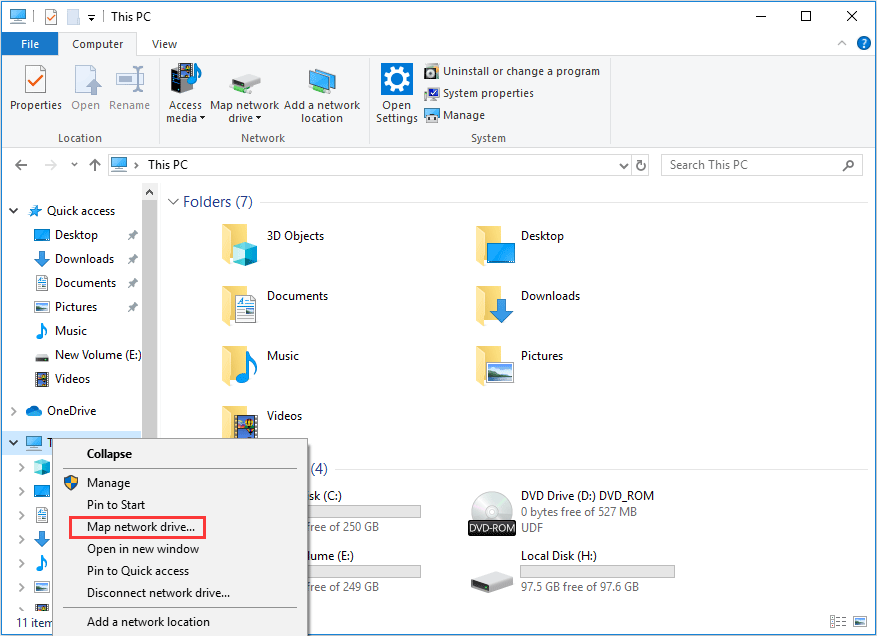
Step 3: Open the Windows 10 File Explorer by clicking the folder icon on the Taskbar. Navigate to the This PC item and right-click it. Select the Map network drive item from the dropdown menu.
Step 4: On the pop-up window, select a drive letter, making sure not to select a letter already in use. Type the following command in the Folder box: https://d.docs.live.net/CIDNumber.
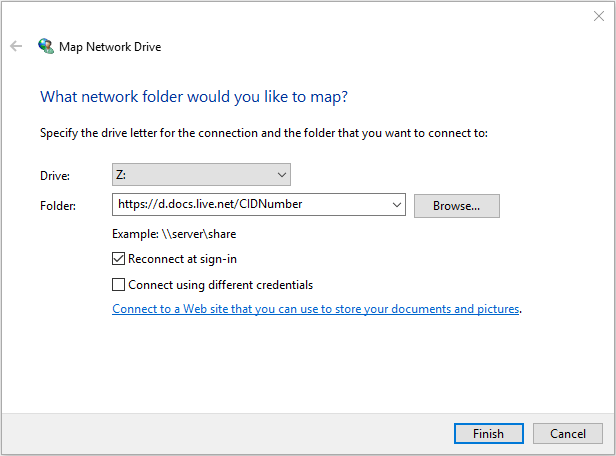
Step 5: You also want to check the Connect using different credentials box so that you can provide the login information. Click Finish to continue the mapping process.
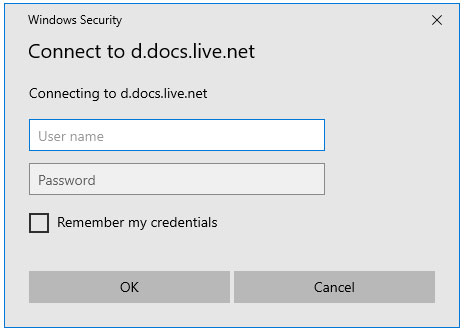
Step 6: A screen should appear asking you to enter your OneDrive credentials. Enter those credentials to make the system log in as necessary. Be sure to check the Remember my credentials box so that you don’t have to enter them every time you want to save a file directly to the cloud. Then, click OK to complete the process.
When your OneDrive is assigned a drive letter, it can be referenced by that letter from the GUI, a shortcut, the command line, PowerShell or another scripting application. This can be convenient for automatic backups and data transfers scheduled at either the user or the network admin level.
Rename the New Drive
After completing the above steps, you may see a new drive listed in the Windows 10 File Explorer by using the letter you just assigned to it. It will be named based on the CID. If you want to change its name, right-click the drive name and select the Rename item from the dropdown menu; type a new name.

User Comments :