Are you troubled by ARK Server not responding? It is annoying that you can’t play games with your friends due to the error. Don’t worry. This post of MiniTool explorers 5 effective methods to fix ARK Server not responding.
ARK: Survival Evolved is a relatively new game industry compared with other games like League of Legends and Call of Duty. So, it still has many issues that need to be resolved. One of the most common issues is ARK Server not responding.
Why ARK Server is not responding? After analyzing several different posts and user cases, some causes are summarized including corrupt Steam game files, antivirus software, Steam ports, and background programs.
According to the above reasons, we summarize its corresponding solutions. Now, let’s see how to fix ARK Server not responding.
Fix 1. Verify the Integrity of Game Files
In some cases, game installation files may get corrupted or incomplete, which can cause server connectivity issues like ARK Server is not responding. For this, verifying the game files’ integrity is an effective method. Here’s how to do that:
Step 1. Launch your Steam client and navigate to the Library section.

Step 2. Right-click ARK: Survival Evolved from the list games and select Properties.
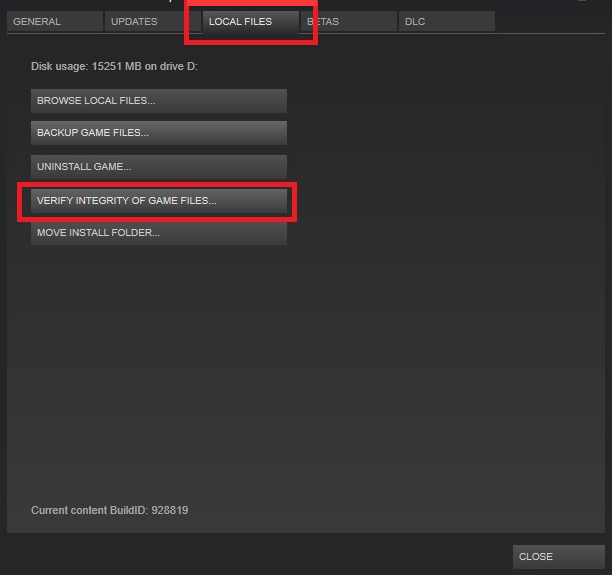
Step 3. Navigate to the Local Files section and click on Verify Integrity of Game Files. Then this tool will verify the game files automatically and replace the corrupted files.

–image from youtube
Once the process ends, relaunch your game and check if ARK Server not responding is fixed or not.
Fix 2. Add the Game to the Exceptions List
Antivirus software is also responsible for Server not responding ARK. It can block ARK Server to access your network. To fix this issue, you can try disabling your antivirus programs temporarily while playing. Then add the game to the exception list for Windows Firewall.
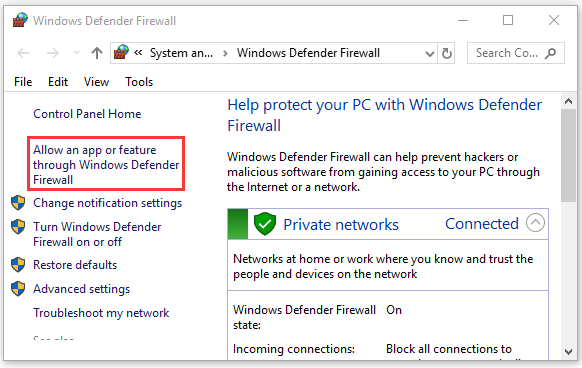
Step 1. Type firewall in the search box and then select the Windows Defender Firewall from the context menu.
Step 2. Click on Allow an app or feature through Windows Firewall from the left pane.

Step 3. Select the checkbox for Ark from the listed programs and click OK to save the change.
Now, you can restart your computer and check if the Server not responding ARK issue is resolved.
Fix 3. Use a Different DNS
The default DNS settings on your computer may refuse to connect the ARK Server. At this time, we recommended using a different DNS like Google’s DNS. Here’s how to change DNS address:
Step 1. Open your Control Panel from the Start menu.
Step 2. Change the View by type to Category, and then navigate to Network and Internet > Network and Sharing Centre > Change adapter settings.
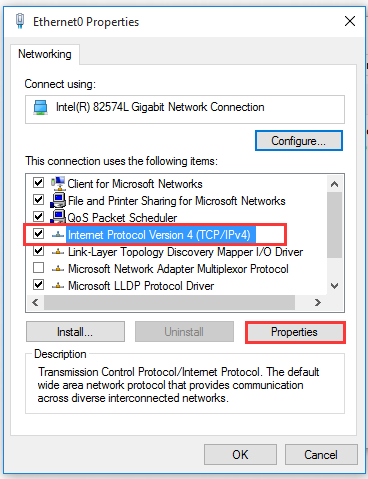
Step 3. Right-click the active network and select Properties.
Step 4. Navigate to the Networking tab, and then select Internet Protocol Version 4 (TCP/IPv4) and click on Properties.

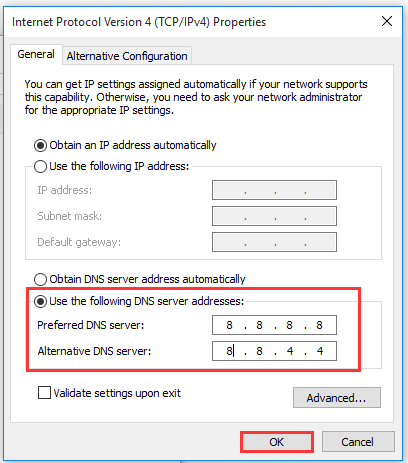
Step 5. Select the Use the following DNS server addresses option, and then set the Preferred DNS server: 8.8.8.8, Alternative DNS server: 8.8.4.4. After that, click on OK to save the changes.

Fix 4. Disable Port Forwarding
If you set other forwarded ports, the ARK Server may lay and encounter faulty connection issues. For this situation, you can try disabling the Steam ports and other ports forwarding. Here’s how:
Step 1. Check your router IP address and open the router web interface. If you don’t know how to find this IP address, you can refer to this post.
Step 2. Disable the Steam ports and other ports forwarding that you have set, and then save the changes.
Step 3. Restart your computer and router.
Now, you can run Ark: Survival Evolved and see if the issue still persists.
Fix 5. Reset Your Network Adapter
If all the above methods haven’t resolved the ARK Server is not responding issue, you can try restarting your network adapter in command prompt. It can help fix many known connection issues like IPv6 connectivity no network access. So, it’s worth having a try.
Step 1. Type cmd in the search box, and then right-click Command Prompt and select Run as administrator.
Step 2. Type netsh winsock reset command in the elevated command prompt and hit Enter.

Step 3. Restart your computer to take the command into effect.

![Top 7 Fixes to League of Legends High Ping [Step-by-Step Guide]](https://images.minitool.com/partitionwizard.com/images/uploads/2020/08/league-of-legends-high-ping-thumbnail.jpg)
User Comments :