Are you feeling annoyed and experiencing ArcheAge unchained not launching after splash screen? So, in this article from MiniTool Partition Wizard, you can learn how to fix ArcheAge not launching on Windows 10/11 so you can continue to play this game and use your PC smoothly.
ArcheAge is a popular Korean MMORPG (Massively Multiplayer Online Role-Playing Game), but Windows users have encountered certain error with this game such as poor performance and graphical glitches or Archeage Unchained error 1020.
ArcheAge performance issues can cause errors such as ArcheAge not launching, game freezes or stutters, crashes on load, high disk usage, and FPS drops. Sometimes ArcheAge not launching after splash screen. These bugs can affect game performance and user experience.
The reasons for ArcheAge not launching are various. PC does not meet the minimum system and hardware requirements for ArcheAge; outdated graphics or network drivers; poor or unstable internet connection can all cause this error to occur.
For these reasons, there are several ways to fix ArcheAge issues on Windows 10/11. Please keep reading.
Before considering the solutions below, please check if that your PC system meets the minimum system requirements for ArcheAge.
The minimum system requirements for ArcheAge are:
- Processor: Intel Core2 Duo or higher
- Hard Disk: 30 GB (NTFS formatted disk)
- Memory: 2 GB RAM
- Graphics Card: At least 1024MB of video memory
- OS: Windows 10 (and Windows Vista SP1, Windows 7 SP1, Windows 8)
If your system does not meet these minimum requirements, you will need to upgrade your system.
Firstly, to check your computer’ processor, you can refer to this article: 13 ways for How to Find What Is My Processor Windows 10
Secondly, to make sure the drive where the game is installed is formatted to NTFS and has 30GB of free space. You can try MiniTool Partition Wizard that is a professional partition management tool. This tool can be used to resize partition, space analyzer, etc.
MiniTool Partition Wizard FreeClick to Download100%Clean & Safe
Step 1: Launch MiniTool Partition Wizard and enter its main interface.
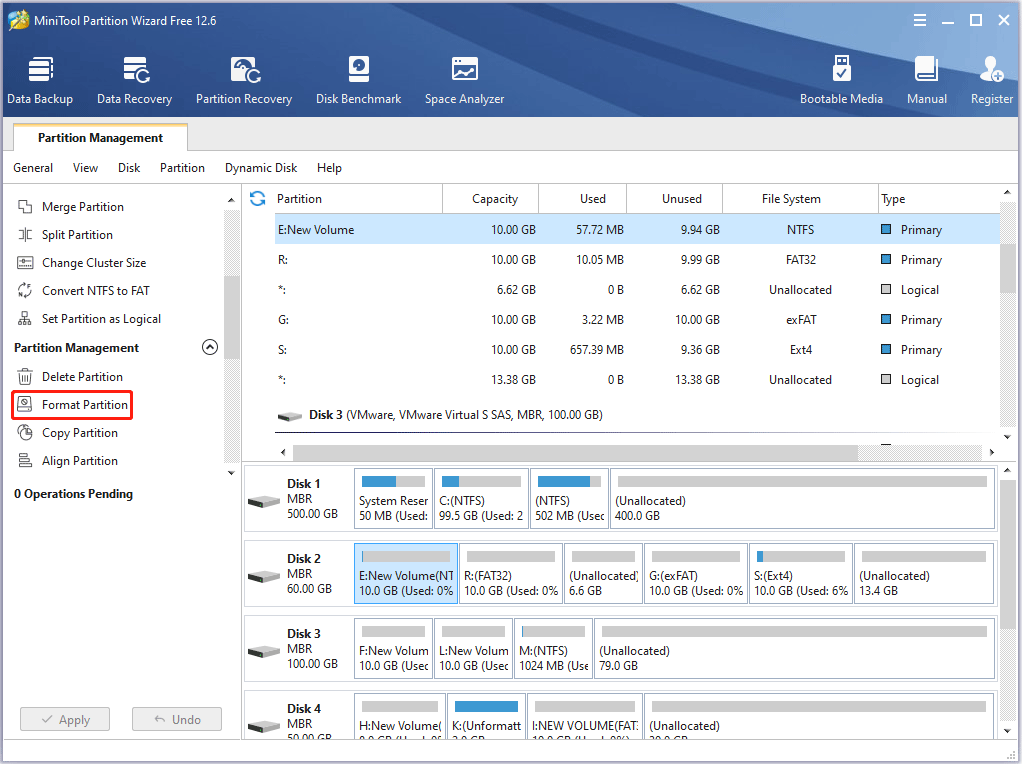
Step 2: Select the partition on the hard drive and choose the Format Partition option under Partition Management.
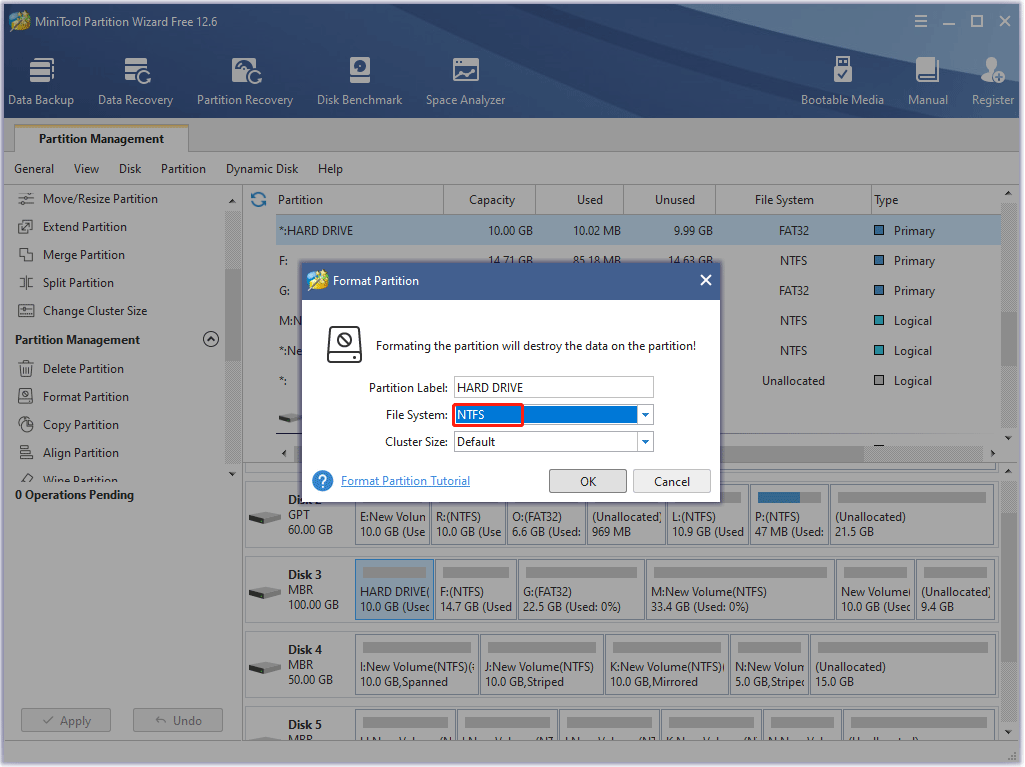
Step 3: In a pop-up window, select NTFS next to File System and click the OK button.
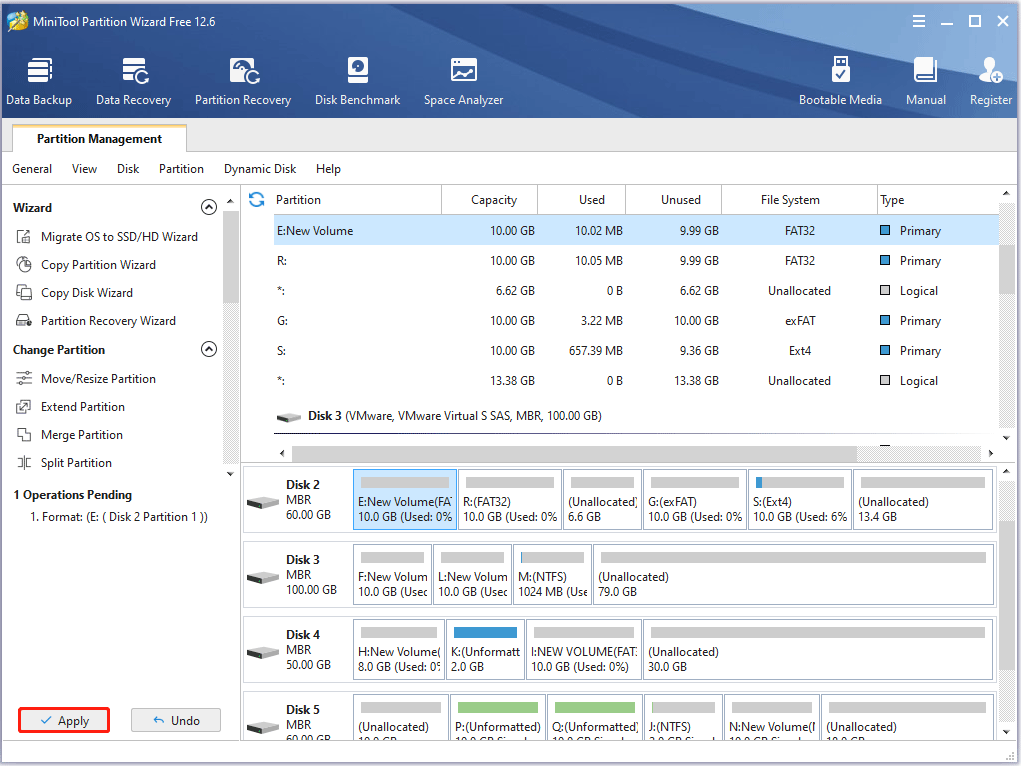
Step 4: Click Apply to finish hard drive formatting process.
If the partition is less than 30GB, you can also use MiniTool Partition Wizard to extend the partition.
MiniTool Partition Wizard FreeClick to Download100%Clean & Safe
Thirdly, to check memory in your computer, you can do the following steps:
Step 1: Press Ctrl + Shift + Esc to open the Task Manager window.
Step 2: Click Performance tab, and click Memory from the left panel. You can see how much RAM you have in total, and how much RAM is being used, and how much memory is available in your Windows 10 computer.
Fourthly, to check Graphics Card, you can refer to this article: How to Check Graphics Card on Windows 10/8/7 PC-5 Ways
Fifthly, to check OS, you can do the following steps:
Step 1: Press Win + R to open the Run dialog. Then type msinfo32 in the search box and press Enter.
Step 2: In System Summary, you can check the version of Windows.
However, if your system meets these requirements and you are still experiencing ArcheAge performance issues, you can continue to try the solutions below.
Way 1: Lower Your Graphic Settings
To lower your graphics settings, here is the guide:
Step 1: While you playing ArcheAge, press the ESC key to launch the main menu.
Step 2: From the menu, select Options.
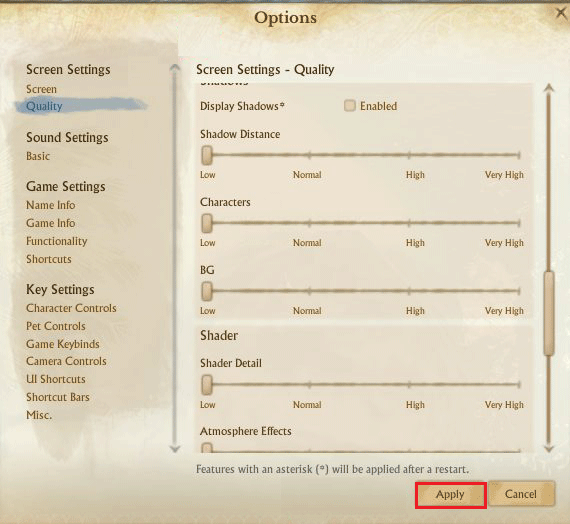
Step 3: In the Options window, go to Screen Settings > Quality.
Step 4: Move the Graphics Quality Settings slider all the way to the left to set your graphic settings to Low.
Step 5: Click the Apply button to save the changes.
Way 2: Switch from DirectX 11 to DirectX 9 Mode
Adjusting the DirectX version used in ArcheAge may help you clear up Graphic issues. To switch the version from 11 to 9, follow the steps below:
Step 1: While you playing ArcheAge, press the ESC key to launch the main menu.
Step 2: From the menu, select Options.
Step 3: In the Options window, go to Screen Settings > Screen.
Step 4: On the ArcheAge section, click DirectX 9, then click the Apply button.
If this method helps with graphics issues, play ArcheAge with this DirectX version. If not, you can switch back to your version using the steps above.
Way 3: Delete Shaders Cache
ArcheAge has some graphical glitches. In order to fix this graphics issue, you need to delete the shader cache folder.
Step 1: Type disk cleanup in the search box on the taskbar. When the result appears, click it.
Step 2: You need to select your C drive and click OK.
Step 3: Select DirectX Shader Cache from the list and then click OK.
Way 4: Update Your Video Drivers
The system’s graphics driver needs to be updated regularly to maintain optimal gaming performance and compatibility. To update your video card driver, here is how to do that:
Step 1: Right click the Windows Start icon on the taskbar, then select the Device Manager option.
Step 2: In the Device Manager window, unfold the Display adapters.
Step 3: Right click the graphics card that you want to update. Then select the Update driver option.
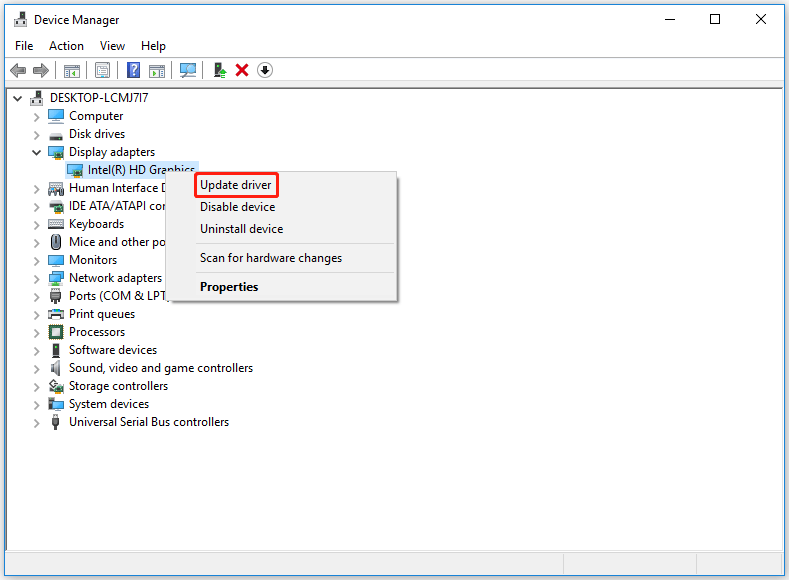
Step 4: In a pop-up window, select the Search automatically for updated driver software option.
Then your Windows will check, download and install the latest and appropriate driver.
Way 5: Run the Game Client as Administrator
This problem can also be caused by permission issues related to the Glyph executable. Well, running the game with administrator can fix ArcheAge not launching. Proceed are as follows:
Step 1: Press the Win + E key to open File Explorer and navigate to the location where you installed the game. The default location is C:Program Files (x86)Glyph.
Step 2: Right click GlyphClient and select the Properties option.
Step 3: Switch to the Compatibility tab from the menu at the top and make sure to check the Run this program as an administrator box.
Step 4: Click the Apply and OK button and try launching the game again.
Way 6: Check Your Firewall / Antivirus
Sometimes your Windows firewall or antivirus software can interfere with the game’s patching system, so it is recommended to exclude the ArcheAge folder from your firewall/antivirus software list.
If you are using Windows Defender, you can fix the problem by establishing a whitelist rule for it in Windows Defender. Here’s a quick guide on how to do this:
Step 1: Press the Win + R key to open the Run dialog. Then type firewall.cpl in the box and press Enter to open Windows Defender Firewall.
Step 2: Once in the Windows Defender main menu, click Allow an app or feature through Windows Defender Firewall in the menu on the left side of the screen.
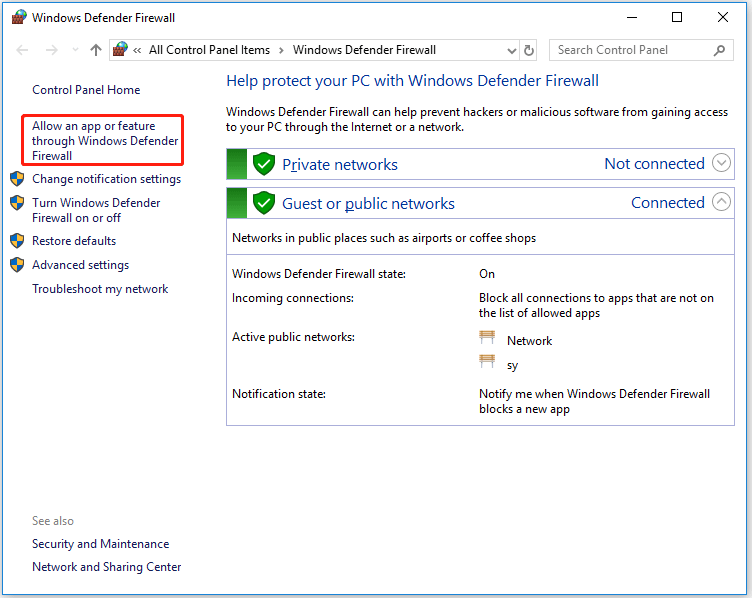
Step 3: In the next window, click the Change settings button, then click Yes at the UAC prompt.
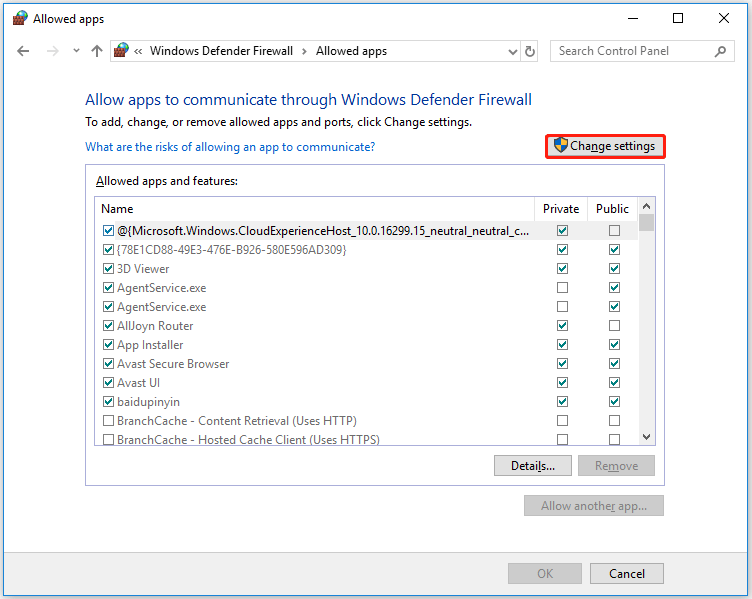
Step 4: After gaining access, scroll down the list of allowed items and see if glyph.exe is present in the list. If you cannot find glyph.exe in the list of options, click Allow another app, then click the Browse button and add the executable manually.
Step 5: Find the glyph.exe file and add it to the list of allowed items, and then ensured the box of glyph.exe is checked. Finally, click Yes to save the changes.
After that, you’ve whitelisted the ArcheAge executable, so your antivirus doesn’t interfere.
If you are using the third-party firewall, you can disable it. Most third-party firewalls allow you to disable real-time protection directly from the tray icon. You can just right-click on it and extend the Avast shields control option and select Disable permanently.
Way 7: Close Other Applications Before Starting ArcheAge
Other installed applications can sometimes cause problems with ArcheAge not launching, so you will need to close them before starting ArcheAge.
Way 8: Use Default Administrator Account to Run the Game
Here is the simple guide to run the game using default administrator.
Step 1: Open Command prompt as administrator.
Step 2: When Command Prompt appears, type the following command and press Enter:
Net user administrator /active: yes
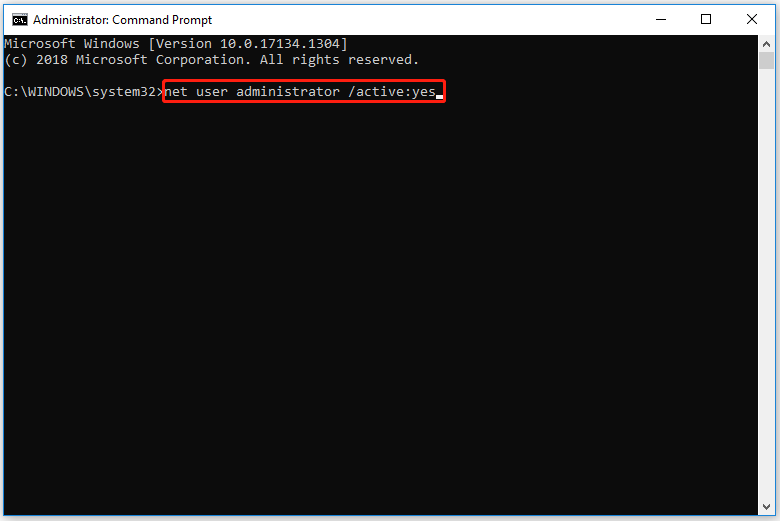
Step 3: Log out your account and switch to the administrator account.
Step 4: After launching the game, disable the administrator account by typing:
Net user administrator /active: no
Way 9: Set ArcheAge Unchained High Priority
If the ArcheAge game is showing FPS drops during playing game, you can set it unchained high priority through Task Manager. Steps are as follows:
Step 1: Right click the empty space on the taskbar. Then select Task Manager in the list.
Step 2: Switch to the Details tab and right click the ArcheAge.exe on the list. Then select the Set Priority > High option.
After that, this way may solve the FPS drops and allow you to play the game without any hinder.
Way 10: Edit System.cfg File
If ArcheAge keeps crashing or gets stuck on the loading screen when you log in, the problem may be caused by a configuration file. You can fix this problem by editing the system.cfg file.
Step 1: Close ArcheAge and Glyph completely.
Step 2: Press the Win + E key to open File Explorer.
Step 3: Go to the Documents folder and find ArcheAge folder.
Step 4: Open ArcheAge folder and you can see the system.cfg file. Then open the file with Notepad.
Step 5: When system.cfg file opens, you can see “login_first_movie =”, then change it to “login_first_movie =1”.
Step 6: Save the changes and try running the game again.
Way 11: Delete the Glyph AppData Folder
These issues most likely occur due to some partially corrupted files in the AppData folder related to ArcheAge game.
Step 1: Press the Win + R key to open the Run Dialog. Then type %AppData% and press Enter.
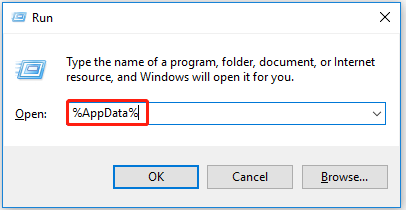
Step 2: From the AppData folder, navigate to the following location:
C:UsersYour USERNAMEAppDataLocalGlyph
Step 3: In the Glyph folder, press the Ctrl + A key to select the all files, then right click items and select the Delete option.
Way 12: Reinstall ArcheAge in Different Location
To reinstall ArcheAge in a different location, you can do so:
Step 1: Press the Win + R key to open the Run dialog. Then type appwiz.cpl and press Enter.
Step 2: In the Programs and Features window, find the ArcheAge installation and right click it and select the Uninstall option.
Step 3: Follow the on-screen instruction to uninstall it.
Step 4: Navigate to the location where you previously save the game for ArcheAge. By default, the location is C:Program Files (x86). Then right click it and select the Delete option.
Step 5: Sign in with your account on the official ArcheAge Game website, then download and install the game files in a different location.
After that, you can check if the problem has been solved.
Way 13: Turn Off Anti-aliasing
If you have problems with game performance, you can turn off anti-aliasing in NVIDIA Control Panel and Catalyst Control Center.
To turn off anti-aliasing in Nvidia Control Panel, follow these steps:
Step 1: Open the Nvidia Control Panel.
Step 2: Click Manage 3D Settings.
Step 3: Find Antialiasing-Mode in the right panel of window and set it to Off.
To turn off anti-aliasing for AMD cards, follow these steps:
Step 1: Open the Catalyst Control Center.
Step 2: Go to Gaming and then click 3D application settings.
Step 3: Lower the anti-aliasing settings.
Bottom Line
In conclusion, we have introduced several ways to fix ArcheAge issues on Windows 10.
After trying so many solutions, we believe that you may have successfully solved your problem. If you have any suggestions or need any help when you use MiniTool Wizard Partition, you are welcome to send us an email via [email protected] or leave a comment below. Thank you in advance.


User Comments :