You can set a password for an Excel to protect your data. You can also remove password from Excel to make it accessible again. In this guide from MiniTool Partition Wizard, you will learn about how to password protect an Excel and remove password from Excel.
Microsoft Excel is an industry-leading spreadsheet program which can help you achieve data visualization and perform data analysis easily. For better management and analysis, users always save data as an Excel file, which is also a common operation in workplace.
To protect your Excel file which includes personal and confidential data from unauthorized accesses, it is a wise choice to password protect it. Generally speaking, there are 2 types of Excel password: opening password and modifying password which separately aim to restrict the privilege to open and modify the file.
But sometimes, you might forget the password and you can’t open or modify it, or you want to make the Excel file accessible for others again. Then, you need to remove password from Excel.
In the following contents, you will learn about how to add or remove password protection in Excel. Just keep reading to get the details.
How to Password Protect an Excel
Microsoft Office provides different options for users to protect Excel data. To add a password protection for your Excel, you need to:
Step 1: Open the target Excel file and click File > Info.
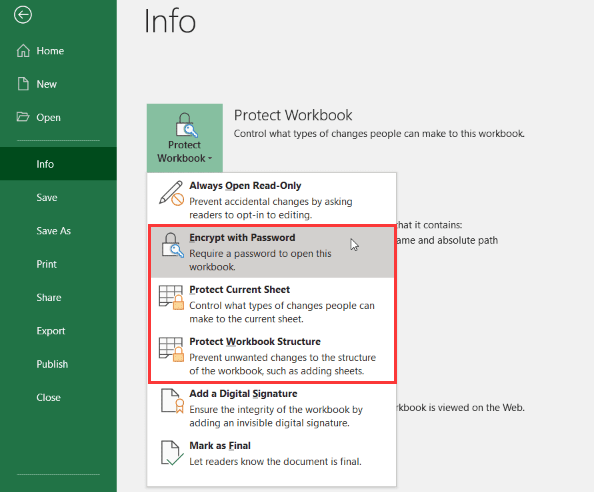
Step 2: Click Protect Workbook in the right pane and choose an option as your needs.
- Encrypt with Password: Open this workbook with a password (opening password).
- Protect Current Sheet: Restrict the modifications for the current sheet.
- Protect Workbook Structure: Prevent unwanted changes to the structure of the workbook like adding sheets.
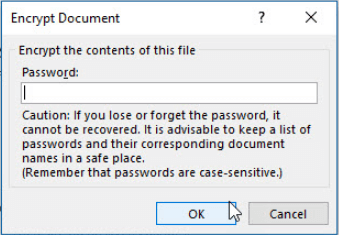
Step 3: In the pop-up window, enter a password in the empty box and click OK. Then, reenter the password and click OK to confirm it.
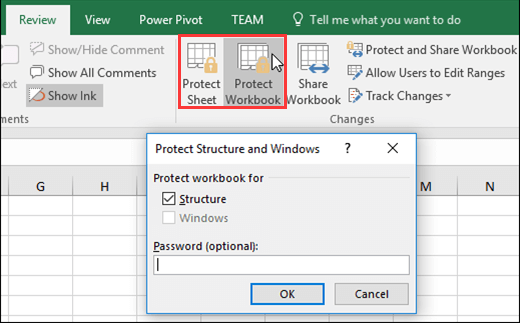
Alternatively, you can also use the related features in the upper ribbon bar as the following screenshot shows. You just need to keep your Excel file open, navigate to the Review tab, and click Protect Sheet or Protect Workbook to set a password for the current sheet or workbook.
How to Remove Password from Excel
It is easy to remove an Excel password if you remember it, and commonly you can follow the steps of adding password to remove a password. Here’s how to do that.
Option 1: Remove Password with Info Feature
Step 1: Open the Excel file that you want to remove password from. Of course, you will be required to enter the password to open it if you have set an opening password for the file.
Step 2: Navigate to File > Info.
Step 3: Click Protect Workbook and then choose the type of password protection you’ve set to remove.
- For Encrypt with Password option, you will get an Encrypt Document You just need to remove the contents in the box of Password and click OK to remove password.
- For Protect Current Sheet and Protect Workbook Structure options, you will get an Unprotect Sheet window, and you need to enter the password and click OK to remove the protection.
To remove password from an Excel spreadsheet, you may have other options as below:
- Go to Home tab, click Format in the Cells In the drop-down list, choose Unprotect Sheet.
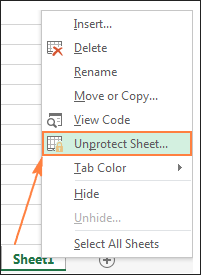
- Right-click the sheet tab at the bottom of the window and choose Unprotect Sheet from the context menu.
Option 2: Remove Password with the Save As Feature
Step 1: Open the target Excel with password and go to File > Save As.
Step 2: In the pop-up window, click Tools beside the Save button and click General Options from the drop-down menu.
Step 3: In the dialog box, clear the contents in the boxes of Password to open and Password to modify to remove all the password.
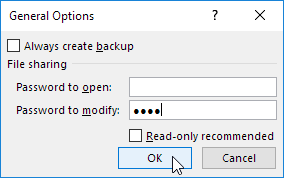
Step 4: Click OK button to save changes and then click Save button to save the new file to your desired location.

![Microsoft Excel Is Waiting for Another Application Error [Solved]](https://images.minitool.com/partitionwizard.com/images/uploads/2020/07/microsoft-excel-is-waiting-for-another-application-to-complete-an-ole-action-thumbnail.jpg)
User Comments :