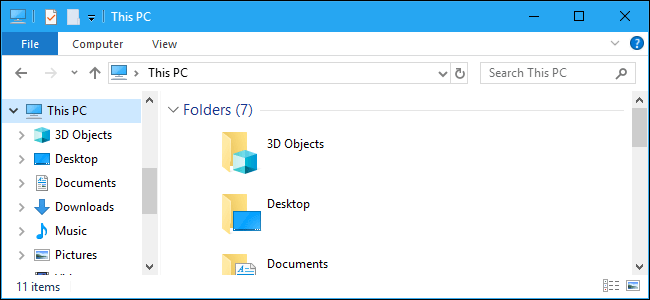
Have you found a folder named 3D Objects under This PC in File Explorer after you upgrade to the Fall Windows Update? What is it? Can you remove this folder from File Explorer? In this post, MiniTool answers the two questions. Let’s check the answers.
3D Objects Folder
The folder named 3D Folder under This PC in File Explorer comes with Windows 10’s Fall Creators Update. 3D Objects folder has been included as a Library and shows up by default. It contains 3D items that you use in apps like Paint 3D or Mixed Reality Viewer.
When folders are sorted alphabetically, it will be the first folder in the list as the following image shows.

Maybe the sudden appearance of the 3D Objects folder cause inconvenience to you. Or for any other reason, you want to remove this folder from File Explorer. To do that, please go on reading.
Remove the 3D Objects Folder from File Explorer
You can’t remove the 3D Objects folder from This PC by right-clicking it and using the Delete option. Instead, you can utilize the Windows built-in tool Registry Editor. This tool is a hierarchical database that stores low-level settings for the Microsoft Windows OS and for applications that opt to use the registry.
Making changes in Registry Editor is risky. In case something goes way, it is highly recommended you to back up the whole computer. To back up your PC, please refer to the following recommended article:
After making a PC backup. Let’s make some changes in Windows Registry to remove the 3D Objects folder from This PC.
Step 1: Press Windows + R key to call out the Run window. Type regedit in the Run window and then hit the OK button to open Windows Registry.
Step 2: On the Windows Registry window, expand the following folders one by one or you can also copy the following path to access find Registry quicker.
HKEY_LOCAL_MACHINESOFTWAREMicrosoftWindowsCurrentVersionExplorerMyComputerNameSpace
Step 3: After expanding the NameSpace, please find and right-click the {0DB7E03F-FC29-4DC6-9020-FF41B59E513A} folder and then click the Delete in the right-click menu.
If you are using a 32-bit version of Windows 10, you can stop here since you have removed the 3D Objects folder. But if you are using a 64-bit version of Windows 10, you should keep reading.
Step 4: Still on the Windows Registry window, navigate the following path or you can also copy and paste it on the window.
HKEY_LOCAL_MACHINESOFTWAREWow6432NodeMicrosoftWindowsCurrentVersionExplorerMyComputerNameSpace
Step 5: Find and delete the {0DB7E03F-FC29-4DC6-9020-FF41B59E513A} folder by repeating the above operations.
That’s it! You will not see the 3D Objects folder under This PC anymore.
Bottom Line
This article comes to an end. Here I would like to emphasis that making changes in Windows Registry requires high carefulness and making a PC backup is quite necessary. Hope you can remove the 3D Objects folder from This PC successfully.
If you have any problems in removing this folder, you can leave them in the following comment zone. We will help you deal with them ASAP.


User Comments :