The 256 micro SD card is a boon for photographers. This article will introduce two main 256GB micro SD cards on the market and tell you how to manage the 256 micro SD card for your camera to capture lots of wonderful moments and shoot some videos.
Best Micro SD Card – 256GB Micro SD Card
With the rapid development of technology, we have entered the era of big data. Most of us tend to use cameras to record the wonderful moments in our lives. In order to capture more pictures, you need some extra storage space for your camera. To meet such demands, memory cards boast greater capacity and higher speed in recent years.
There are various capacities of micro SD cards photographers can choose from, and the 256GB micro SD is one of the best and most popular micro SD cards for cameras nowadays.
Generally, a megapixel photo takes up space about 4MB. In other words, a 2GB memory card can only store 500 photos. In this situation, the 256GB micro SD card is such a great blessing to shutterbugs because they can shoot more photos and videos.
Searching on the Internet, you may see the following two kinds of 256 micro SD cards:
Samsung micro SD card
Samsung is excellent at producing fast, efficient and dependable micro SD cards. The Samsung EVO Select is a great all-rounder that can be used in a digital camera, drone, phone, and Nintendo Switch games console.
Its features are listed here:
- Up to 100MB/s read and 90MB/s write speed;
- Water-proof; Shock-proof; Temperature-proof; X-ray-proof; Magnetic-proof;
- 10-year warranty.
You can get this card with 256GB for $36.99 on Amazon.
SanDisk micro SDcard
SanDisk is one of the most famous brands of micro SD card. The SanDisk Ultra micro SD card is a brilliant micro SD card for shutterbugs. It is ideal for Android smartphones and tablets, and MIL cameras.
Its features are listed here:
- Up to 100MB/s transfer read speed (you can transfer 1,000 photos in a minute);
- 10-year limited manufacturer warranty.
After learning some information about the 256GB micro SD card, let’s explore how to manage it on your camera.
Manage 256GB Micro SD Card for Camera from 3 Aspects
In order to take full use of the 256GB micro SD card for your camera, you should do the following items to get started.
# 1: Format 256GB Micro SD Card to exFAT
As we know, if we want to use an SD card as a storage device, the necessary thing we need to do is formatting it.
But why do we need to format the 256GB micro SD card to exFAT instead of NTFSor FAT32? The reason is that exFAT not only overcomes the single file size limitation of FAT32, but also provides better compatibility than that of NTFS. (In order to learn more about the differences between the two file systems, you can click NTFS vs. FAT32 vs. exFAT.)
How to format the 256gb micro SD card to exFAT? Since the capacity of this card is more than 32GB, it is highly recommended to use the third-party software MiniTool Partition Wizard to complete this formatting.
Here is the tutorial on formatting the micro SD card to exFAT with MiniTool Partition Wizard:
MiniTool Partition Wizard FreeClick to Download100%Clean & Safe
Step 1: Insert the SD card into your computer first. Please note that you should use the SD adapter rather than force the micro SD card to be inserted if the SD slot does not match the card.
Step 2: Download MiniTool Partition Wizard by clicking the offered downloadable button and launch it to get its main interface.
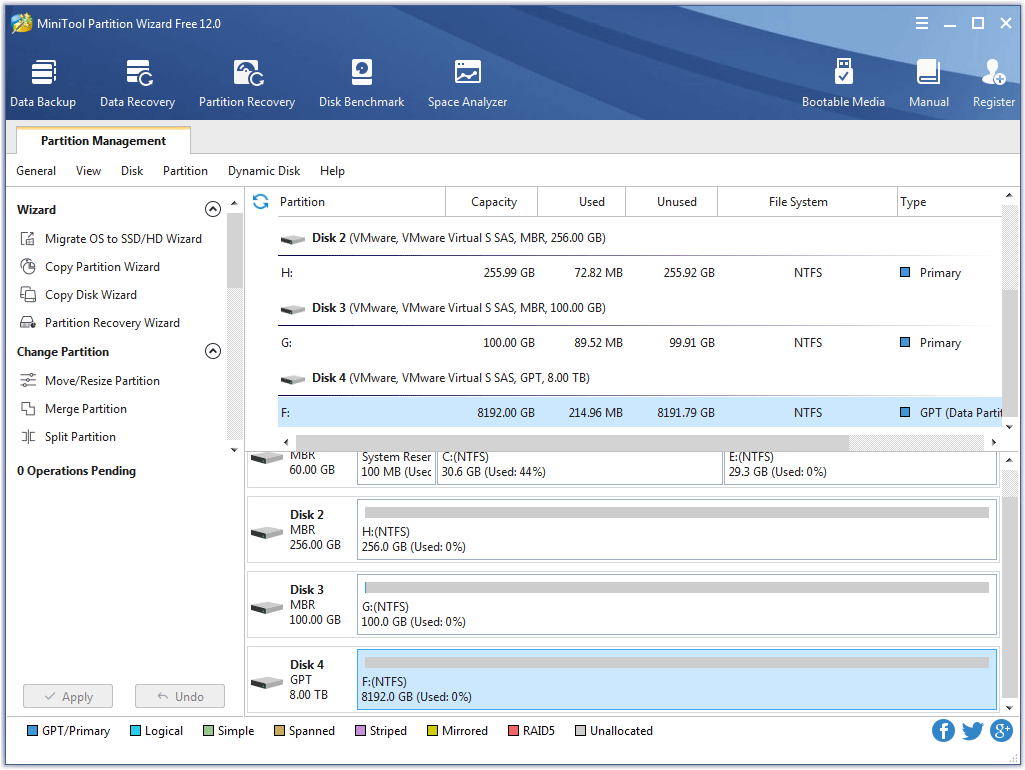
Step 3: Select the partition of the 256GB micro SD card in the Map Disk and select the Format Partition from the left panelor right-click on the partition and choose the Format feature to format this partition.
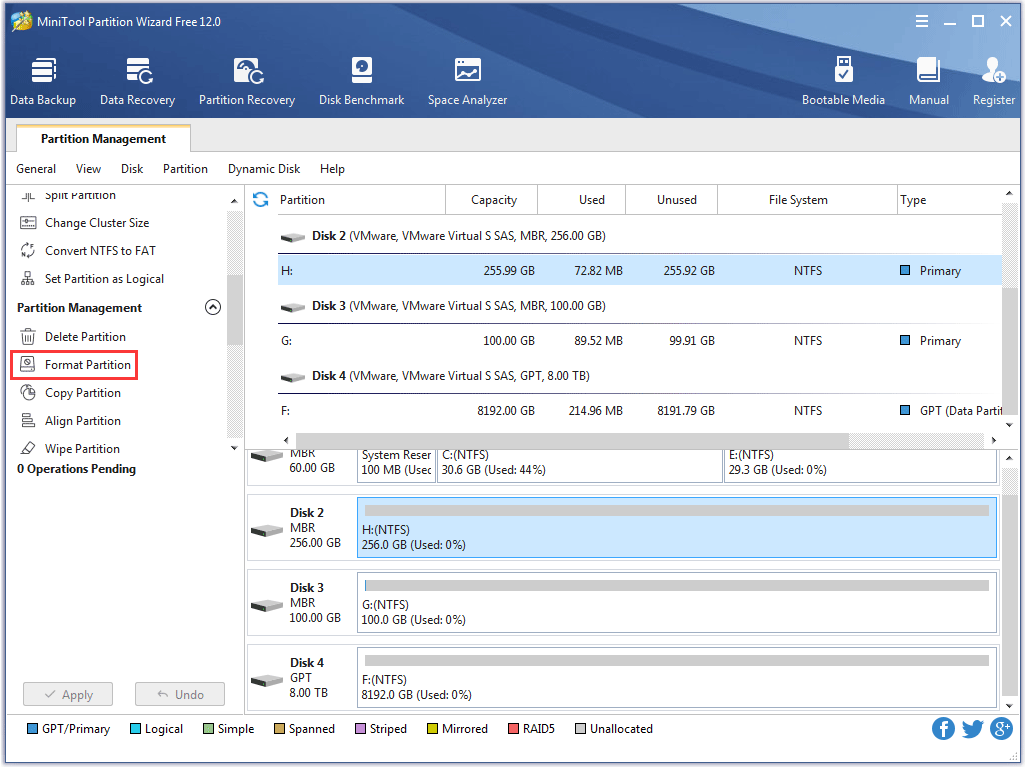
Step 4: Once you get the Format Partition window, you should do three important things:
- choose exFAT as the file system for the selected partition;
- choose Default as the cluster size for the selected partition. (As we know, one cluster only store one file. If the filesize is more than the cluster size, it means there are at least two clusters to store this file; if the file size is smaller than the cluster size, it means the disk space will be wasted. For a disk larger than 32GB, the default cluster size is 32KB.)
- click the OK button to save the settings.
Step 5: After going back to the main interface, you should click the Apply button to execute the changes.
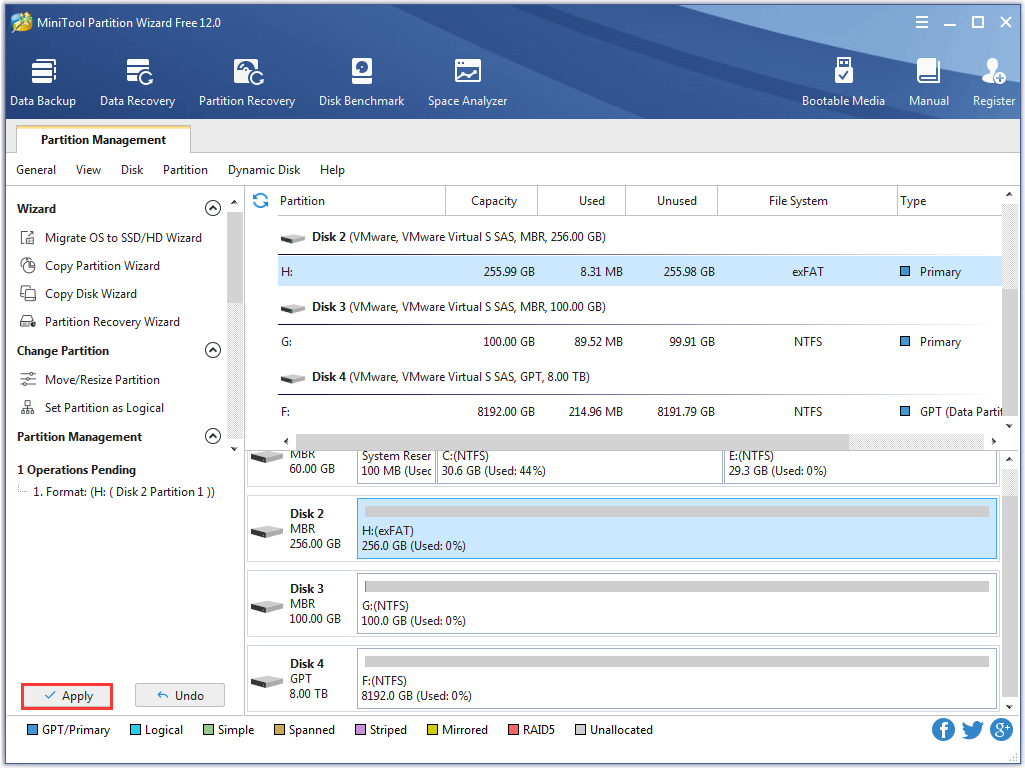
Now the 256GB micro SD card has been formatted by MiniTool Partition Wizard. You can insert it into your camera to save the photos you capture.
If the capacity of your selected micro SD card is no more than 32GB, you can read this article SD Card Formatter | How Do I Format SD Card Quickly to learn more ways to format this card.
# 2: Back up the Data Saved in256GB Micro SD Card
A sea of precious photos and videos is saved in the micro SD card, so it is of great significance to back them up in case of data loss.
How do we make a backup quickly and easily? Here, I also recommend MiniTool Partition Wizard to make a backup.
The Copy Disk feature of this software can transfer the data from one disk to another disk easily and quickly. Several steps are listed below:
Step 1: Insert the SD card into your computer.
Step 2: Launch MiniTool Partition Wizard to get its main interface.
Step 3: Choose the Copy Disk Wizard feature from the left panel, and then click the Next button to continue this copying in the pop-up window.
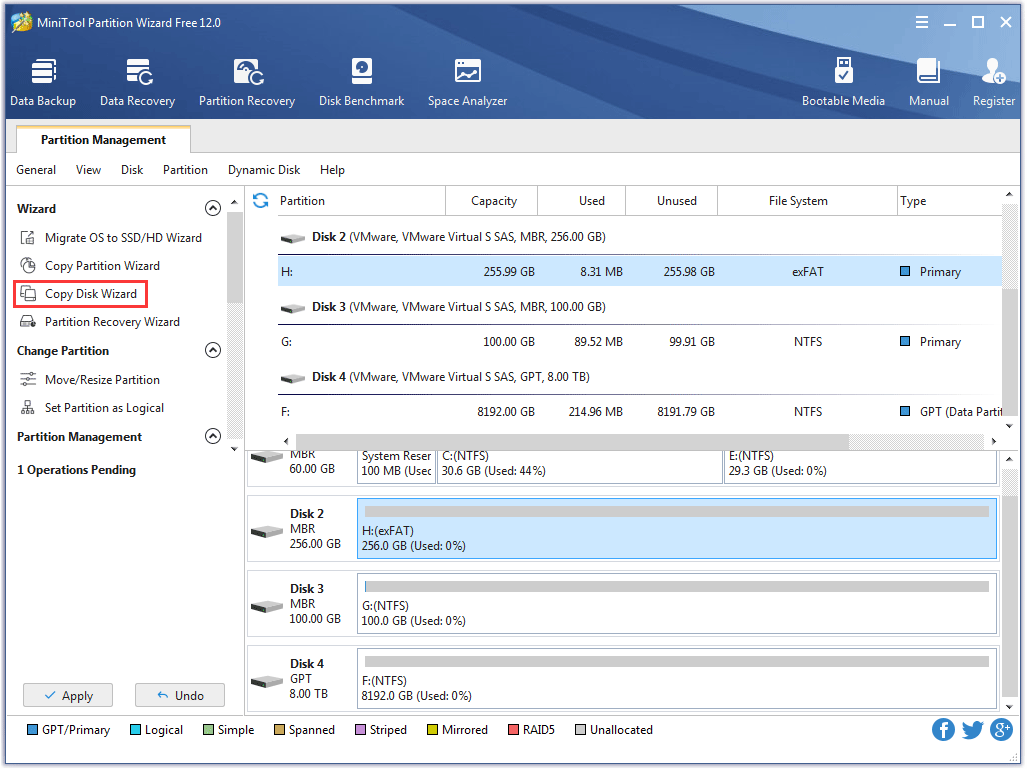
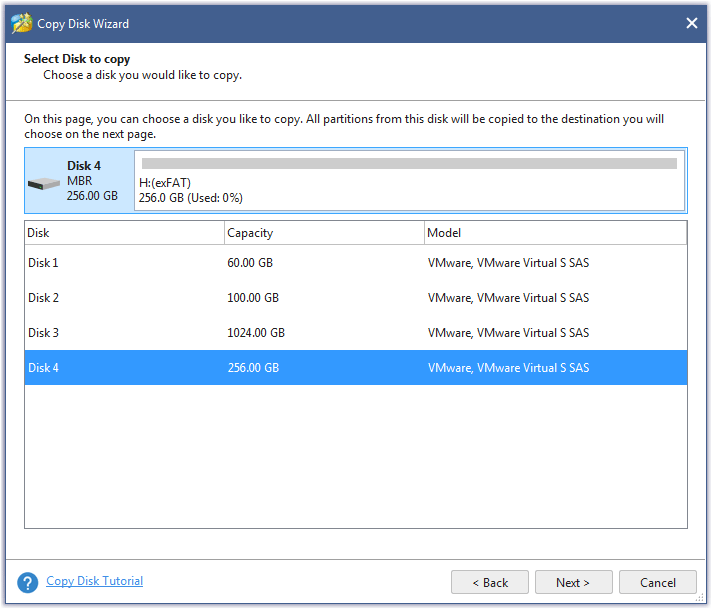
Step 4: Select the micro SD card to make it as the source disk, and then click the Next button.
Step 5: Select another disk as the target disk to save the backup, and then click the Next button.
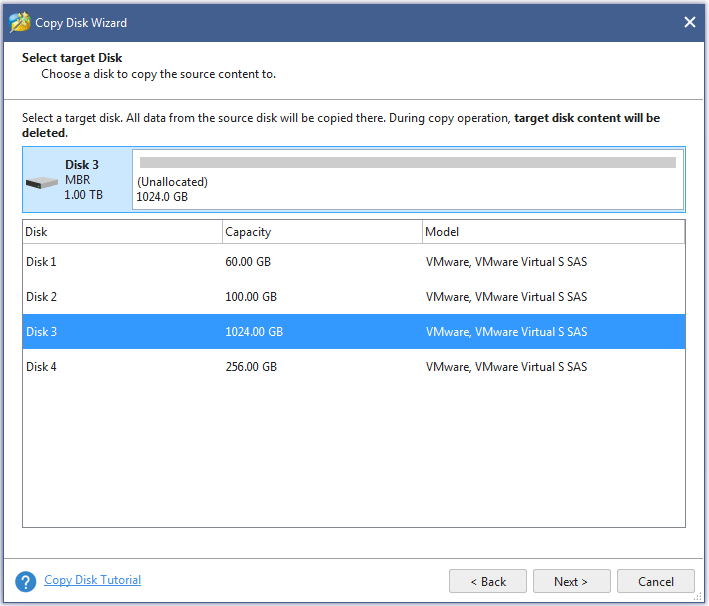
Step 6: If there is no data saved in the target disk, you can directly click the Yes button to execute the operation. Otherwise, you should make a backup for the data saved in the target disk at first.
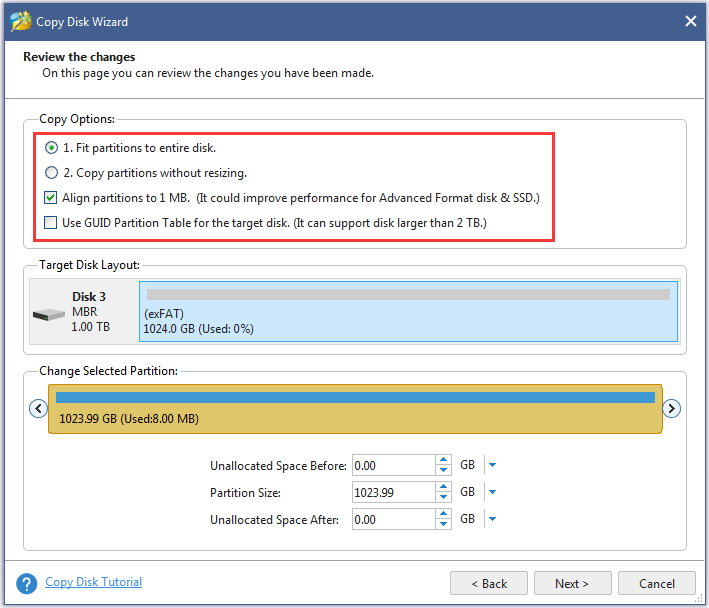
Step 7: Choose a copy method and click the Next button.
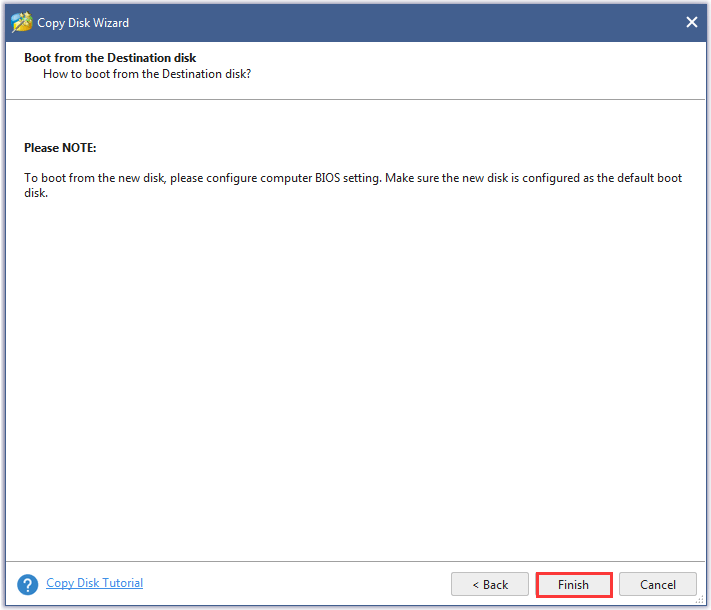
Step 8: Read the note carefully and then click the Finish button to go back to the main interface.
Step 9: Once going back to the main interface, please click the Apply button to execute all changes.
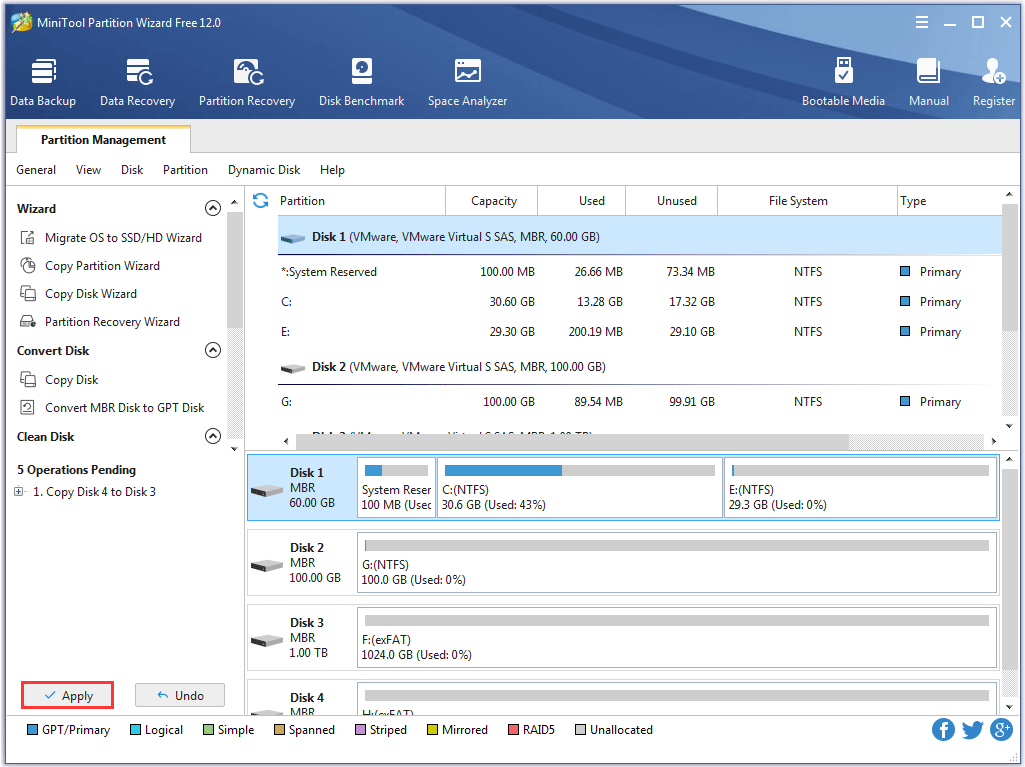
Now all the photos and videos saved in the micro SD card have been backed up. Please put the target disk in a fixed position for safekeeping.
# 3: Reformat the 256GB Micro SD Card
In everyday terms, formatting and reformatting mean the same thing, but there is a difference between these two operations. The former refers to the first time a micro SD card is formatted, while the latter refers to the subsequent times the SD card is formatted.
However, in technological terms, the two operations are slightly different. Take iem 1 for example. This formatting is to create a file system, or directory structure, to store files. However, when the micro SD card is formatted a second time, this formatting uses the same file system but deletes the data saved in the card.
There are some benefits from reformatting the micro SD card.
- Regular formatting keeps your SD card operating at peak performance and reducesthe chance of your files becoming corrupted.
- Format the SD card to restore it to its original state when you receive an error message becausethe SD card could have a corrupted file system or computer virus during the SD card usage.
Please note the following items:
- You must back up the data saved in the micro SD card before reformatting it. If you forget before formatting, you also use MiniTool Partition Wizard to restore the formatted data, because formatting only removes the reference to the files.
- By the way, you can use the Wipe Disk feature of MiniTool Partition Wizard to wipe all the data from the SD card if you want to clear
The most efficient way to format the camera SD card is with your camera. The camera’s formatting process minimizes the chance of errors.
Step 1: Make sure the camera battery is fully charged.
Step 2: Turn off the camera and insert the SD card into the proper slot.
Step 3: Turn on the camera.
Step 4: On the camera, press the Menu button.
Step 5: In the camera display, select the Setup menu and choose Format, Format Memory Card, or something similar.
Step 6: Wait for the camera to format the micro SD card. It may take a few minutes to format this card.
Step 7: When the card is formatted, turn off the camera.
Now, the micro SD card had been reformatted with your camera, and you can continue to use it to store beautiful and funny photos.
Recommended articles:
- Quickly Fix Corrupted SD Card with Professional SD Card Repair Tools;
- SDHC VS. SDXC -Which One Is Better for You?
Bottom Line
After reading, you may have mastered how to manage the 256GB micro SD card for your camera with the third-party software MiniTool Partition Wizard and your own camera. Hope you can use your camera to capture more touching moments and record your colorful life.
If you have any questions or advice for the content, please don’t hesitate to contact us via [email protected] or leave your message following this article. Thanks in advance.

User Comments :