Many users report that they failed to update to Windows 10 version 1903 via Windows Update and they received some error codes. In this post, MiniTool Solution provides some fixes for one of the error codes, 0xc190012e. You can have a try if you are bothered by the same error.
The error 0xc190012e is common to see among users who want to update their operating system to Windows 10 version 1903, and the full error message shows “Feature update to Windows 10, version 1903 – Error 0xc190012e”.
When you see this error message, don’t be anxious. Keep reading and you can find some fixes to solve the problem.
Fix 1: Run Windows Update Troubleshooter
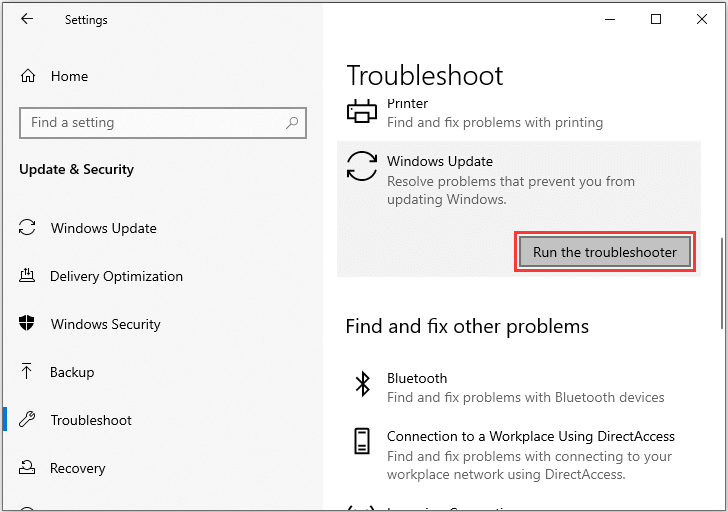
Microsoft provides a built-in troubleshooter which is designed to fix problems leading to Windows Update errors. To solve Windows Update error 0xc190012e, an easy way is to run the troubleshooter.
The steps are as follow.
Step 1: Press Win + I to open Windows Settings.
Step 2: Click Update & Security. Then select Troubleshoot in the left pane. In the right pane, choose Windows Update and click Run the troubleshooter.

Step 3: Then Windows will detect problems related to Windows Update error 0xc190012e and try to fix them. Wait patiently and follow the onscreen instructions to finish the process.
If Windows have fixed the problems, you can try to install the update again. If Windows doesn’t find any problems, you should move on to the next method.
Fix 2: Clear Temporary Files
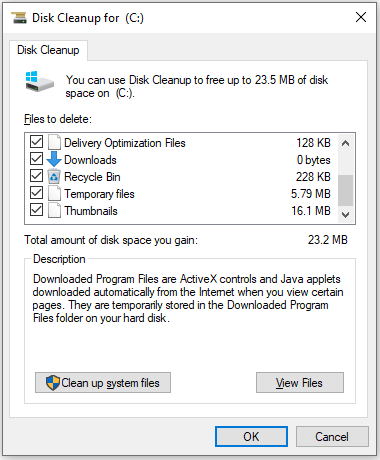
Some corrupted temporary files stored in your hard drive could lead to Windows Update error 0xc190012e. To solve the issue, you can clear them via Disk Cleanup.
Step 1: Press Win + S to open Search. Then input cleanup in the search box and click Disk Cleanup.
Step 2: In the pop-up window, select C drive and click OK.
Step 3: Check the files under Files to delete section and click OK.

Once it’s completed, you should go to Windows Update and check if error 0xc190012e has been fixed.
Fix 3: Run CHKDSK
“Feature update to Windows 10, version 1903 – Error 0xc190012e” could also happen if there are any disk errors. The built-in CHKDSK utility might be helpful the remove the issue.
Step 1: Press Win + X to open Start menu. Then select Windows PowerShell (Admin).
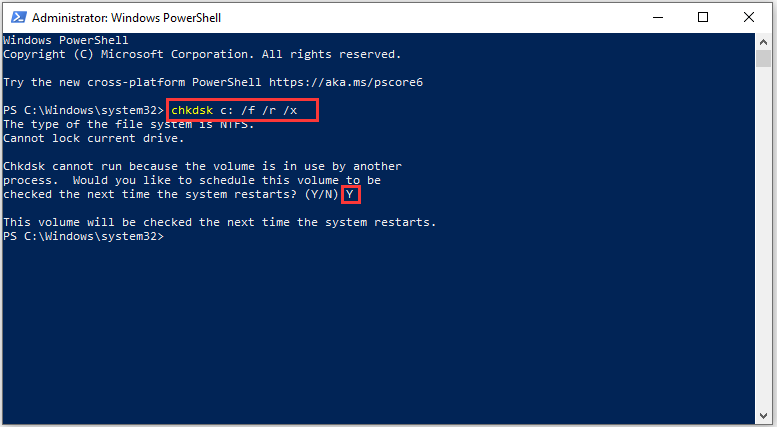
Step 2: Type chkdsk c: /f /r /x and press Enter to execute the command.
Step 3: Since C drive is being used now by the system, PowerShell will not run the command immediately and you will receive the message that asks you “Would you like to schedule this volume to be checked the next time the system restarts?” Just type Y and press Enter to perform the command later.

Then you should save all your works and restart the computer. Then Windows will check errors on your C drive and try to fix them automatically.
Fix 4: Run SFC Scan
If the Windows Update error 0xc190012e is not caused by disk errors, you need to check whether there are any corrupted or missing system files which might also lead to the error. And Windows PowerShll will be able to help you. You just need to run Windows PowerShell (Admin) with the same method in Fix 3 and then execute the command sfc /scannow.
Then Windows will detect problematic system files and repair them automatically. Restart your computer and check if your Windows Update works properly when the process is finished.
If you still receive the error code, you might need to download Windows 10 Update Assistant to install version 1903.

User Comments :