In this post, MiniTool talks about one of the Windows update error that is 0x80240fff and show you top 5 solutions to get rid of this error. This error has been bothered thousands of Windows users. If you are one of them, it is worth reading this post.
Why do you get the Windows update error 0x80240fff? The possible reasons are displayed below:
- Internet connection issues;
- Hard disk issues;
- Firewall malfunctioning;
- File corruption.
Now, let’s see how to fix 0x80240fff.
Fix 1: Run Windows Update Troubleshooter
Running Windows update troubleshooter can verify the causes behind the Windows update error 0x80240fff, including:
- the Windows Update Service running or not;
- network adapter functionality;
- the Internet connectivity of the system.
Refer to the tutorial below to fix 0x80240fff.
Step 1: Hit the Windows icon and then select Setting.
Step 2: On the Settings window, select Update & security > Troubleshoot.
Step 3: In the right pane, find Windows update and click it to choose Run the troubleshooter.
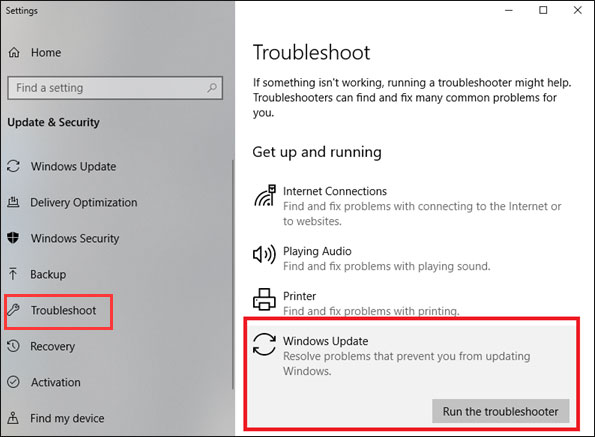
Step 4: Click Fix problems with Windows Updates under System and Security.
Fix 2: Disable Windows Firewall Temporarily
As firewall malfunctioning can also lead to 0x80240fff, you can try disabling your Windows Firewall temporarily.
Here is the tutorial.
Step 1: Type Control Panel in the Cortana’s search bar and then click the best-matched result.
Step 2: On the Control Panel window, select System and Security and then select Windows Firewall from the right pane.
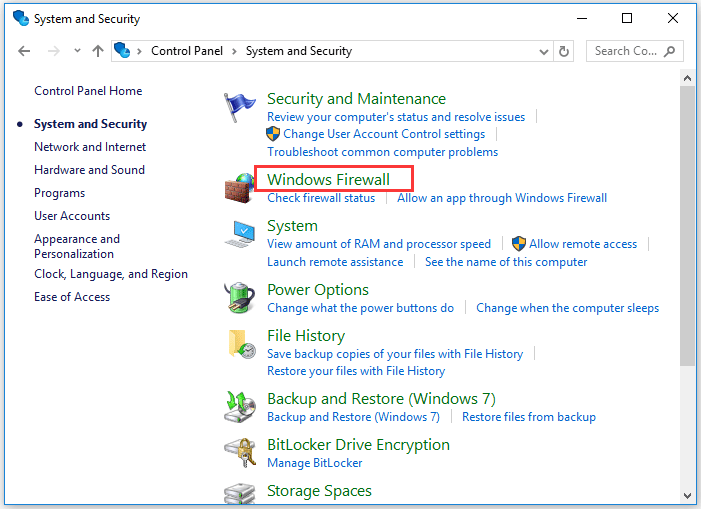
Step 4: On the Windows Firewall window, please click Turn Windows Firewall on or off option.
Step 5: Click Turn off Windows Firewall in private and public network options and then click OK to confirm the changes.
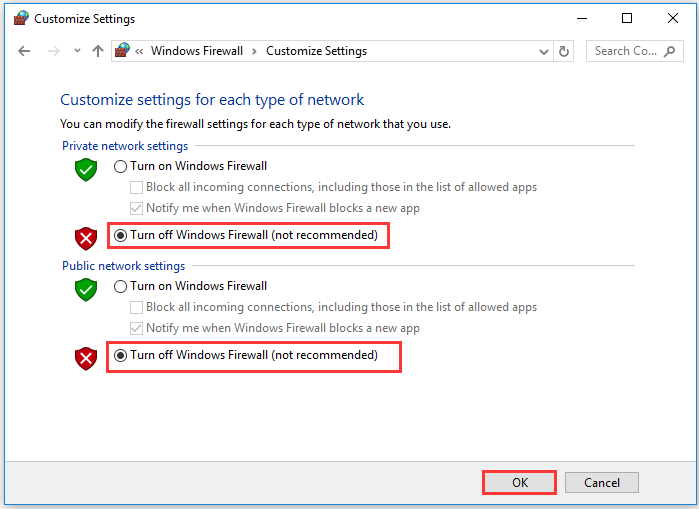
Step 6: Try to update your system and see if the Windows update error has been fixed. If yes, you should enable Windows Firewall again; if not, try the following fixes.
Fix 3: Restart the Background Intelligent Transfer Services
how to fix 0x80240fff? Alternatively, you can try restarting the Background Intelligent Transfer Services.
Here is the definition of Background Intelligent Transfer Services from Wikipedia:
Background Intelligent Transfer Services (BITS), is a part of Microsoft Windows XP and later iterations of the operating system. It is used to facilitates asynchronous, prioritized, and throttled transfer of files between machines using idle network bandwidth.
To restart the BITS to fix 0x80240fff, please follow the steps below.
Step 1: Open Services.
- Press Windows + R to call out the Run window.
- Type services.msc on the Run window and then click the OK button.
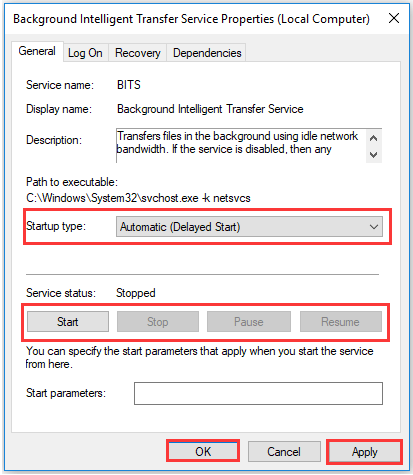
Step 2: On the Services window, find and right-click Background Transfer Services and then select Properties.
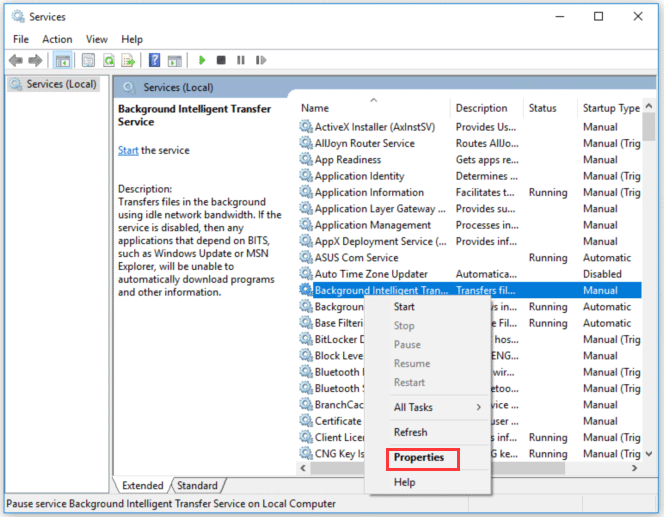
Step 3: On the Properties window, see whether the Automatic (Delay Start) option next to Startup type is selected. If not, select it. Then, see whether the Started button next to Service Status is selected. If not, select it. When the two options are both selected, hit the Apply > OK.
Fix 4: Fix File Corruption
Some type of file corruption can also lead to the error code 0x80240fff and therefore you can scan your computer and replace the corrupted file by running the sfc/scannow command.
Step 1: Type Command Prompt in the Cortana’s search bar and then right-click the best-matched result to select Run as administrator.
Step 2: Type sfc/scannow and then click the Enter key to run this command.
Step 3: When the command finishes, reboot your computer to see whether the issue has been solved.
Fix 5: Check and Fix Hard Disk Issues
The Windows update error 0x80240fff can be also ascribed to the hard disk issues. Let’s see how to fix 0x80240fff by checking and fixing hard drive issues.
Step 1: Run Command Prompt as administrator.
Step 2: On the Command Prompt window, type chkdsk #: /f/r (# refers to the drive letter of the partition you want to check and repair) and then hit the Enter key to run this command.
Step 3: When the process finishes, restart your computer to see whether the error has been solved.
Apart from this Windows Update error, there is a common one 0xc1900107. If you want to check the solutions to this error, please click Receive Windows Update Error code 0xc1900107 – What to Do.

User Comments :