Some users reported that they ran into Windows 10 error code 0x80072746 when trying to sync Gmail in email app. Are you also bothered by the same error code? If yes, please read the MiniTool’s post from and you will get 4 solutions.
Error Code 0x80072746
The error 0x80072746 is usually encountered in the Windows Mail app when users try syncing the application to see the new e-mails. Along with this error code, a message that users also receive is that “We’re having a problem downloading messages. Make sure you have a connection and your account info is incorrect, and then try again”.
This error indicates that an existing connection was forced to be closed by the remote host. Now, let’s see the 4 tutorials on fixing 0c80072746.
Fix 1: Manually Set up Your Account
The first case for 0x80072746 showing up is that users use a less popular email client (like GoDaddy, and TalkTalk). The reason is that Windows client is unable to manage these settings properly. Thus, it is wise to check the manual settings for POP & IMAP and configure on Windows Mail client by following the steps below.
Step 1: Type Windows Mail in the Cortana’s search bar and then chose the best-matched search result.
Step 2: Once accessing the Windows Mail interface, please click the Settings icon and then choose Manage accounts.
Step 3: On the Manage accounts tab, please click the e-mail account causing 0x80072746 and then click Change Settings.
Step 4: In Account Settings, click Remove this account from your device under Delete account and hit the Delete button to confirm.
Step 5: Once the account has been removed successfully, you should go to the email provider and copy the manual for IMAP. If IMAP is unavailable, please select POP3.
Step 6: Return to Windows Mail client, click Settings again and then select Manage accounts again to get Add account.
Step 7: In the Add an account window, please scroll down the page until you find Advanced Setup and click it.
Step 8: Select Internet email to add your credentials and manual settings for IMAP which you got from your email provider and apply settings.
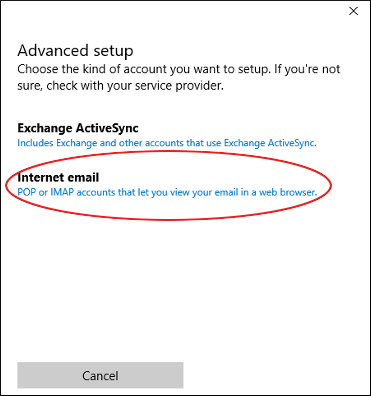
Step 9: Click Sign In button to see if the mail error code 0x80072746 occurs again.
If you are stuck on this error, please try the following fixes.
Fix 2: Configure Svchost.exe in Windows Firewall
The second fix to the error code is configuring the svchost.exe application in Windows Firewall.
The tutorial is below:
Step 1: Type Windows Firewall in the Cortana’s search bar and then select the best-matched search result.
Step 2: On the Windows Firewall window, please select Allow an app or feature Windows Defender Firewall from the left pane.
Step 3: Select the Change Settings button and the Allow another app… button on the next window. Then click the Browse button to add the svchost.exe application.
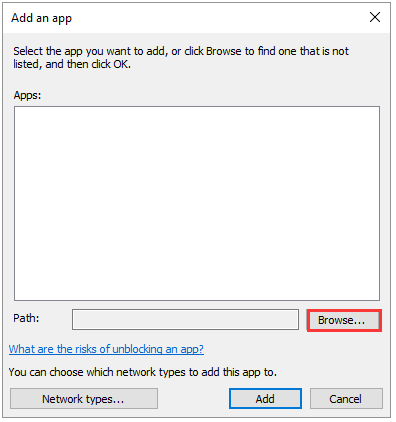
Step 4: Navigate to C:Windowssystem32 and find svchost.exe from the list. After that, click the Add button and OK button to add this application successfully.
Step 5: After adding, you should go to Windows Mail client to see if the error code 0x80072746 has been solved.
Fix 3: Modify VPN Settings
According to some users’ reports, modifying VPN settings can fix the Mail error code 0x80072746. Therefore, have this fix try.
Step 1: Hit the Windows key on the keyboard and select the Settings icon.
Step 2: Select the Network & Internet option and then click VPN from the left pane.
Step 3: In the VPN section, please check if the toggle of the Allow VPN over metered network is on. If not, please turn it on.
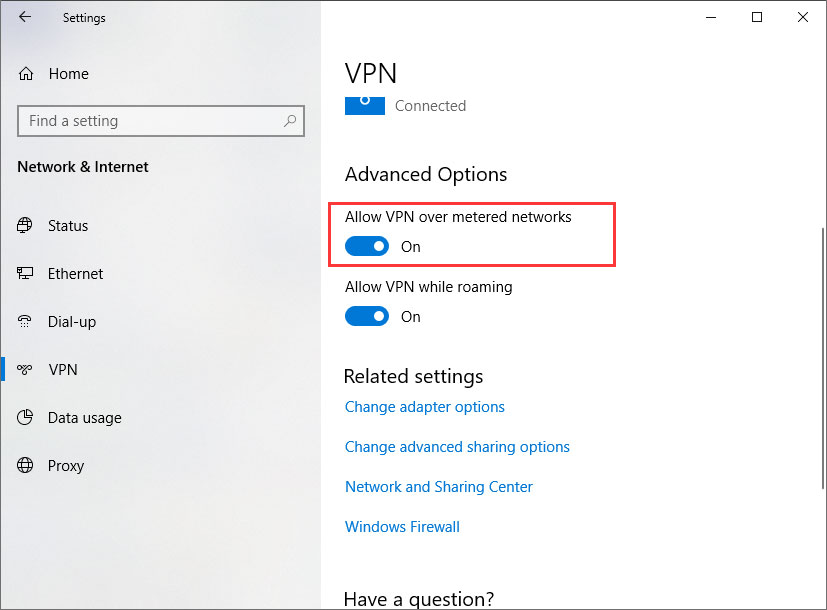
Step 4: Now you should move to Change adapter options under Related Settings.
Step 5: Right-click the LAN (Wi-Fi) connectivity and select Properties.
Step 6: Under the Networking tab, please check Internet Protocol Version 6 (TCP/IPv6) and then select OK to save the changes.
Step 7: Close all apps and see if you are able to access emails without any interruption.
Fix 4: Disable and Re-enable Windows Firewall
Sometimes, it is helpful to fix this error code by temporarily disabling Windows Firewall and then deleting and re-adding the problematic account. Absolutely, after that, you should re-enable Windows Firewall.
Step 1: Disable Windows Firewall.
Step 2: Delete and re-add the problematic account (Repeat Step 1 – Step 7 and then follow the on-screen instructions).
Step 3: Enable Windows Firewall:
- Press the Windows key and the R key at the same time to call out the Run window.
- Type wf.msc in the Run window and then hit the OK key to launch Windows Firewall with Advanced Security.
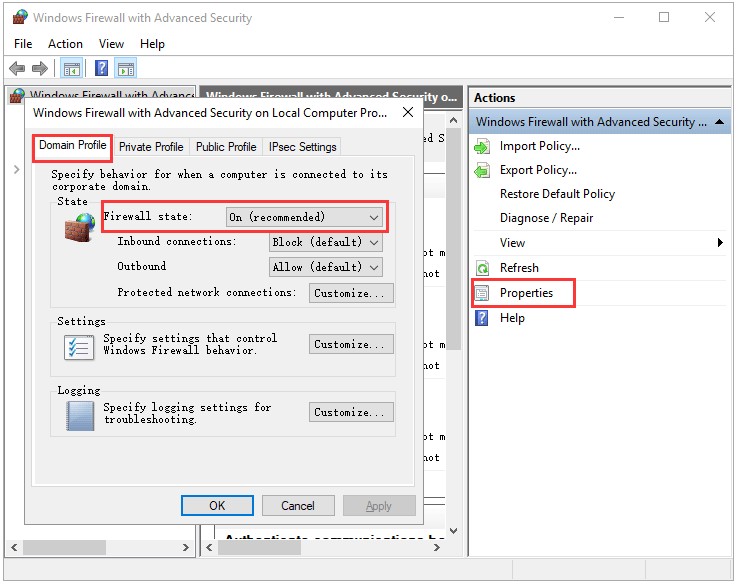
- In the new window, please select Properties in the right pane.
- Move to the Domain Profile tab and switch Firewall state to on. Then hit Apply and OK button to confirm the changes.
- Reboot your computer.


![10 Reasons and 10 Fixes for Computer Running Slow [New Updated]](https://images.minitool.com/partitionwizard.com/images/uploads/2019/08/my-computer-runs-slow-thumbnail.jpg)
User Comments :