What Is Error 0x80070013?
The error code 0x80070013 is a common Windows 10 write error that may trouble you a lot. It always happens when you are attempting to update your Windows PC, perform a Windows backup or system restore in your Windows 10.
The error 0x80070013 can occur due to various factors, such as virus attacks, corrupted or missing system files, hardware failure, etc. Once the error comes out, you cannot finish what you want to do. So, it’s important to solve this annoying error.
If you have no idea how to fix the error 0x80070013, you can try these solutions provided in the following content.
How to Fix Windows 10 Update Error 0x80070013?
What can you do if you run into the error code 0x80070013 while installing Windows updates? There are several feasible methods you can try.
Method 1: Run the Windows Update Troubleshooter
The Window Update troubleshooter is a useful built-in tool on your Windows PC that can help you solve almost all the Windows update issues. Therefore, you can run this troubleshooter when you encounter the Windows 10 update error 0x80070013.
Step 1: Press Windows + I to open Windows Settings and then select Update & Security.
Step 2: Go to Troubleshoot. Then click Additional troubleshooters from the right side.
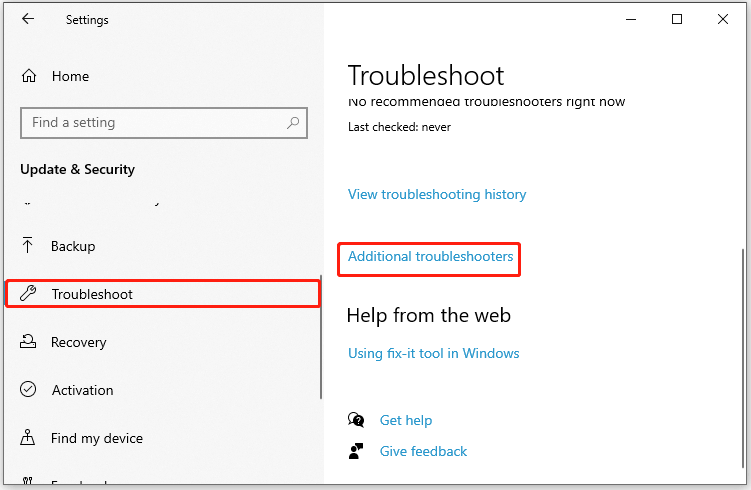
Step 3: Find and click Windows Update in the next window and then click Run the troubleshooter.
Step 4: After that, the Windows Update troubleshooter will detect problems related to Windows updates. If any issues are found, you need to follow the on-screen instructions to solve them.
After the troubleshooter finishes working, restart your computer and retry the update to see if the error is repaired.
Method 2: Enable the Windows Update Service
Sometimes, the Windows 10 update error 0x80070013 may also occur if the Windows Update service on your computer is not running. So, to fix the error, enabling the specific service is worth trying. And the detailed steps of this way are as below.
Step 1: Press Windows + R to open the Run dialog.
Step 2: Type services.msc in the text box and then press Enter.
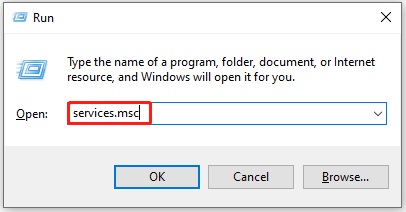
Step 3: After you enter the Services window, scroll down to find Windows Update. Then right-click it and select Start to enable this service.
If the Windows Update service has already been enabled. You can select Restart to re-enable it.
Once done, restart your computer and try updating your Windows 10 again to check if the error disappears.
To solve the Windows 10 update error 0x80070013, there are additional two ways you can try:
How to Fix Windows 10 Backup Error 0x80070013?
The error code 0x80070013 may show up as well when you are attempting to make a backup on your Windows 10. Once you encounter the error, you can try the following methods to fix it.
Method 1: Check Windows Backup Service
If the Windows Backup service is disabled, you may meet the Windows backup error code 0x80070013. Therefore, it’s recommended to check the service’s status when the error appears.
Step 1: Get into Services, and then scroll down to find and double-click the Windows Backup service.
Step 2: After that, the Windows Backup Properties window will pop up. Set the Startup type as Automatic (Delayed Start).
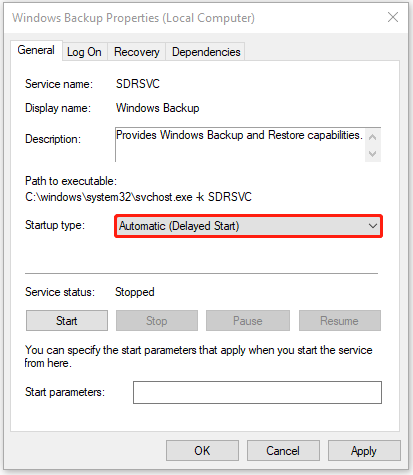
Step 3: Finally, click Apply and OK to save the changes.
After the operation is completed, restart your computer and check if the error is fixed.
Method 2: Change the Drive’s Attribute
Another way you can try to get rid of the Windows backup error code 0x80070013 is to remove the drive’s read-only attribute.
Step 1: Press Windows + R to open the Run dialog.
Step 2: Type cmd in the box and then press Ctrl + Shift + Enter to open elevated Command Prompt.
Step 3: In the Command Prompt panel, type the following commands and then press Enter after each one.
- diskpart
- list disk
- select disk N (N refers to the number of the target disk)
- attributes disk clear readonly (this command can disable write protection)
After that, restart your computer and try the backup again. The error might be solved.
Method 3: Check the Drive for Errors
In some cases, the Windows 10 backup error 0x80070013 may also show up if there are some unknown errors on your disk. Therefore, when you meet the error, it’s recommended to check for disk errors.
To check the hard drive, you can try a piece of third-party software – MiniTool Partition Wizard. It is an excellent partition manager that enables you to perform various operations on your disk. For example, you can check your disk health, create/format/resize partition, convert to NTFS/FAT, and so on.
How to check drive errors with MiniTool Partition Wizard? Follow the steps below, please.
Check File System
The Check File System feature can help you check and fix the corrupted file system of your hard drive.
Step 1: Download and install MiniTool Partition Wizard. Then launch it to enter its main interface.
MiniTool Partition Wizard FreeClick to Download100%Clean & Safe
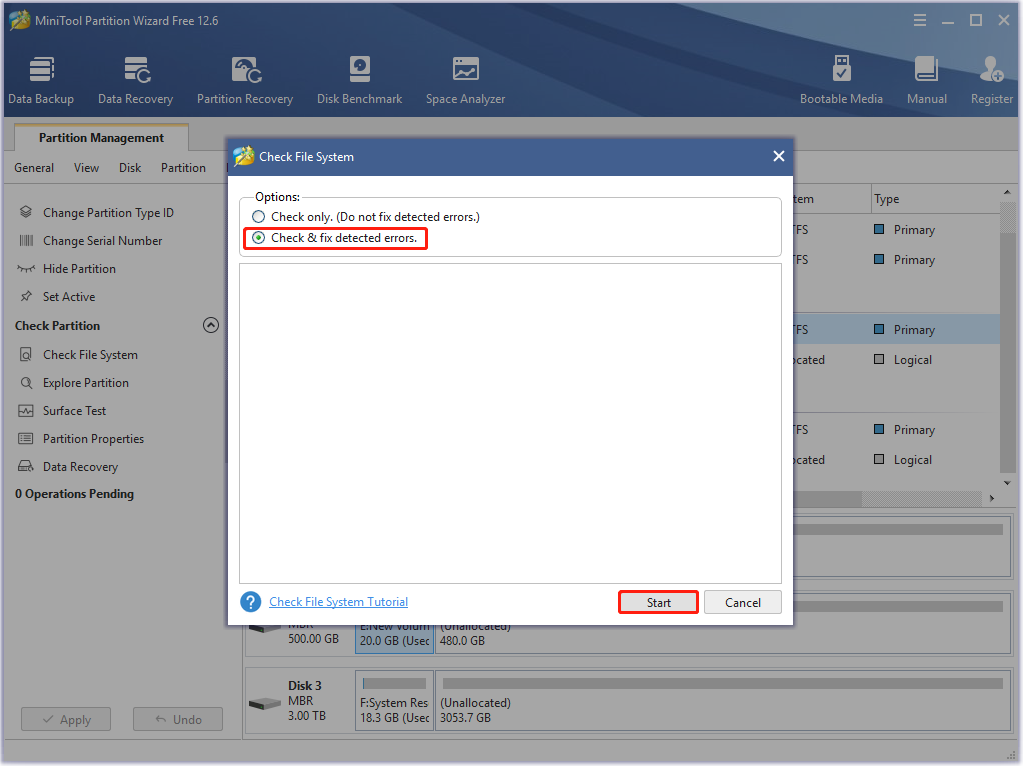
Step 2: Locate the target partition and then select Check File System from the left action panel.
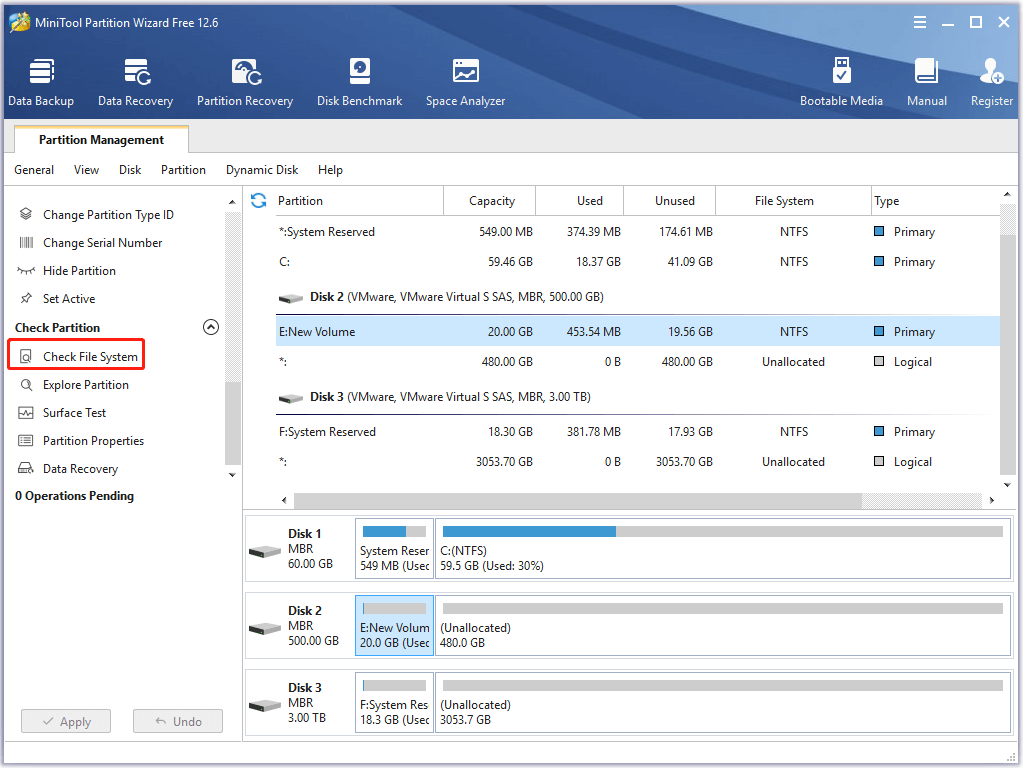
Step 3: In the pop-up window, select the Check & fix detected errors option and click Start to begin the scan.
Surface Test
In this way, you can find out if there are bad sectors on your hard drive.
Step 1: Launch MiniTool Partition Wizard to enter its main interface.
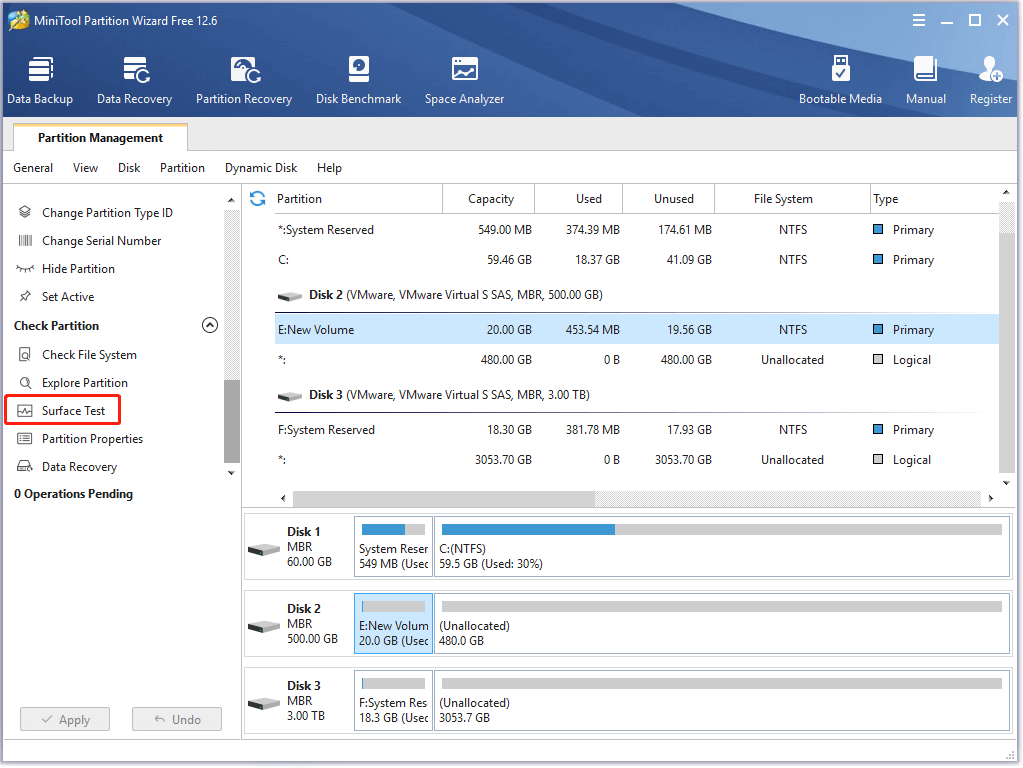
Step 2: Select the target partition and then choose Surface Test from the action panel.
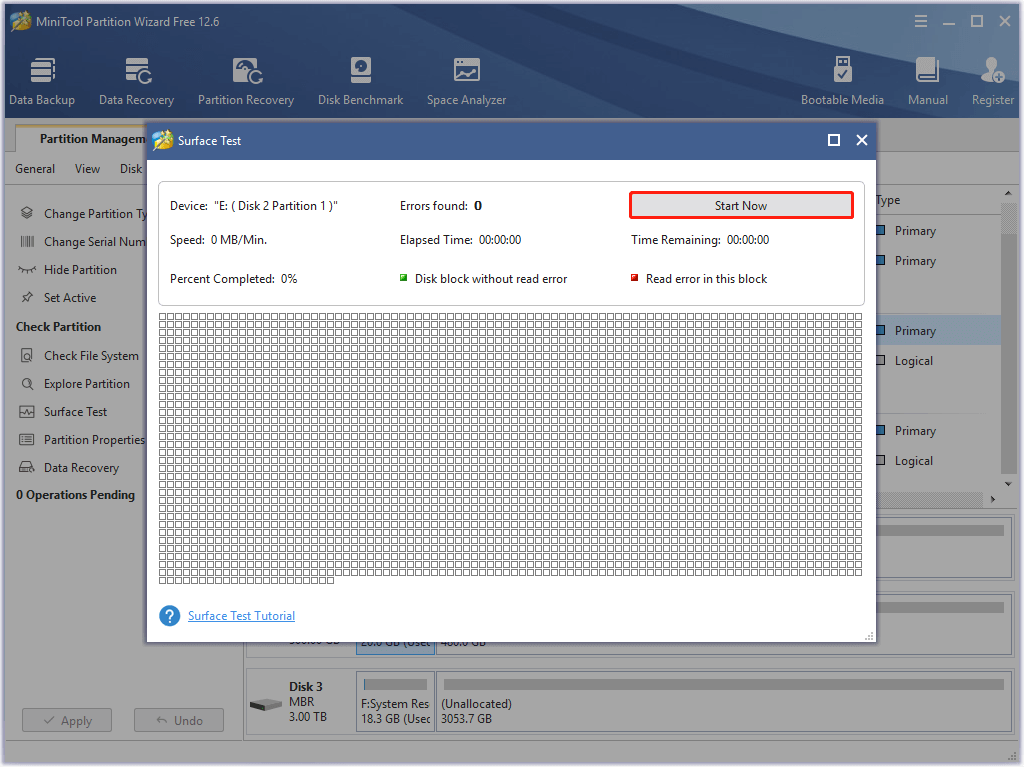
Step 3: Click Start Now to scan your drive for bad sectors. If any bad sectors are found on the drive, they will be marked with red color.
This article can help you deal with bad sectors on the hard drive.
Once you repair disk errors, the backup error might be fixed as well.
Method 4: Reformat the Drive
When it comes to solutions to the Windows 10 backup error 0x80070013, formatting the hard drive is worth trying.
To do this, there are several possible ways.
You’d better back up important files on the hard drive first to avoid data loss.
Way 1: Use File Explorer
You can attempt to format the hard drive in File Explorer.
Step 1: Press Windows + E to open File Explorer.
Step 2: Click This PC from the left side. Then right-click the target drive and select Format.
Step 3: In the pop-up window, select a file system from the drop-down options and then check Quick Format.
Step 4: Finally, click Start to execute the operation.
Way 2: Use Disk Management
Disk Management is a Windows built-in utility that provides some basic features to help you manage your partitions and disks. For instance, you can create/delete/format partitions, change drive letter, etc.
The following are detailed steps for formatting your hard drive using Disk Management.
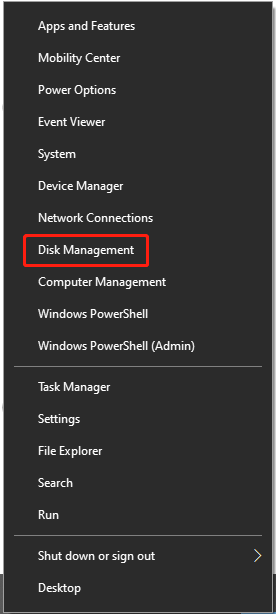
Step 1: Right-click the Start icon on your desktop and select Disk Management.
Step 2: In Disk Management, right-click the target partition and select Format.
Step 3: In the pop-up window, set the file system and check Perform a quick format.
Step 4: Finally, click OK to carry out the format operation.
Way 3: Use MiniTool Partition Wizard
If the target drive is larger than 32GB, it cannot be formatted to FAT32 by File Explorer or Disk Management. In this case, we recommend you use MiniTool Partition Wizard which breaks through the limitation.
Step 1: Launch MiniTool Partition Wizard to get into its main interface.
MiniTool Partition Wizard FreeClick to Download100%Clean & Safe
Step 2: Right-click the target partition and then select Format.
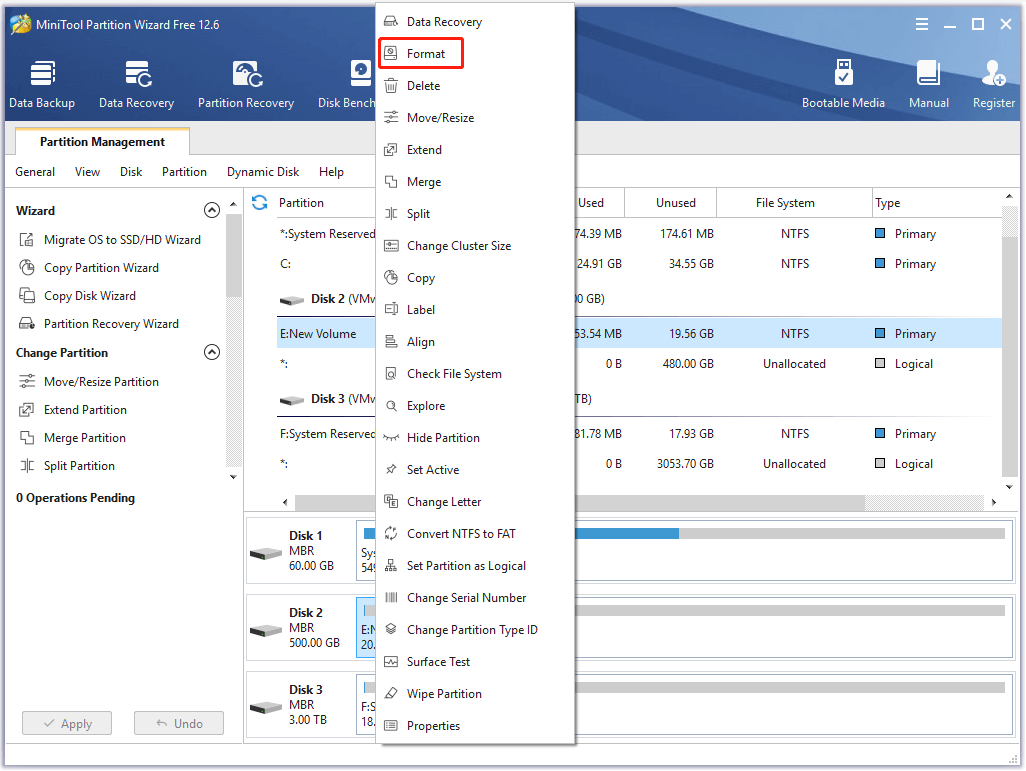
Step 3: Choose the file system you prefer and then click OK.
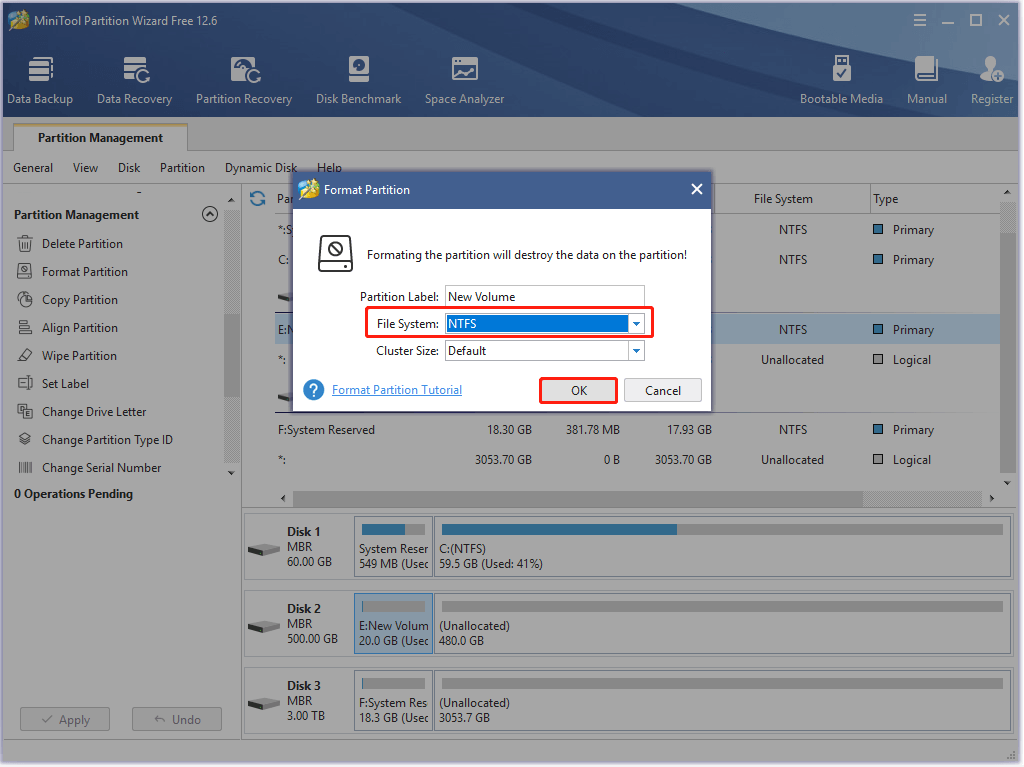
Step 4: Finally, click Apply to execute the operation.
After formatting the hard drive, you may remove the error successfully.
How to Fix System Restore Error 0x80070013?
While performing a system restore on your Windows 10, you might also be bothered by the error 0x80070013.
How to resolve the Windows 10 system restore error 0x80070013? Here are two feasible methods.
Method 1: Run SFC and DISM Scans
The error 0x80070013 can be caused by corrupted or missing system files on your hard drive. On this occasion, you ought to run the SFC (System File Checker) and DISM (Deployment Image Servicing and Management) utilities to repair the error.
Step 1: Open Command Prompt as an administrator.
Step 2: Type sfc /scannow in the Command Prompt panel and then press Enter to execute the scan.
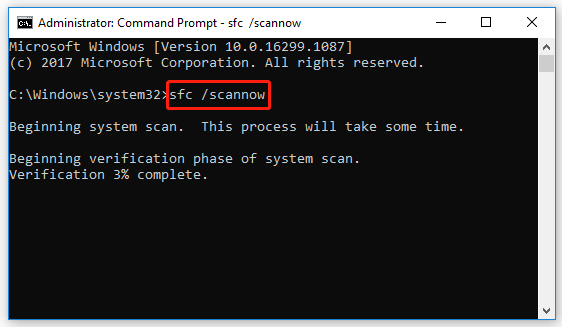
Step 3: After the scan completes, restart your computer and run Command Prompt as an administrator again.
Step 4: Type the following commands and press Enter after each to carry out them.
- DISM /Online /Cleanup-Image /CheckHealth
- DISM /Online /Cleanup-Image /ScanHealth
- DISM /Online /Cleanup-Image /RestoreHealth
Once the DISM scan finishes, restart your computer to see if the error is fixed.
Method 2: Use CHKDSK Utility
Another way to repair the Windows 10 system restore error 0x80070013 is to run CHKDSK. In this way, you can fix lots of disk errors on your hard drive
Step 1: Open Command Prompt as an administrator.
Step 2: In the Command Prompt panel, type chkdsk *: /f /r /x /b (* is the drive letter of the target disk) and then press Enter.
Step 3: Wait until the process is completed. Then restart your Windows PC to check if the error is solved.
Bottom Line
This post lists several solutions to the error 0x80070013 under different conditions. If you are facing the error, you can try specific methods according to your needs. If you have any other good solutions to this error, you can share them with us in the following comment part.
If you meet certain issues while using MiniTool Partition Wizard, you can contact us via [email protected].

User Comments :