For some reason, you may need to wipe SSD from BIOS. It seems difficult for many people. If you are also bothered by it, read this post by Partition Magic. It provides two methods to wipe an SSD from BIOS.
Why Need to Wipe SSD from BIOS?
Generally, you can delete data by wiping the hard drive while running the computer. However, if you are trying to erase the system drive, you will need to erase it from the BIOS because you cannot do this while the drive is in use.
You will also need to erase the SSD from the BIOS when your operating system is faulty, damaged, and cannot boot.
Before starting this process, if you have any important data, it is best to back it up first. Otherwise, you will face data loss.
How to Wipe SSD from BIOS?
How to wipe SSD from BIOS? In this section, we introduce two methods to wipe an SSD from BIOS. You can choose one way according to your needs.
Way 1. Use the Secure Erase Tool (HP&ASUS)
If your PC is an HP or ASUS PC, you can wipe an SSD using HP Secure Erase or ASUS Secure Erase. Here is the guide:
# How to use HP Secure Erase:
- Turn on your HP computer.
- After the HP logo appears on the screen, repeatedly press the BIOS key (F10, Esc, F2, or F6). This will open the HP firmware.
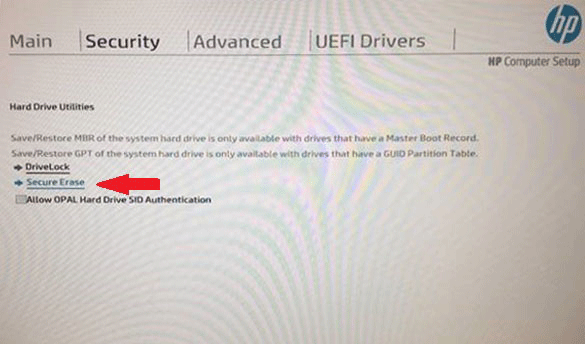
- Click Security. Then click Hard Drive Utilities, Utilities, or Hard Drive Tools.
- Select Secure Erase or Disk Cleaner to open the tool.
- Select the SSD from the listed storage devices.
- You will be warned that this will delete all data on the hard drive. Confirm the action and click Continue.
# How to use ASUS Secure Erase:
- Turn on your ASUS computer and press the BIOS key (F2, Delete, or F9) when you see the ASUS logo appear on the screen. This will open the ASUS firmware.
- Go to Advanced > SATA Configuration and make sure the SATA mode is set to AHCI. This is because ASUS Secure Erase is only available in AHCI mode. If the SATA mode is already AHCI, you can skip to step 3. If not, you need to change the SATA mode to AHCI, save the changes, and then exit the firmware. Then, restart the PC and enter the firmware again.
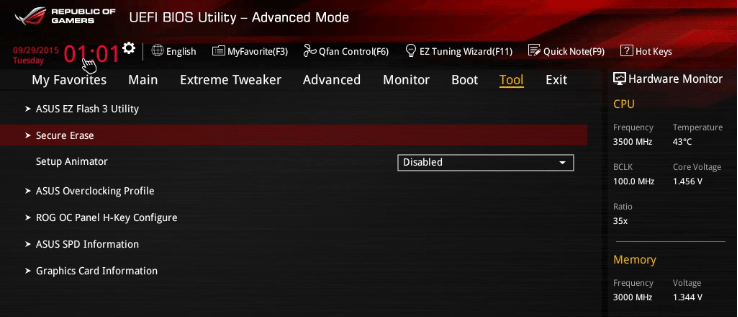
- In the Advanced Mode menu, go to Tools > ASUS Secure Erase. Then, the installed SSDs (SATA and NVME SSDs) will be displayed in the interface. Select the SSD you want to erase and follow the wizard to securely erase the drive.
Way 2. Use MiniTool Partition Wizard
HP Secure Erase and ASUS Secure Erase may only work on certain hard drives. Here is an ASUS Secure Erase compatible SSDs list. If your hard drive is not on the list, I recommend you use MiniTool Partition Wizard for secure erasure.
Of course, if your PC is not equipped with a secure erase function, MiniTool Partition Wizard can also help you. Here is the guide:
To wipe an SSD from BIOS with this software, you should create a bootable media and then boot the PC with it. After that, follow these steps to wipe SSD from BIOS.
MiniTool Partition Wizard DemoClick to Download100%Clean & Safe
Step 1: Make a bootable USB drive on a working computer.
- Insert a USB flash drive into another working PC.
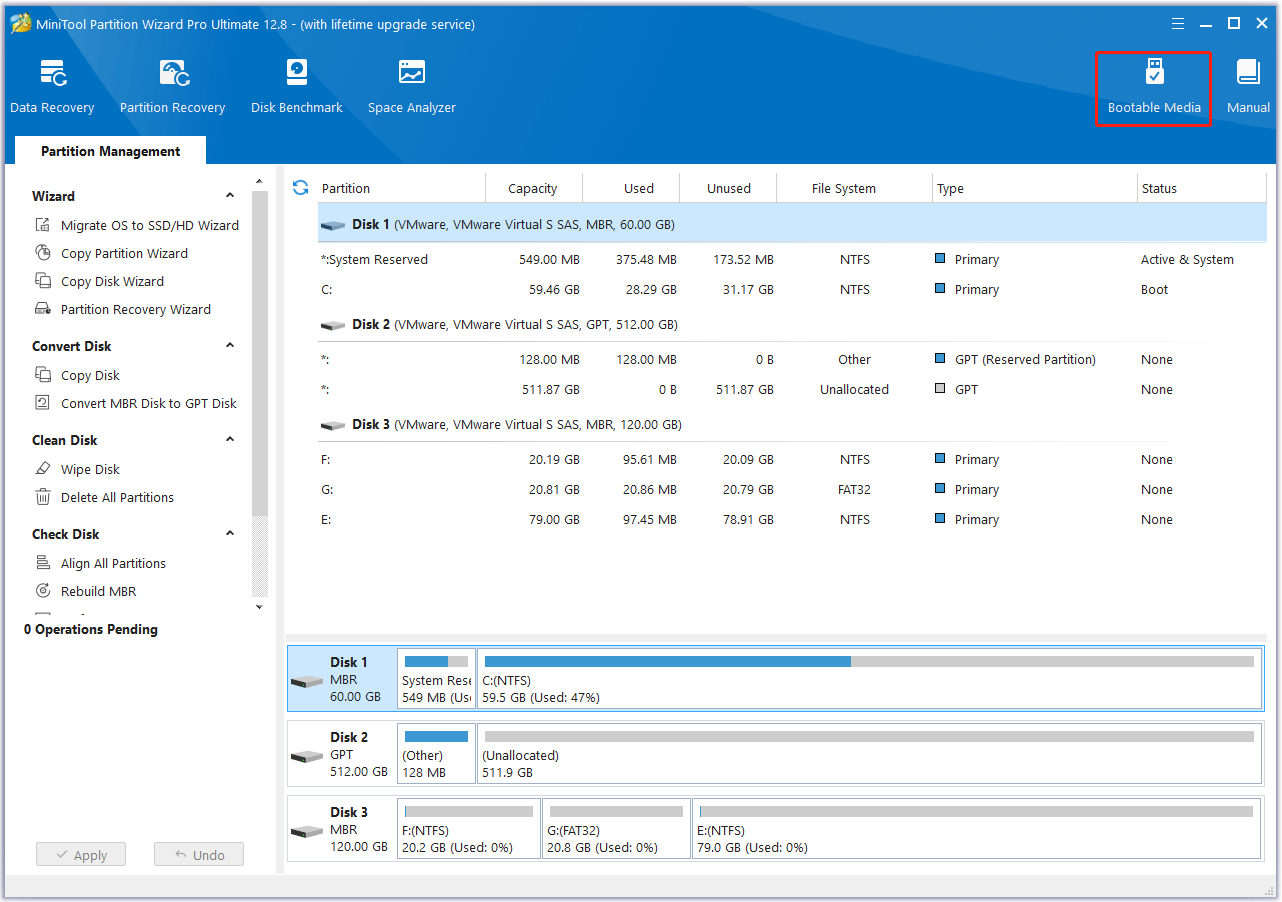
- Launch MiniTool Partition Wizard and click Bootable Media.
- In the pop-up window, click WinPE-based media with MiniTool plug-in.
- Click the USB Flash Disk. You will be warned that the data on the USB disk will be destroyed. Click Yes and then MiniTool Partition Wizard will start to create a bootable drive.
Step 2: Boot your PC from the bootable USB drive.
- Connect the bootable USB drive to your dead computer. Then set the computer to enter BIOS.
- Set the bootable USB drive as the first boot drive with the on-screen instructions.
- Once done, press F10 and Enter to save the changes and exit the BIOS screen. Your computer will restart automatically with a new boot order and enter the main interface of MiniTool Partition Wizard after a while.
Step 3: Wipe an SSD.
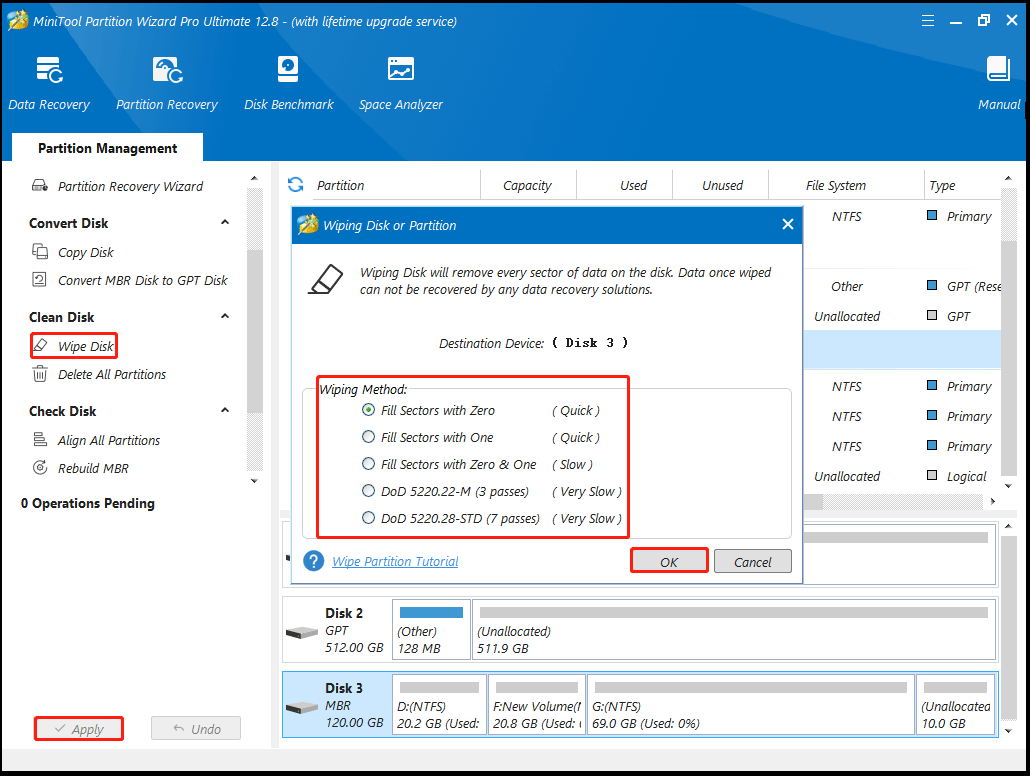
- In the main interface, select the target SSD and then select Wipe Disk from the left action panel.
- On the pop-up window, select a wiping method. Then, click OK.
- Click Apply to execute the pending operation.
Bottom Line
This article describes two methods on how to wipe SSD from BIOS. You can choose one way if you have this need.



User Comments :