Windows update is very important as it can fix some system bugs, provide some security improvements, and help your device run efficiently and stay protected. However, some people report that they encounter the error code 0x8024d001 when they update their Windows.
Have you also encountered the same error? Do you know how to fix it? Don’t worry. This post provides several useful fixes to solve the error.
Fix 1. Run the Windows Update Troubleshooter
There is a built-in update troubleshooter on Windows OS that can help you fix many basic update-related errors. So, you can try using the troubleshooter to fix the Windows update error 0x8024d001 if restarting your PC is unable to fix the error. Here’s the tutorial:
- Press the Win + S to open the Search window.
- Type “troubleshoot” and select Troubleshoot settings from the results.
- Click the Additional troubleshooters link.
- Select Windows Update and click Run the troubleshooter.
Fix 2. Delete the SoftwareDistribution Folder
Deleting the files in the SoftwareDistribution folder can refresh the Windows update process. So, you can also try deleting the Software Distribution folder to fix the Windows update error 0x8024d001. Here’s the guide:
Step 1. Press the Win + E keys to open the File Explorer window.
Step 2. Then, navigate to this path: C:\Windows\SoftwareDistribution\Download.
Step 3. Select all the files in this folder and click the Delete option in the Home tab.
Step 4. Once done, restart your PC and check if the error has been resolved.
Fix 3. Restart the Windows Update-Related Services
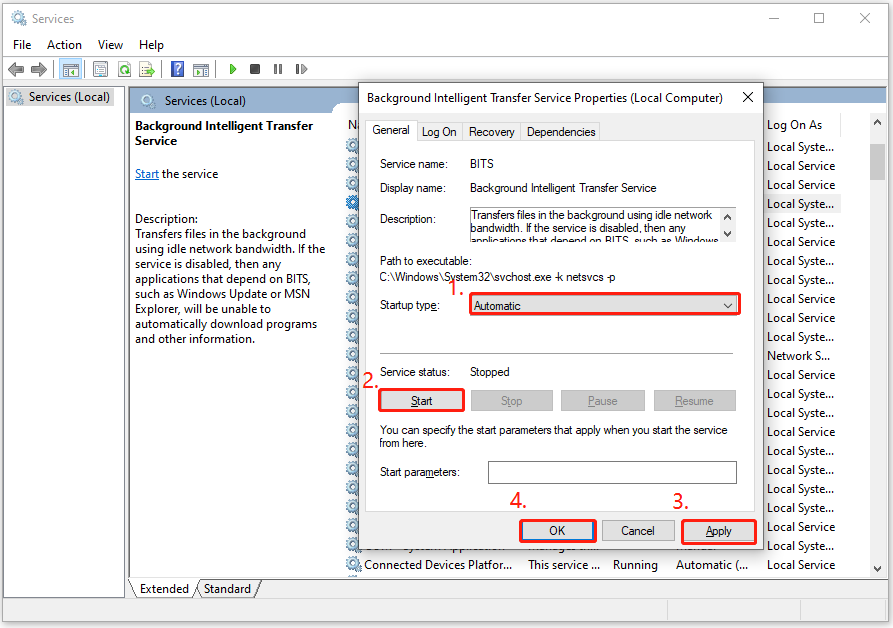
Windows update-related services play an important role in Windows updates. So, if the Windows update-related services aren’t running well, you can also encounter update errors like the Windows update error 0x8024d001. Here’s how to restart them:
- Open the Run window, type “services.msc”, and then press Enter.
- In the Services window, double-click Windows Update from the list.
- From the Startup type field, select Automatic from its drop-down menu.
- Go to the “Service status” and click on Start.
- Then, click Apply and OK to save the changes.
- Next, do the same operations with Background Intelligent service.
- Once done, restart your PC and check if you fixed the Windows update error 0x8024d001 successfully.

Fix 4. Run SFC and DISM
Corrupted system files can also result in the Windows update error 0x8024d001. In this case, you can try running SFC and DISM to fix the error. Here’s the way:
Step 1. Press the Win + S keys simultaneously to open the Search window. Type “cmd” in the search box, right-click Command Prompt under Best Match, and then select Run as administrator.
Step 2. In the elevated Command Prompt window, type “sfc /scannow” and press Enter.
Step 3. Once the process is complete, restart your PC and check if the error has been resolved. If not, pro If not, proceed by initiating a DISM scan. Here are the DISM commands:
- DISM.exe /Online /Cleanup-image /Scanhealth
- DISM.exe /Online /Cleanup-image /Checkhealth
- DISM.exe /Online /Cleanup-image /Restorehealth
Fix 5. Reset the Windows Update Components
If there is anything wrong with the Windows update components, you can also encounter the error code 0x8024d001 when updating Windows. So, you can try resetting Windows Update Components to fix the error. Here’s the guide: How to Reset Windows Update Components in Windows 11/10?
Fix 6. Update Windows Manually
Some people report that they fixed the Windows update error 0x8024d001 successfully by updating Windows manually. You can also have a try. To do that, you need to navigate to the Microsoft Update Catalog website, search for the number or name of the updates you need in the search box, download them, and then run the downloaded file and follow the on-screen instructions to complete the installation process.
Fix 7. Try Clean Boot
If you suspect the error code 0x8024d001 you encounter when updating Windows is caused by some background programs or apps, you can try running a clean boot to find out the culprit. To run the clean boot, you can refer to these posts:
- How to Clean Boot Windows 10 and Why You Need to Do So?
- How To Perform A Clean Boot On Your Windows 11 PC
Fix 8. Perform an In-Place Upgrade
If none of the above solutions can help you fix the Windows update error 0x8024d001, you can try performing In-Place Upgrade to fix the error.
Further Reading:
If you forget to select the Keep personal files and apps option when you perform the in-place upgrade, you can run the MiniTool Partition Wizard to help you get back the data. It provides the Data Recovery feature to help you recover lost/deleted data with ease.
In addition, this multifunctional tool can also help you format SD card FAT32, convert MBR to GPT, recover data from hard drive, migrate OS to SSD without reinstalling OS, and so on.
MiniTool Partition Wizard DemoClick to Download100%Clean & Safe
Have A Try Now
Here comes the end of the post. Now, you may already know how to fix the Windows update error 0x8024d001. Try these fixes mentioned above to get rid of the error on your own.

User Comments :