Sometimes, when you are trying to install Windows 10, after the installation files are loaded from the bootable drive, you may fail and receive an error message: Windows Setup could not install one or more boot-critical drivers. To install Windows make sure that drivers are valid, and restart the installation.
What you should do if Windows Setup could not install boot-critical drivers? Don’t worry. Read the following methods to resolve this issue.
![[4 Ways] How to Fix Blue Screen After Installing Wi-Fi Card?](https://images.minitool.com/partitionwizard.com/images/uploads/2024/08/blue-screen-after-installing-wifi-card-thumbnail.png)
Method 1. Remove the Disk from the DVD/CD-ROM
The first way to fix this error is to remove the CD or DVD from the ROM. The conflict between the two media drives mainly concerns the disk with the drivers in the DVD-ROM compartment. But other disks can also cause the same error.
To do this, remove the disk from the DVD/CD-ROM. Restart your PC. Try to boot with USB again and see if there is a change.
On the other hand, if this does not solve your problem and you still see the same error when booting with USB, you need to take other steps. Remember that these require access to the hardware configuration, so you need to take the following steps:
Open the PC case. Unplug the DVD-ROM completely. Also, if you use multiple HDD/SSD drives, insert only the drive where Windows 10 is installed. Unplug all peripherals. Only bootable USB drives should be plugged in.
Method 2. Make a New Windows Installation USB Drive
Sometimes, Windows Setup could not install one or more boot-critical drivers due to corrupted files. To fix this, you can use Windows Media Creation Tool to remake the Windows installation USB drive. Here is the guide:
Step 1: Connect the USB drive to another working PC.
Step 2: Press the Win + R key to open the Run dialog box. Type diskpart in it and press Enter. Then execute the following command in the pop-up window to clean the USB drive.
- list disks
- select dsk # (# is the number of the USB drive)
- clean
Step 3: Close the DiskPart window. Then, press the Win + X key and select Disk Management to open this tool. Right-click the unallocated space of the USB drive and select New Simple Volume. Then follow the wizard to create a new partition.
Step 4: Download the Windows Media Creation Tool from Microsoft’s website and then launch it.
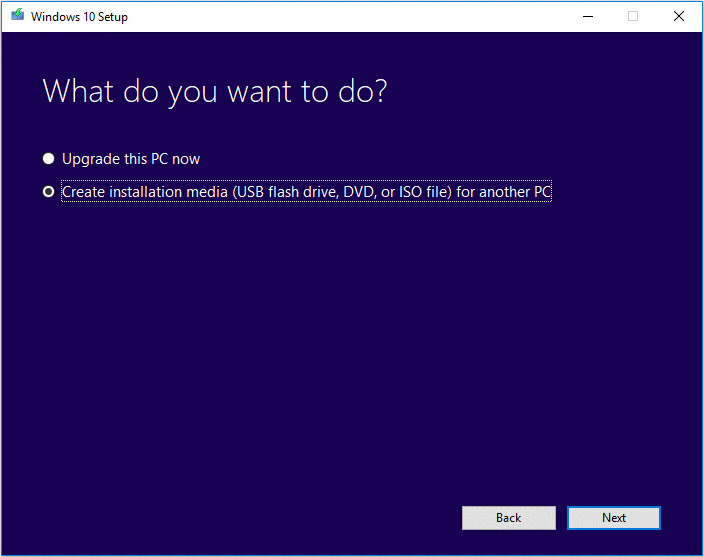
Step 5: When you get the following screen, choose Create installation media (USB flash drive, DVD, or ISO file) for another PC and click the Next button.
Step 6: Set your preferences and click on the Next button. Then, choose the USB flash drive option, select the drive you prepared, and click Next to start creating installation media.
Step 7: Finally, use this USB drive to install Windows again.
Method 3. Troubleshoot the USB Drive
If the above methods don’t work, you can switch to another USB port to see if the problem is solved. Secondly, you can check if the USB drive is damaged. You can do this using MiniTool Partition Wizard, which can scan the hard drive for bad sectors, format SD card FAT32, convert MBR to GPT, clone a hard drive, perform data recovery, etc.
To troubleshoot the USB drive with MiniTool Partition Wizard, you should download and install it on your PC and then follow the steps below.
MiniTool Partition Wizard FreeClick to Download100%Clean & Safe
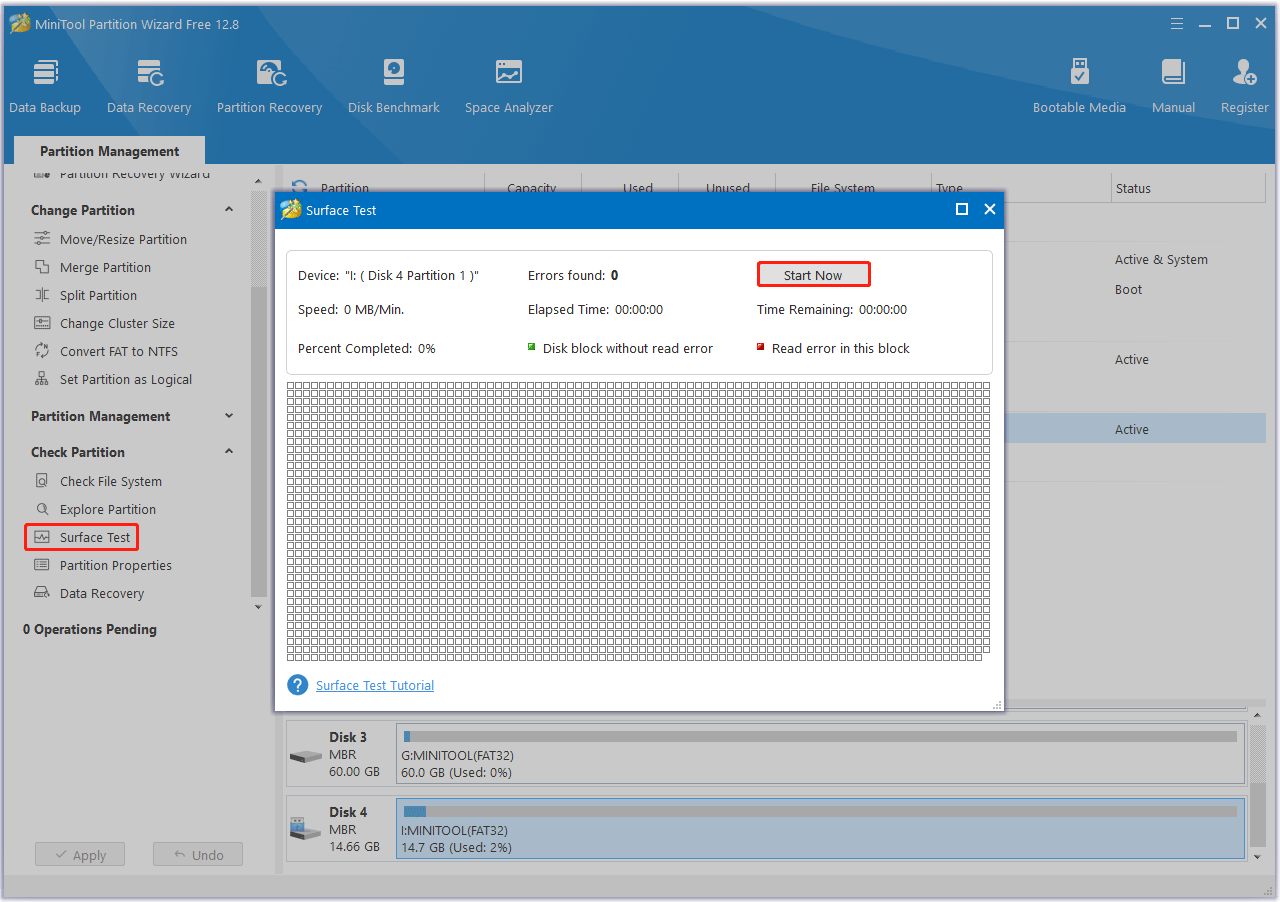
Step 1: Launch MiniTool Partition Wizard on your computer and enter its main interface. Click on your USB drive and select Surface Test.
Step 2: In the pop-up window, click on the Start Now button to scan the hard drive for bad sectors. If bad sectors on the hard drive are found, blocks in the scan area will be marked with red colors. If there are too many bad sectors, you need to back up data and then replace the hard drive.
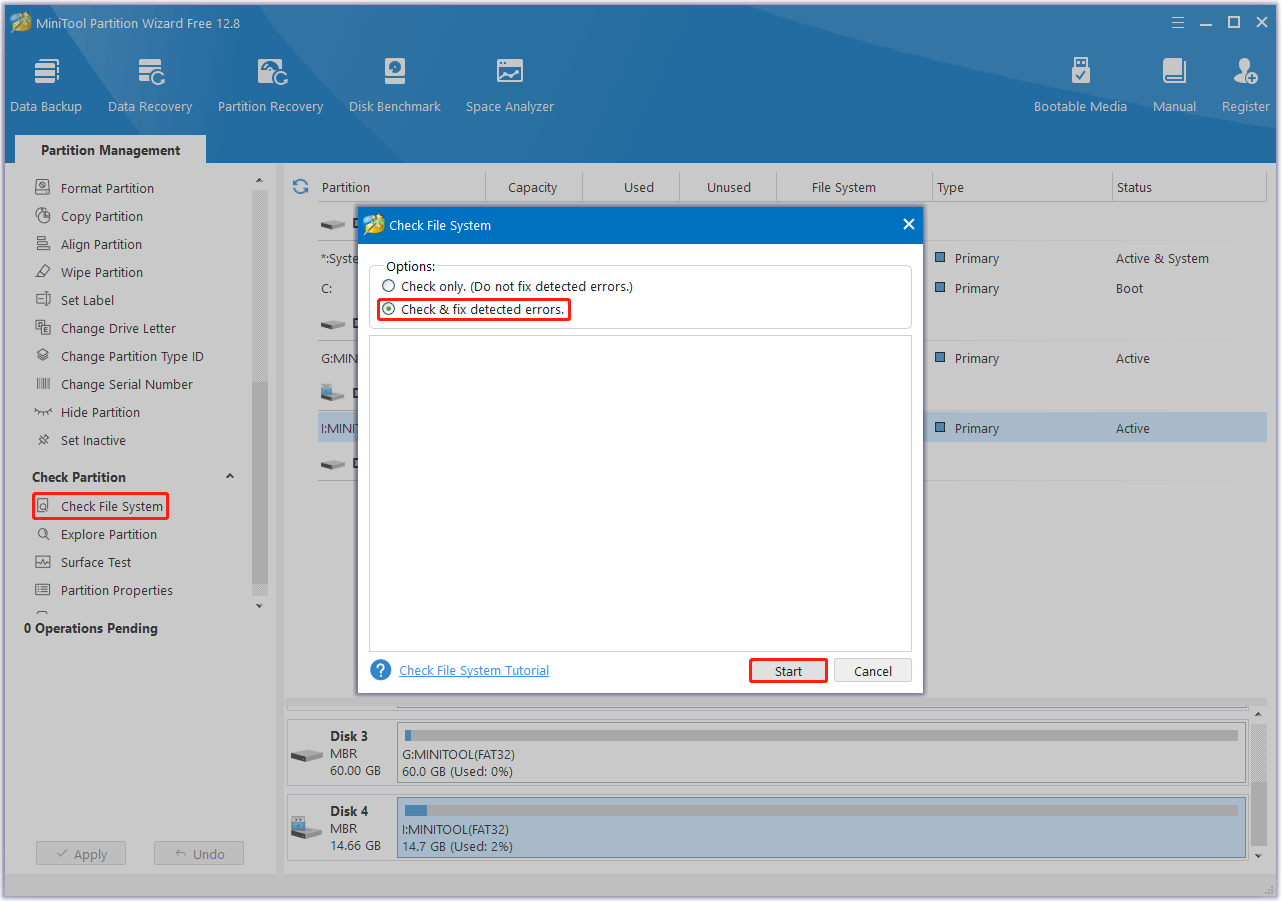
To repair file system errors, click on the USB drive and select Check File System from the left action panel. Then select Check and fix detected errors and click on the Start button.
![[Solved] PC Keeps Restarting After Installing New RAM](https://images.minitool.com/partitionwizard.com/images/uploads/2024/08/pc-keeps-restarting-after-installing-new-ram-thumbnail.png)
Bottom Line
This post introduces how to solve the “Windows Setup could not install one or more boot-critical drivers” issue in detail. If you run into the save issue, you can try to fix it with the methods above.
About The Author

Position: Columnist
Vega enjoys helping people with computer problems, including disk management, data recovery, data backup, and more. She is constantly expanding her knowledge in related fields. And she will continue to bring more easy-to-understand professional articles to help people solve various problems on the PC.
User Comments :