If you are bothered by the “Windows can’t boot with external hard drive connected”, this post is what you need in which 3 solutions are offered. Explore the details now!
Solution 1: Disconnect the External Hard Drive
If Windows can’t boot with external hard drive connected, simply disconnect the external hard drive before you turn on the computer. This method has been proven to be useful by plenty of users. You can have a try.
As external hard drives are plug and play devices, you don’t have to configure anything for device to work. Besides, the external hard drive doesn’t need to be always connected to the computer unless you boot the PC from it. So, you can disconnect the external hard drive before powering on the computer and then reconnect it when the PC loads up.
If the external hard drive is from Seagate, you should perform some checks on another working PC before conducting the solutions below. Then you can find the reason why Windows 10 won’t start with external drive connected and solve the problem.
- Check if the partition on the hard drive is set to active. If so, you should set it inactive.
- Check the file system format of the hard drive. To be compatible with Windows and Mac, some Seagate hard drives use the exFAT format by default. This may cause some issues for certain operating systems. If you only use the hard drive on Windows PCs, you’d format the drive to NTFS. If you have to use exFAT format, you should disable booting from USB devices or disable USB Legacy Support in BIOS.
MiniTool Partition Wizard FreeClick to Download100%Clean & Safe
Solution 2: Change the Boot Sequence
The system will hang at startup if you set the USB device as the first boot option. Then computer won’t boot with USB drive connected. This is also true for the external hard drive. You may be unable to boot Windows 10 with external hard drive attached due to the incorrect boot order.
In this case, you can troubleshoot the problem by changing the boot order in BIOS. In other words, set the internal hard drive as the first boot. Though BIOS boot priority options are located at different locations of BIOS, they often can be found under the “Boot” tab. Press the arrow keys and follow the on-screen instructions to change the boot sequence.
Here are detailed steps for doing that.
Step 1: Restart your computer and keep pressing the BIOS key to enter the BIOS setup. The BIOS key varies on different brands and models of computers. It could be F1, F2, F10, Del, Esc, etc.
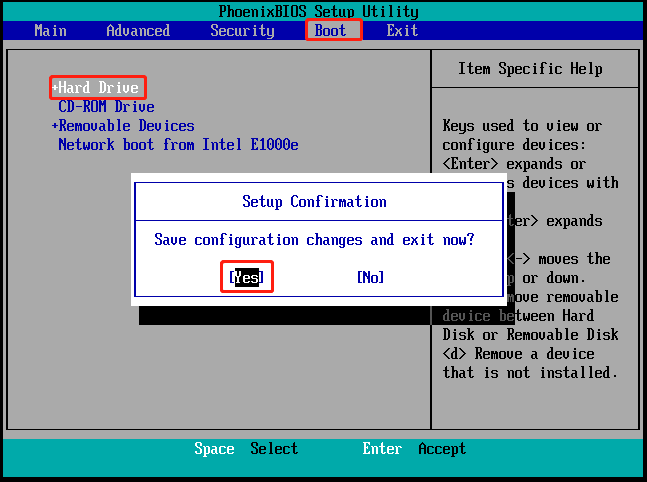
Step 2: Navigate to the Boot tab and press the “+” key to move the Hard Drive option at the top of the boot menu.
Step 3: Press F10 > Enter to save changes and close BIOS.
Step 4: Try booting the computer again to see if it boots normally.
![External Hard Drive Not Showing up Windows 11 [Solved]](https://images.minitool.com/partitionwizard.com/images/uploads/2023/08/external-hard-drive-not-showing-up-windows-11-thumbnail.jpg)
Solution 3: Disable USB Legacy Support
USB Legacy Support enables the PC to use USB peripherals without running operating system drivers and causes the system to hang on boot when an external hard drive is connected. Therefore, you need to disable USB Legacy Support to let the computer boot properly with external hard drive connected.
How to disable USB Legacy Support? Here’s the tutorial for you.
Step 1: Boot your computer into BIOS.
Step 2: Navigate to the Advanced tab and find USB Legacy Support.
Step 3: Configure the USB Legacy Support option to either Auto or Enabled.
Step 4: Press the F10 > Enter key to save the changes and exit BIOS.
Conclusion
This post tells you what to do if a computer won’t boot with external drive plugged in. When Windows can’t boot with external hard drive connected, try the solutions in this post to resolve immediately.
About The Author

Position: Columnist
Having writing articles about computer tech for a long time, I am rather experienced especially on the aspect of computer optimization, PC enhancement, as well as tech terms explanation. The habit of looking through tech forums makes me a great computer issues collector. And then, many articles related to these issues are released, which benefit plenty of users. Professional, effective, and innovative are always the pursuit of an editing worker.
User Comments :