There are multiple editions of Windows 7. The Windows 7 Black Edition is one of them. If you are interested in this system edition, this post of MiniTool Partition Wizard is worth reading. It shows you the basics, features, and download & install steps of this system.
About Windows 7 Black Edition
The Windows 7 Black Edition was created during the beta phase of Windows 7. As its name suggests, Windows 7 Black Edition has a beautiful black appearance. Actually, it is an easy-to-use and fast operating system that makes your computer faster than all other operating systems. Even if your computer is old, this system will make it like new.
Working with all types of hardware, Windows 7 Black Edition can be installed on any type of computer. It is available in 32-bit and 64-bit versions. To know more about this system, please move on!
Other available Windows 7 editions are listed as follows. You can pick one according to your demands.
Windows 7 All in One Activated ISO
Windows 7/8.1/10/11 All in One ISO
Windows 7 Black Edition Features
The Windows 7 Ultimate Black Edition has the following features.
- Work with all types of hardware, including old and new
- Completely compatible with all versions of Windows including Windows 7
- Free from the clutches of spyware, malware, and viruses
- With improved stability and security
- Improve the speed of the computer by 20% at least
- Integrate updates and technology into the system
- Defrag the hard drive automatically
- No alterations and no add-ons
- No extra applications
- With improved Windows Media Center and Windows Firewall
If you want to get Windows 7 Black Edition Ultimate downloaded on your computer, download the ISO file of this system and then set up the system step by step. The section below will illustrate that for you.
Download Windows 7 Black Edition ISO
Make sure that your computer meets the following system requirements of Windows 7 Black Edition before you download it on your device.
- CPU: 1GHz IA-32 processor
- Graphics card: DirectX 9 graphics processor
- RAM: 1GB
- Free hard drive space: 16GB
- Installation media: DVD drive or USB drive
After that, follow the steps below to get Windows 7 Black Edition Ultimate downloaded.
Step 1: Find a reliable source to download Windows 7 Black Edition ISO. For instance, you can get the ISO file of Windows 7 Ultimate Black Edition from archive.org.
Step 2: After navigating to the target website, find the needed system ISO file.
Step 3: Then click the ISO IMAGE link in the right side of the page.

Step 4: Wait for the finish of the Windows 7 Black Edition Ultimate download process. If you have a USB drive, please continue the process by using the following steps. If you don’t have, install Windows without USB drive with this tutorial.
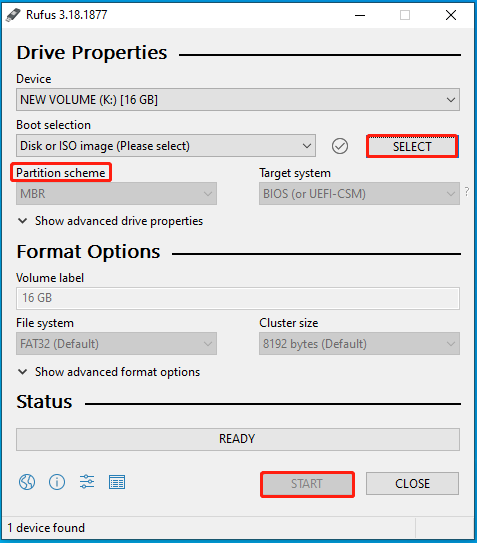
Step 5: Download Rufus or Windows USB/DVD Download Tool on their official websites. In this scenario, we use Rufus.
Step 6: Connect the prepared USB drive to your computer and run Rufus.
MiniTool Partition Wizard FreeClick to Download100%Clean & Safe
Step 7: Click Select to find and choose the downloaded Windows 7 Black Edition ISO. Then configure partition scheme, format options, and file system based on your condition.
Step 8: Click the Start button to begin the process.

Step 9: After the installation media is created, remove the USB drive and plug it into the target computer. Then restart your computer to enter its boot menu and select the created bootable USB drive as the boot option. After that, follow the on-screen instructions to complete the operation.
If you need to convert a bootable USB to ISO conversely, try the methods provided in this post.


User Comments :