BIOS is a firmware embedded on the chip on the computer’s motherboard. The BIOS firmware is pre-installed on the motherboard of a PC. It’s important to update BIOS timely to avoid some problems. However, it may be annoying for you if Windows 11 updates the BIOS automatically, like the user from the Reddit forum:
Windows 11 forced BIOS update now? I had bad experience in the past with bios update. And I surely do not want to receive such type of updates, this update belongs to unnecessary updates. Is there any way to delete and block this update forever?https://www.reddit.com/r/Windows11/comments/15soxo4/windows_11_now_forcing_to_bios_update/
According to user reports, Windows 11 updates the BIOS automatically when restating the system or after the computer wakes up from sleep. How to stop BIOS from updating automatically on Windows 11/10? Here we summarize 3 simple ways according to extensive user reports from different forums and communities. Let’s start trying.
Way 1. Disable BIOS Automatic Updates via Windows Update Settings
Some users found that Windows 11 forced BIOS update automatically due to Windows updates. In this case, you can stop the forced BIOS update on Windows 11 via the Windows update settings:
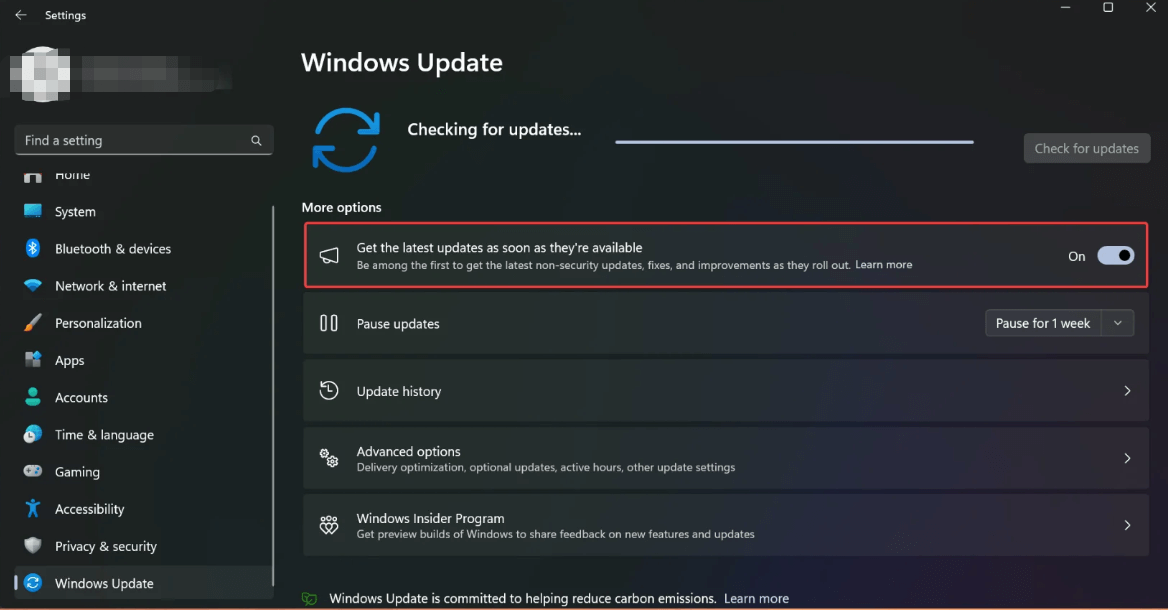
Step 1. Press the Win + I keys to open the Settings window and select Windows Update from the left panel.
Step 2. Toggle off the switch next to the Get the latest updates as soon as they’re available option. If it is not available here, you can manually pause the Windows updates to stop the forced BIOS update on Windows 11. Go to the Windows Updates > Pause updates and select a duration from the drop-down menu.
Way 2. Disable BIOS Automatic Updates via the BIOS Setup Software
As you might know, some computer manufacturers like Dell, HP, and Lenovo provides a BIOS setup utility, which runs the BIOS automatic update separately. For instance, Dell laptops have the DellCommandUpdate and SupportAssis to update the BIOS automatically when updates are available.
If you have this BIOS software on Windows 10/11, you can disable the forced BIOS update via the utility.
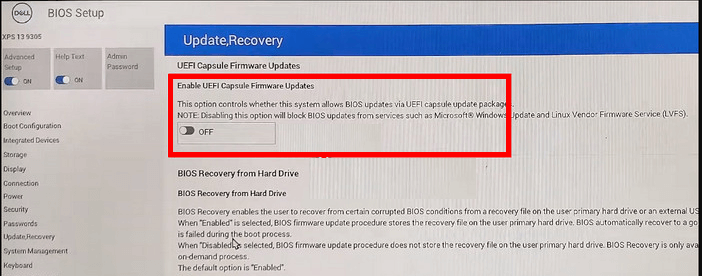
Step 1. Restart your computer and immediately press the F2 or Delete key when the first log screen appears to enter BIOS.
Step 2. Look for an option named BIOS Update, Firmware Update, BIOS Update, or Capsule Update. The BIOS settings may vary depending on your computer manufacturer. For example, the option should be “Enable UEFI Capsule Firmware Updates” on the Dell XPS series.
Step 3. Once found it, turn off the option and save the change by pressing the F10 key.
Way 3. Disable the Forced BIOS Update via the Local Group Policy Editor
Some users report that they can stop the forced BIOS update on Windows 11 via the Local Group Policy Editor. Here you may have a try.
Step 1. Press the Win + R keys to open the Run dialog box, and then type gpedit.msc in it and press Enter.
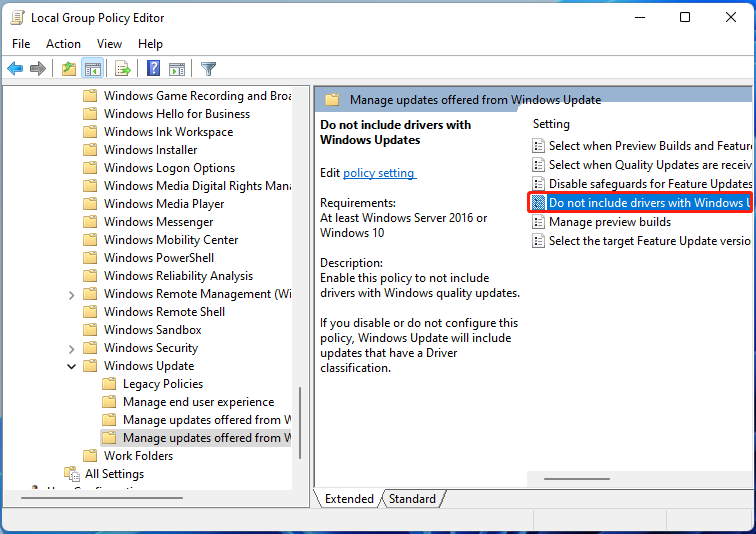
Step 2. In the pop-up window, navigate to the following path via the left search bar.
Computer Configuration > Administrative Templates > Windows Components > Windows Update > Manage updates offered from Windows Update
Step 3. On the right panel, double-click the option “Do not include drivers with Windows Update”.
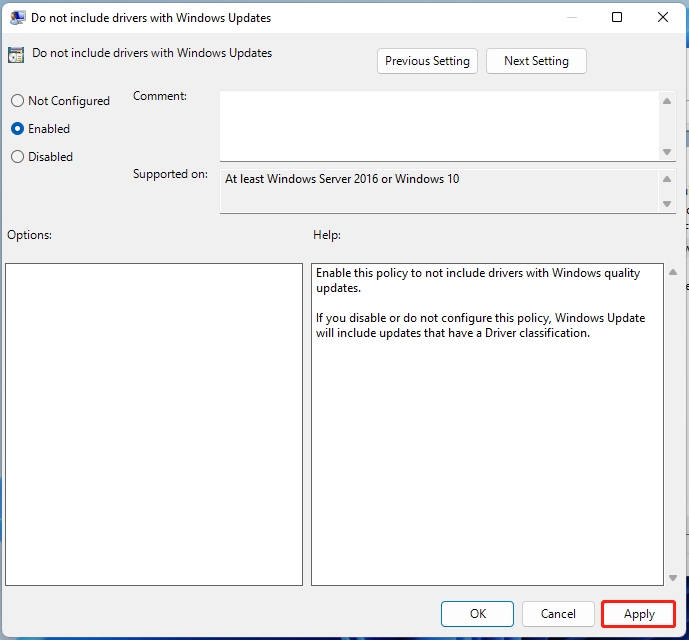
Step 4. Select the Enable option and click on Apply > OK to save the change.
Bottom Line
Here comes the end of this post. It focuses on 3 ways to fix the “Windows 11 updates the BIOS automatically” issue. If you have any other opinions about the topic, please share them with us in the following comment area.
Besides, if you want to manage partitions or disks on Windows 11/10 effectively, MiniTool Partition Wizard is a good choice. It can partition hard drive, migrate OS to SSD, clone hard drive, convert FAT32 to NTFS, convert MBR to GPT, rebuild MBR, securely erase SSDs, and more.
MiniTool Partition Wizard DemoClick to Download100%Clean & Safe


User Comments :