Windows 11 Pin to Start Menu Missing
In this section, several fixes for Windows 11 Pin to Start menu disappeared issue are offered. If you are experiencing Windows 11 Pin to Start menu missing issue, pay attention to this part and use the provided methods to resolve it.
Fix 1: Restore Pin to Start via Group Policy Editor
You can get the disappeared Pin to Start menu back by using Local Group Policy Editor. Here’s the tutorial for you.
Step 1: Type gpedit.msc in the search box and click Open under the matching app.
Step 2: Access User Configuration > Administrative Templates > Start Menu and Taskbar. Then locate the policy setting: “Prevent users from customizing their Start Screen” on the right pane.
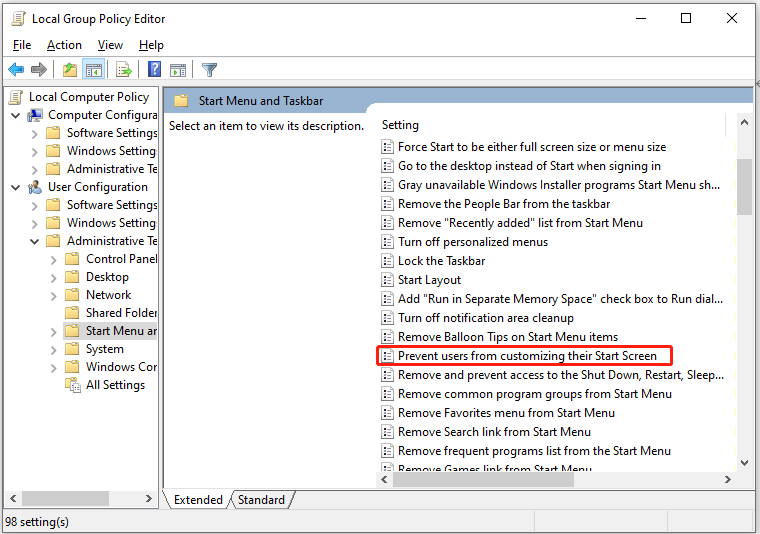
Step 3: Double-click Prevent users from customizing their Start Screen.
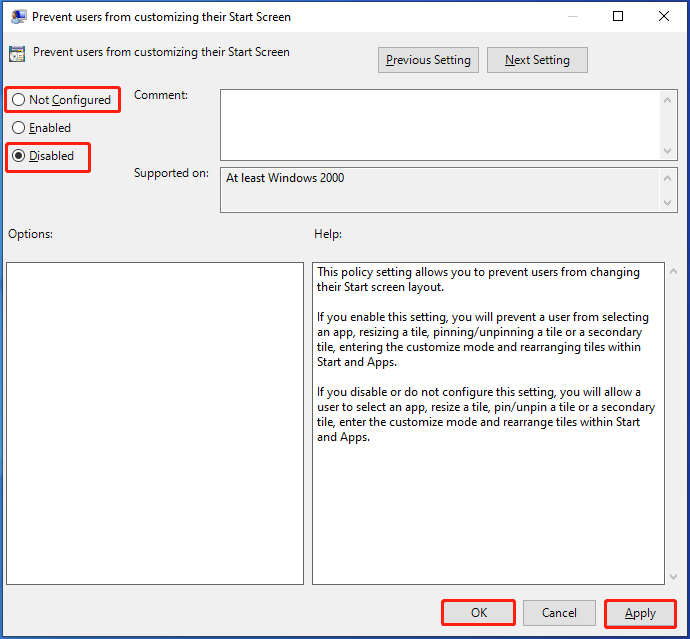
Step 4: Tick the Disabled or Not Configured option and click Apply > OK.
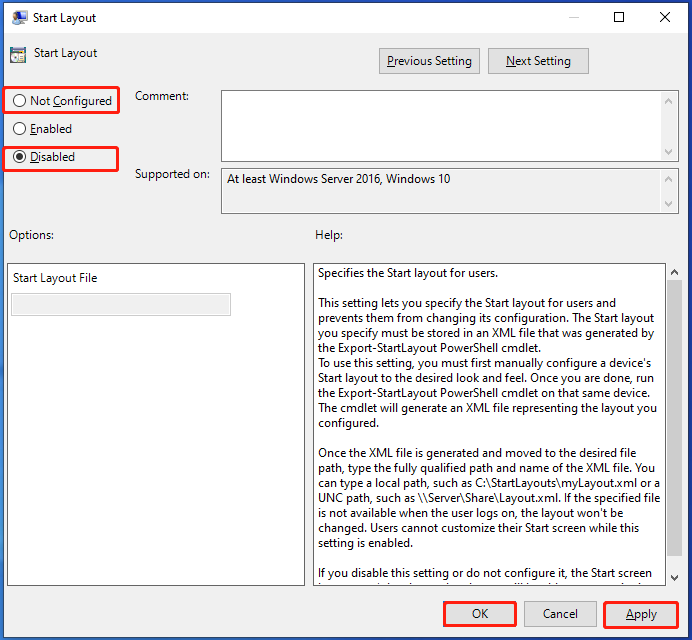
Step 5: Find the Start Layout policy setting and double-click it. Likewise, check the Disabled or Not Configured option and click Apply > OK.
Step 6: Exit Local Group Policy Editor. Then right-click on any app/shortcut icon/folder and see if the Pin to Start option gets back.
Fix 2: Restore Pin to Start via Registry Editor
In addition to Local Group Policy Editor, Registry Editor also helps you bring the Pin to Start option back. When Windows 11 Pin to Start menu missing issue occurs, restore the menu via Registry Editor with these steps.
MiniTool Partition Wizard DemoClick to Download100%Clean & Safe
Step 1: Open the Run window, type regedit, and click OK. In the UAC window, click Yes to allow the operation.
Step 2: Follow the path below to navigate to the key. Double-click options one after another or paste the path in the address bar in Registry Editor and hit Enter.
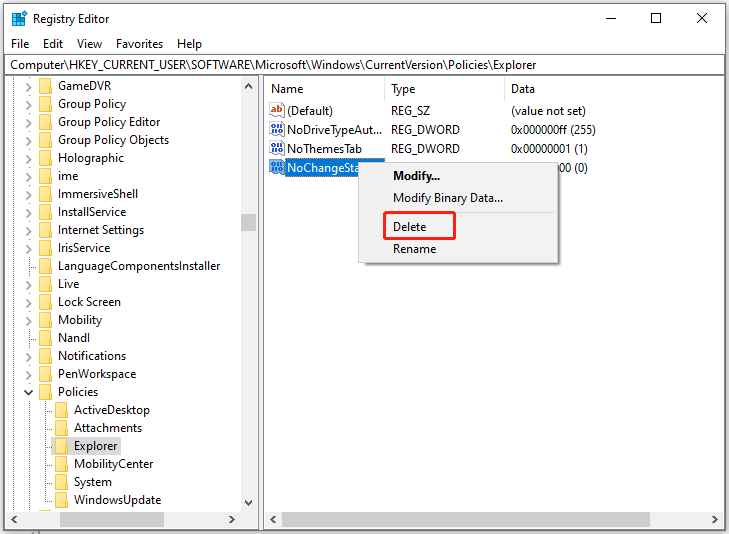
HKEY_CURRENT_USER\SOFTWARE\Microsoft\Windows\CurrentVersion\Policies\Explorer
Step 3: Under the Explorer key, locate and right-click NoChangeStartMenu, and then click Delete. In the warning window, click Yes to confirm the operation.
Step 4: Navigate to the target key by following this path. Right-click LockedStartLayout value and choose Delete.
Computer\HKEY_CURRENT_USER\SOFTWARE\Policies\Microsoft\Windows\Explorer
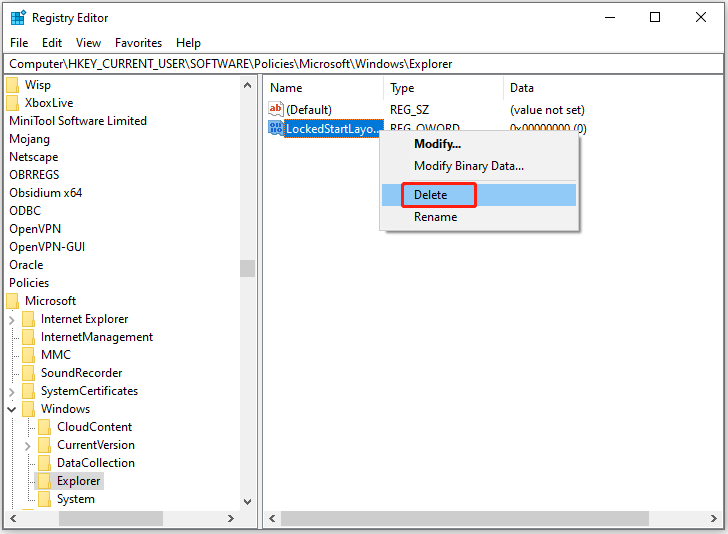
Step 5: Click Yes in the warning window. Once done, restart the computer.
Fix 3: Update Windows 11
According to user reports, updating Windows 11 to the latest version works for the Pin to Start option missing issue. You can have a try!
Step 1: Open Settings on your computer.
Step 2: Click on Windows Update option in the left pane.
Step 3: Click Check for updates to find available updates. If there are available updates, they will be displayed after a while.
Step 4: Install updates by following the on-screen instructions.
Now, check if Windows 11 Pin to Start menu disappeared issue is solved.
Windows 11 Pin to Start Menu Not Working
If Windows 11 Pin to Start menu is not working, try using these methods to troubleshoot the problem.
Way 1: Reset the Start Menu Cache
The Start menu cache saves information about the tiles and shortcuts on the Start menu. Once it gets corrupted, it can result in Windows 11 Pin to Start menu not working issue. So, it’s recommended to reset the Start menu cache when you receive the discussed issue.
Step 1: Right-click the Windows icon to open the Start menu. Then click on Settings.
Step 2: Click on Personalization in the Settings window.
Step 3: Tap on Start in the left sidebar.
Step 4: Locate the More settings section and click Turn off under the Use Start full screen option.
Step 5: Scroll down and click Restart under the Restart your PC section. After the PC restarts, try pinning an app/file/folder to check if Windows 11 Pin to Start menu not working issue is solved.
Way 2: Modify the UAC (User Account Control) Settings
Windows 11’s UAC can stop unwanted changes from happening by informing you when changes are made to the system. Nevertheless, sometimes UAC settings can affect the Pin to Start option and prevent you from pinning items. In this case, simply modify UAC settings with the steps below.
Step 1: Open the Start menu and click Settings.
Step 2: In the Settings app, click Accounts > Family & other users.
Step 3: Under the Other users section, tap on your account and click the Change account type button.
Step 4: From the Account type drop-down menu, choose Administrator and hit OK.
Step 5: Restart the computer and try pinning items to the Start menu to see the Pin to Start option works properly.
Way 3: Reset Windows 11
Resetting Windows 11 is the last resort to Windows 11 Pin to Start menu not working issue. You can use this method after you try all feasible solutions. This way will reinstall the operating system while keeping personal files intact. Even so, you’d better back up important files before starting the process.
Step 1: Open the Settings app and click System > Recovery.
Step 2: Under the Reset this PC section, hit the Get started button.
Step 3: Follow the on-screen instructions to finish the resetting process.
Bottom Line
Solutions to Windows 11 Pin to Start menu missing and not working issues have been shown to you. According to your situation, use the corresponding methods to fix the issue.
About The Author

Position: Columnist
Having writing articles about computer tech for a long time, I am rather experienced especially on the aspect of computer optimization, PC enhancement, as well as tech terms explanation. The habit of looking through tech forums makes me a great computer issues collector. And then, many articles related to these issues are released, which benefit plenty of users. Professional, effective, and innovative are always the pursuit of an editing worker.
User Comments :