Many users receive the Windows 11 24H2 install error 0xC1900101 - 0x40017 when in-place or upgrading. Are you also struggling with the error? This post from Partition Magic dives into several proven ways to fix the error code 0xC1900101 - 0x40017.
The Windows 11 24H2 ISO is officially released to all users on October 1, 2024. Since its release, a large number of users have upgraded or clean-installed Windows 11 24H2 by using the ISO. However, various error codes occur when installing the version, like Windows 11 24H2 installation error 0x80042444 – 0x4002f, Win11 24H2 error 0x80070001 – 0x4002f, Win11 24H2 update error 0x800f0838, and Windows 11 24H2 install error 0xC1900101 – 0x40017.
The following is a user from the elevenforum who reported the Win 11 24H2 in-place upgrade fails second boot phase 0xC1900101 – 0x40017 error.
23H2 to 24H2 in-place upgrade fails second boot phase 0xC1900101 - 0x40017. I successfully updated several pcs to 24H2 using in-place upgrade with media creation tool iso and setup /product server method. However, one PC keeps failing during the second boot phase.https://www.elevenforum.com/t/23h2-to-24h2-inplace-upgrade-fails-second-boot-phase-0xc1900101-0x40017.29414/
According to user reports, the Windows 11 24H2 error code 0xC1900101 – 0x40017 mainly occurs when performing an in-place upgrade with the ISO. The issue may be caused by a corrupted ISO file, incompatible devices, outdated CPU drivers, antivirus interference, and some unknown glitches. Here we summarize 4 feasible solutions for the error. Let’s try.
Before You Do
Before trying the solutions below, ensure the ISO file is downloaded properly and unplug all external devices from the computer before upgrading. Additionally, you’d better check the device install log file from the $Windows.~bt\Sources\Rollback\setupapi\setupapi.dev.log path to find the root cause of the Windows 11 24H2 install error 0xC1900101 – 0x40017.
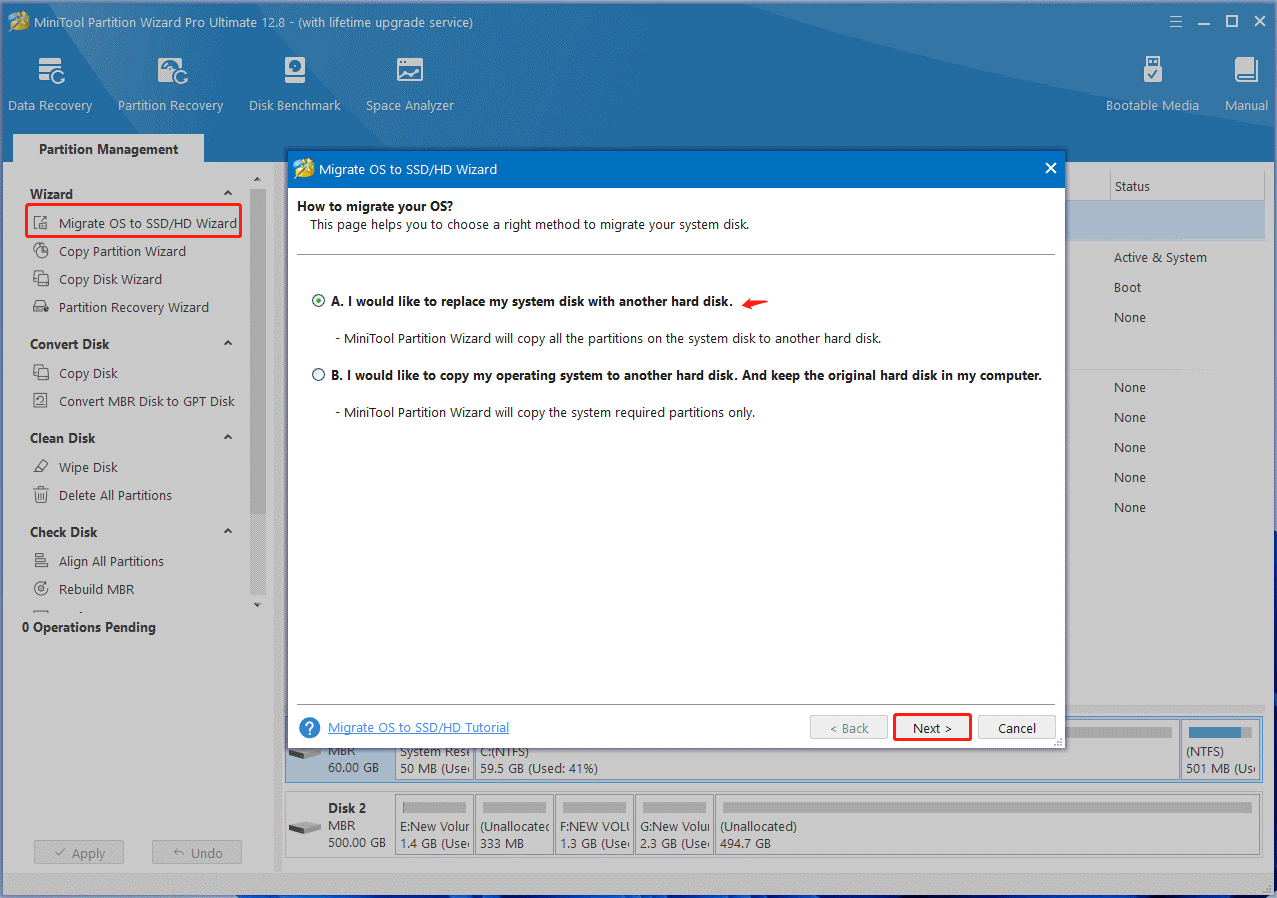
Another important thing is to back up your current Windows OS because this upgrade may cause your computer to be unbootable if failed. Here I highly recommend you use MiniTool Partition Wizard. It’s a comprehensive disk partition manager that can migrate Windows OS to SSD, extend/resize partitions, clone hard drives, convert MBR to GPT without data loss, etc.
MiniTool Partition Wizard DemoClick to Download100%Clean & Safe
Solution 1. Disable Antivirus and Startup Apps
First of all, you can try disabling your antivirus software and startup apps, which may interfere with the upgrade. This can help fix the Win 11 24H2 in-place upgrade fails second boot phase 0xC1900101 – 0x40017 error. Here’s how to disable startup apps in Task Manager.
Step 1. Press the Ctrl + Shift + Esc keys at the same time to open Task Manager.
Step 2. Navigate to the Startup tab, right-click the third-party app, and select Disable.
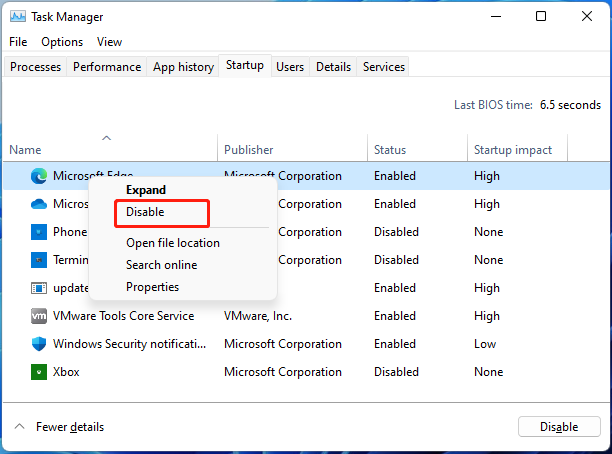
Step 3. Repeat the same procedure for other apps. Once done, restart your PC and see if the Windows 11 24H2 error code 0xC1900101 – 0x40017 disappears during the upgrade.
Solution 2. Install the Latest Intel Management Engine Interface Driver
Some users find the Windows 11 24H2 installation failed error 0xC1900101 – 0x40017 is related to outdated chipset drivers like Intel Management Engine Interface drivers. Let’s follow the guide below to update the driver.
Step 1. Right-click the Start menu and select Device Manager from the context menu.
Step 2. In the Device Manager window, expand the System devices categories, right-click the Intel Management Engine Interface driver, and select Update driver.
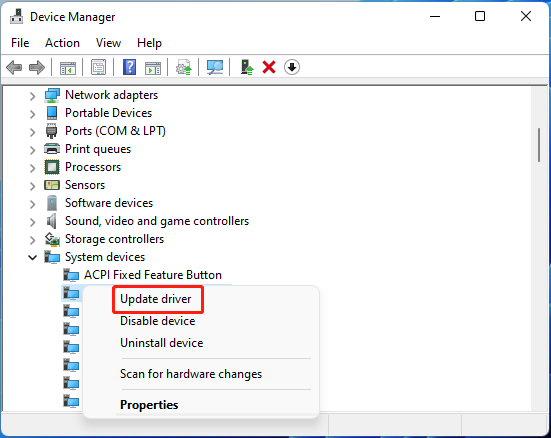
Step 3. Select the Search automatically for drivers option and follow the on-screen prompts to update the driver automatically. If the 0xC1900101 – 0x40017 when upgrading to Win11 24H2 persists, you can manually download the latest CPU diver from its manufacturer’s website and install it.
Solution 3. Disable Driver Signature Enforcement
In addition, you can try disabling driver signature enforcement to fix the Windows 11 24H2 installation failed error 0xC1900101 – 0x40017. This has been proven by some users to be helpful.
Step 1. Click the Restart button from the Start menu and hold down the Shift key at the same time. Then your PC will reboot into WinRE.
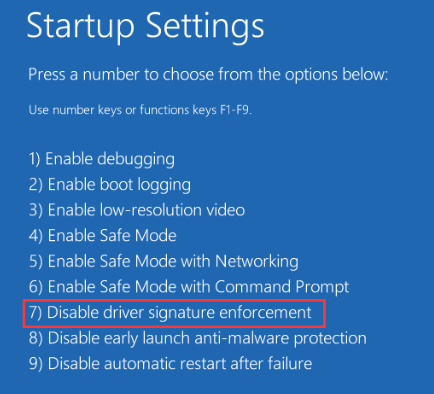
Step 2. Select Troubleshoot > Advanced options > Startup Settings one by one.
Step 3. A list of options will show up. Press the F7 key to choose Disable driver signature enforcement and restart your PC. After that, you can upgrade to the version and see if the Win 11 24H2 in-place upgrade fails second boot phase 0xC1900101 – 0x40017 is gone.
Solution 4. Check Your CPU
If your CPU is not supported or outdated, you may encounter the error 0xC1900101 – 0x40017 when upgrading to Win11 24H2. In this case, you need to upgrade your CPU or bypass the requirements using some tools like Rufus. You can refer to this guide – How to Install Windows 11 24H2 on Unsupported PC? 2 New Ways.
To Sum Up
Here comes the end of this post. It focuses on how to fix Windows 11 24H2 install error 0xC1900101 – 0x40017. If the above methods help you fix the error, you can share this blog post on your forums or communities.

User Comments :