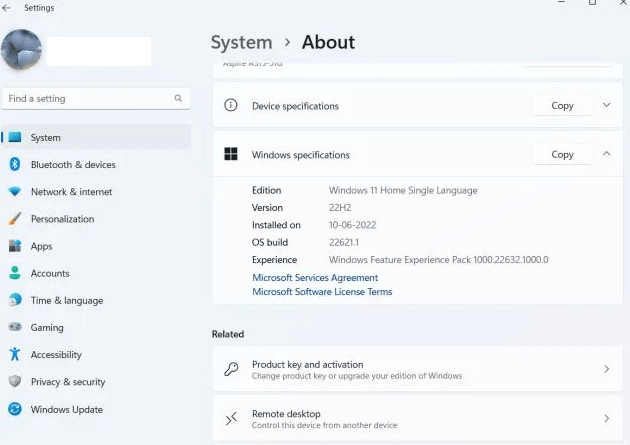
What is Windows 11 Home Single Language? What’s the difference between the Windows Home edition and the Windows Home Single Language edition? How to change language in Windows 11/10 Home Single Language edition? This post from MiniTool Partition Wizard will show you all.
Windows 11/10 Home Single Language
Those people who have bought PCs abroad may encounter the Windows 11/10 Home Single Language issue. When they try to change the system language to their mother language, they are told that “your Windows license supports only one display language.” This issue prevents them from changing the system language.
Why do PC manufacturers sell PCs with the Windows 11 Home Single Language edition or Windows 10 Home Single Language edition?
The fundamental reason is that the license of the Windows Home Single Language edition is cheaper than that of the regular Home edition. In addition, the Single Language edition is usually only offered to OEMs.
Windows 11/10 vs Windows 11/10 Home Single Language
What about Windows 10 vs Windows 10 Home Single Language or Windows 11 vs Windows 11 Home Single Language? Some people may wonder about this question.
The Windows 11/10 Home edition is the same as the Windows 11/10 Home Single Language, except that the Single Language edition doesn’t allow users to change the system language after the Out of Box Experience (they have chosen one language in this process).

How to Solve the Windows 11/10 Home Single Language Issue
You can the following ways to solve the Windows 11/10 Home Single Language issue.
Way 1. Upgrade to the Pro Edition
To solve the Windows 11/10 Home Single Language issue, you need to purchase a Windows 11/10 Pro license and then activate Windows 11/10 using the new license. You can refer to the detailed steps in this post: How to Upgrade Windows 11 Home to Pro – 5 Steps.
Way 2. Use Commands
This way is offered by users of the Super User forum and many people say that it works for them. So, you can also have a try.
For Windows 11 Home Single Language Issue
Step 1: Press the Windows logo key + R to open the Run dialog box. Then, type “cmd” and press Enter to open Command Prompt.
Step 2: Run the command gotten on this page. For example, if you want to change the language to en-US, the command should be:
curl -o %TEMP%\Microsoft-Windows-Client-Language-Pack_x64_en-us.cab "https://filedn.com/lOX1R8Sv7vhpEG9Q77kMbn0/Windows11/LanguagePacks/Microsoft-Windows-Client-Language-Pack_x64_en-us.cab"
dism /online /Add-Package /PackagePath:%TEMP%\Microsoft-Windows-Client-Language-Pack_x64_en-us.cab
reg add HKLM\SYSTEM\CurrentControlSet\Control\Nls\Language /v InstallLanguage /t REG_SZ /d 0409 /f
reg add HKLM\SYSTEM\CurrentControlSet\Control\Nls\Language /v Default /t REG_SZ /d 1033 /f
cd
For Windows 10 Home Single Language Issue
Step 1: You should first download and install the language pack by adding a language in Settings > Time & Language > Language.
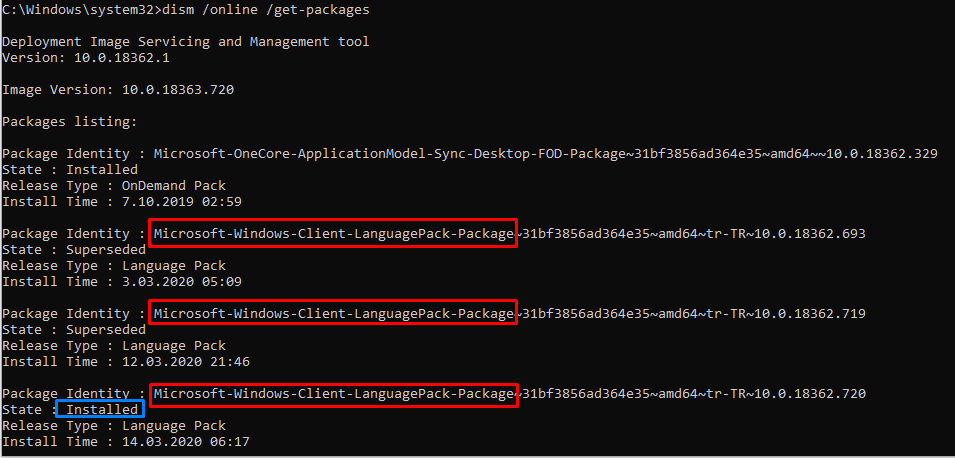
Step 2: Open Command Prompt with Administrator rights. Type dism /online /get-packages and press Enter. Look for Microsoft-Windows-Client-LanguagePack-Package as a start for Package Identity. And its State should be Installed. You can see the next 5 characters after ~ to understand which language it is (tr-TR for example).

Step 3: Press Win+R, type “regedit”, and then press Ctrl+Shift+Enter to open Registry Editor with Administrator rights. Go to \HKEY_LOCAL_MACHINE\SYSTEM\CurrentControlSet\Control\Nls\Language.
Step 4: Check the Language/region ID of the installed language in the Available languages for Windows page. Double-click the Default entry on Registry Editor and then change its Value data to the ID of the installed language. In some cases, you might need to change the InstallLanguage entry as well.
MiniTool Partition Wizard is a multifunctional tool that can migrate OS, clone disks, recover data, convert disks between MBR and GPT without data loss, etc. If you have these needs, you can try it.
MiniTool Partition Wizard DemoClick to Download100%Clean & Safe


User Comments :