Are you experiencing issues with the Windows 10 Switch User missing from login screen? If so, you come to the right place. This article from MiniTool Partition Wizard will provide two effective solutions to solve this issue.
When you access the Windows 10 login screen, the names and pictures of all available user accounts are displayed in the lower left portion of the login screen. You can click on any user account and enter your login details to access that account. 、
However, many users are facing the problem of Windows 10 no Switch User option on login screen because other user accounts are not visible there. If you are also facing this problem, then this article may help you to fix it using two built-in features of Windows 11/10.
Way 1: Use Local Group Policy Editor
Local Group Policy Editor is a useful tool that helps users configure and modify Group Policy settings: it controls the sign-in and shutdown processes and decides which settings and applications users can use/change. So, you can try to configure it to fix the Windows 10 Switch User missing from login screen issue.
Step 1: Press the Win + R key to open the Run dialog box. Then type gpedit.msc in it and press Enter to open Local Group Policy Editor.
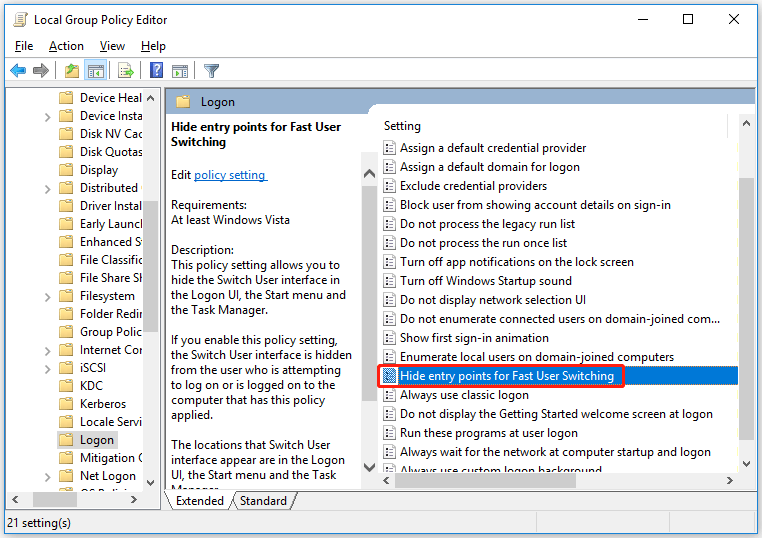
Step 2: In the Local Group Policy Editor window, go to the path:
Computer Configuration > Administrative Templates > System > Logon
Step 3: In the right-hand section, double-click Hide entry points for Fast User Switching.

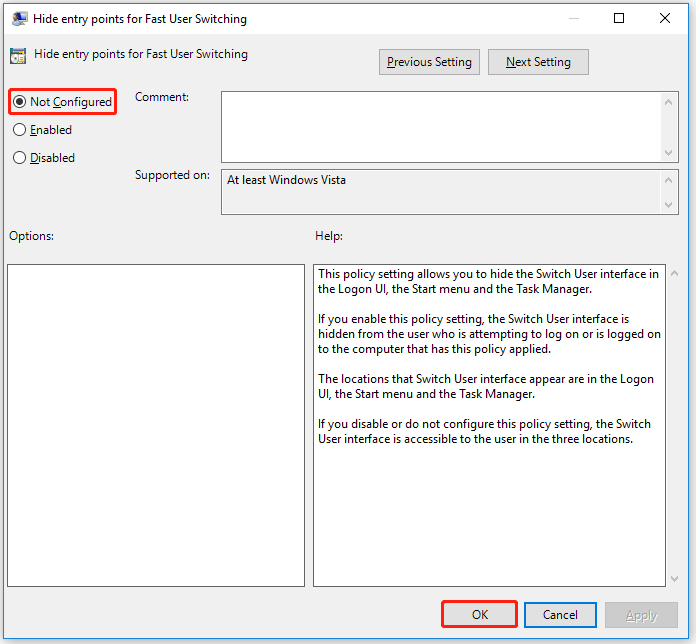
Step 4: In the next pop-up window, select the Not Configured option, and press the OK button.

Once done, you can check if the Switch User Windows 10 missing problem still appears.
Way 2: Use Registry Editor
The second way is using Registry Editor. It is an integral part of the Windows operating system. Any changes made to it may cause irreversible damage. So, make sure to back up your registry files first before making any changes.
Step 1: Press the Win + R key to open the Run dialog. Then type regedit and press Enter to open Registry Editor.
Step 2: In the Registry Editor window, go to the following path:
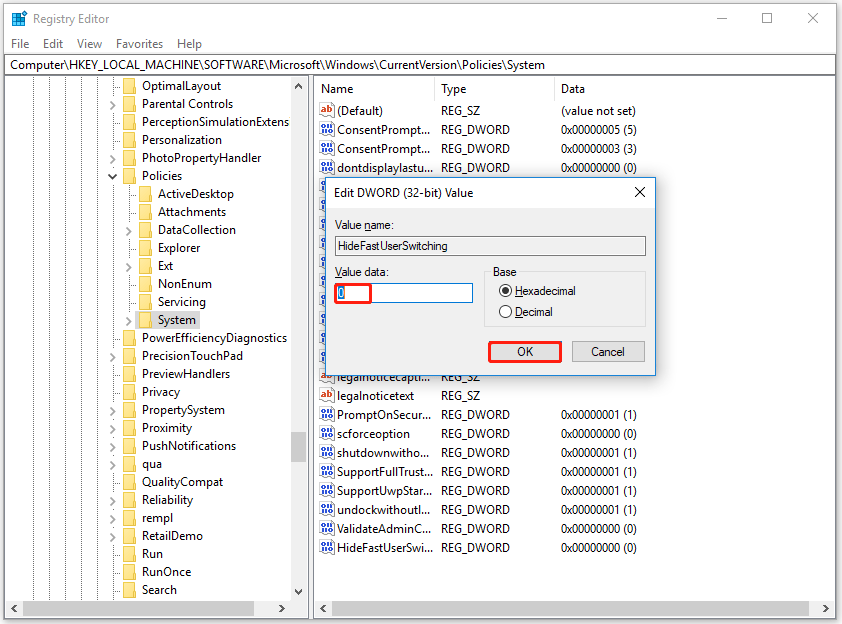
HKEY_LOCAL_MACHINE\SOFTWARE\Microsoft\Windows\CurrentVersion\Policies\System
Step 3: Right-click on this key, and then go to New > DWORD (32-bit) Value. Then set its name to HideFastUserSwitching. If the DWORD value is already present, then there is no need to create it.
Step 4: Double-click on the HideFastUserSwitching value and a window will pop up. Then, put 0 in the Value data box, and press the OK button.

Alternatively, you can also simply delete the HideFastUserSwitching value. After that, when you will access the login screen of Windows 11/10, the Switch User accounts option will be visible there.
Even if the user account names are not displayed on the Windows login screen after using the above two options, then you can display them using Command Prompt or the Local Users and Groups window. Alternatively, you can switch users on Windows in a different way.
Bottom Line
The “Switch User” option in Windows is very useful when multiple users are working in different domains. However, sometimes the Switch User missing, preventing that user from working. This post provides two methods to help you fix the Windows 10 Switch User missing from login screen issue.


User Comments :