How can the Windows 10 KB5053618 not installing issue be fixed? If you encounter the same issue, you have come to the right place. Here, Partition Magic shows detailed steps on KB5053618 installation and offers several effective ways to help you troubleshoot the issues.
Windows 10 KB5053618 Release
On March 11, 2025, Microsoft released the update KB5053618 (OS Build 10240.20947) for Windows 10 1507. It just addresses some security for the Windows OS and brings some improvements, including:
- [Daylight saving time (DST)] Updated: DST changes for Paraguay. For more information, see the Daylight Saving Time & Time Zone Blog.
- [Use-after-free (UAF) risk] Fixed: A race condition might lead to a UAF risk during process creation.
So, how to download and install KB5053618? Typically, Windows 10 KB5053618 will be downloaded and installed automatically from Windows Update and Microsoft Update. If this update fails to install automatically on your PC, you can manually download and install KB5053618 via the Microsoft Catalog. Here’s the way:
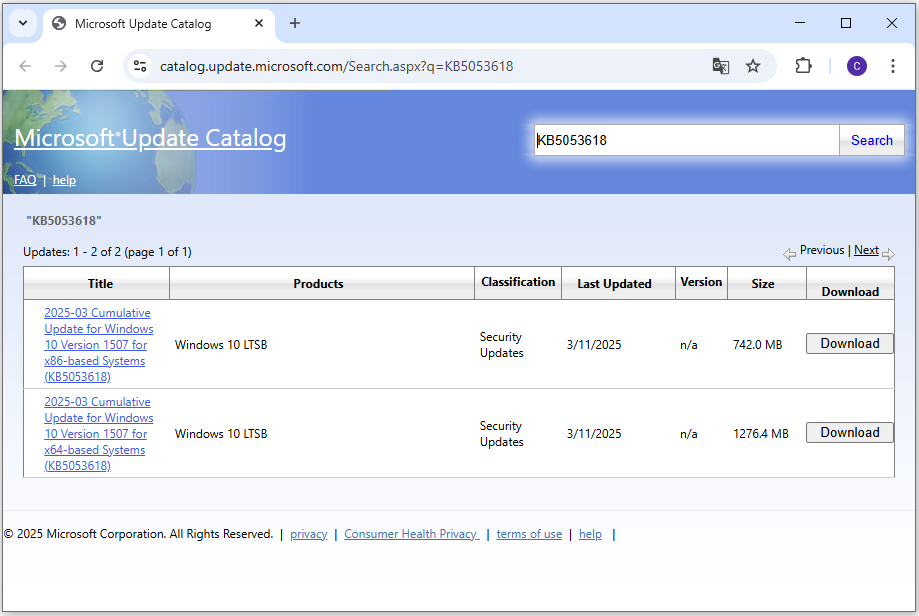
Step 1. Launch your browser and navigate to Microsoft Catalog.
Step 2. Type “KB5053618” in the search box and press Enter.
Step 3. Select the correct installation package for your PC’s system type (x64 or x86), then click the Download button to get the update.
Step 4. Click the link in the pop-up window to continue.
Step 5. After that, run the installation package and follow the on-screen instructions to install the update on your PC.
4 Ways to Fix the KB5053618 Not Installing Issue
However, some people report that they encounter the KB5053618 not installing issue on their PC. Have you also experienced the same issue? If so, continue reading to get several useful ways to get rid of the issue.
Way 1. Try Some Basic Tricks
If you encounter the Windows 10 KB5053618 fails to install issue on your PC, you can try these basic tricks to fix the issue first:
- Check the Internet connection
- Make sure you have administrator access
- Disconnect external hardware
- Verify Date and Time settings
- Update outdated drivers
- Go to Windows Update to update KB5053618 again
- Restart your PC
If none of the above ways can help you fix the KB5053618 not installing issue, you can continue and try the following ways.
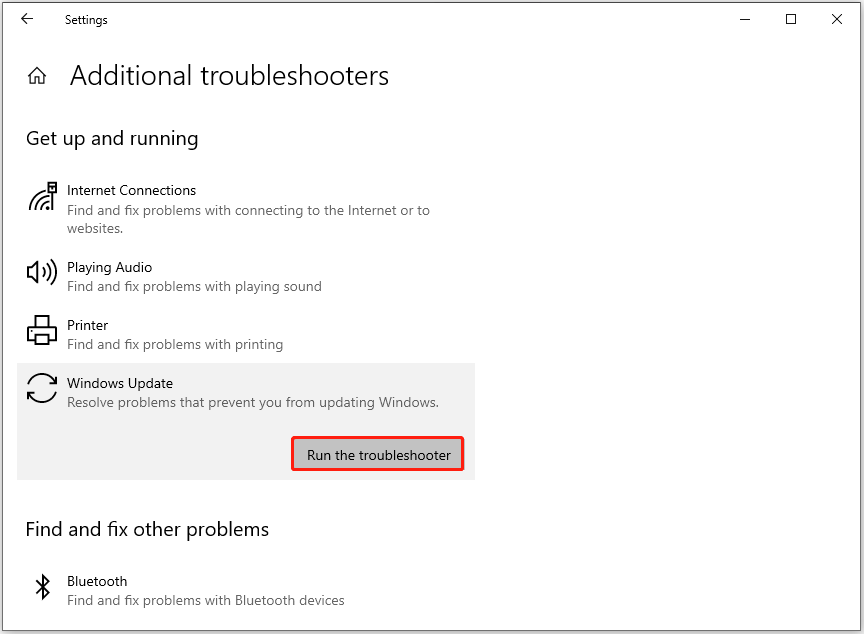
Way 2. Run the Windows Update Troubleshooter
When you encounter the KB5053618 not installing issue on your PC, you can try to run the Windows update troubleshooter to fix the issue. It is a built-in tool in Windows that can troubleshoot issues related to Windows updates. Here’s the way:
Step 1. Press the Win + S keys simultaneously to open the Search window.
Step 2. Type “troubleshoot” in the search box, and select Troubleshoot settings under Best Match.
Step 3. In the pop-up window, click Additional troubleshooter.
Step 4. Choose Windows Update and click Run the Troubleshooter.
Step 5. Once done, if there are any issues found, follow the on-screen guide to fix them. After that, restart your PC and check if the KB5053618 fails to install issue has been resolved.
Way 3. Free up Disk Space
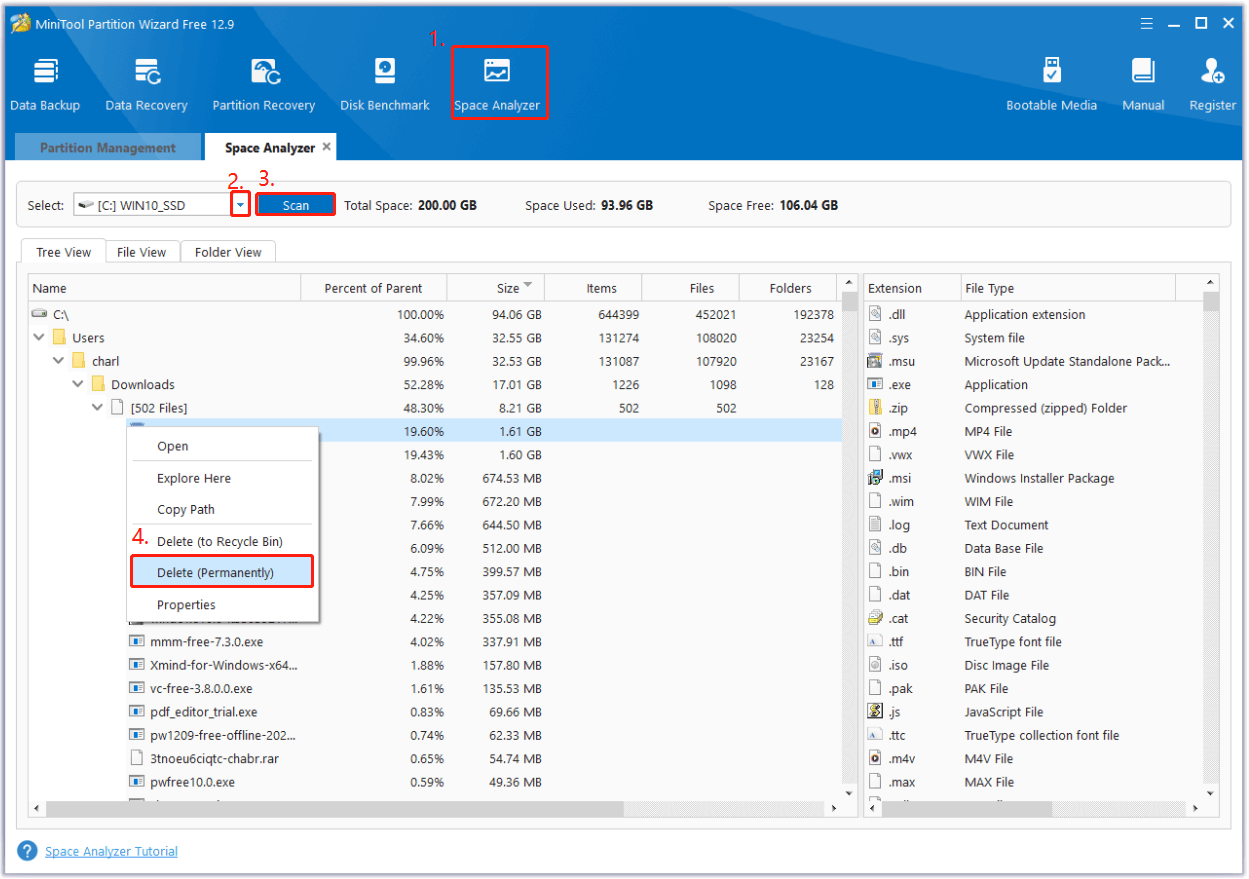
If your PC has insufficient disk space, you may encounter the Windows 10 KB5053618 fails to install issue as well. In this case, you can use the Space Analyzer feature in MiniTool Partition Wizard to scan and analyze disk storage usage.
Besides, this feature-rich partition disk manager can also help you create/delete partitions, clone a hard drive, check disk for errors, convert MBR to GPT, rebuild MBR, recover data from hard drive, and so on.
After installing MiniTool Partition Wizard on your PC, you can do the following steps to use the Space Analyzer feature:
MiniTool Partition Wizard FreeClick to Download100%Clean & Safe
- Launch this app to enter its main interface, and click Space Analyzer.
- Select your system drive from the drop-down menu of Select, and click Scan
- Right-click the file/folder you don’t want, and select Delete (Permanently).
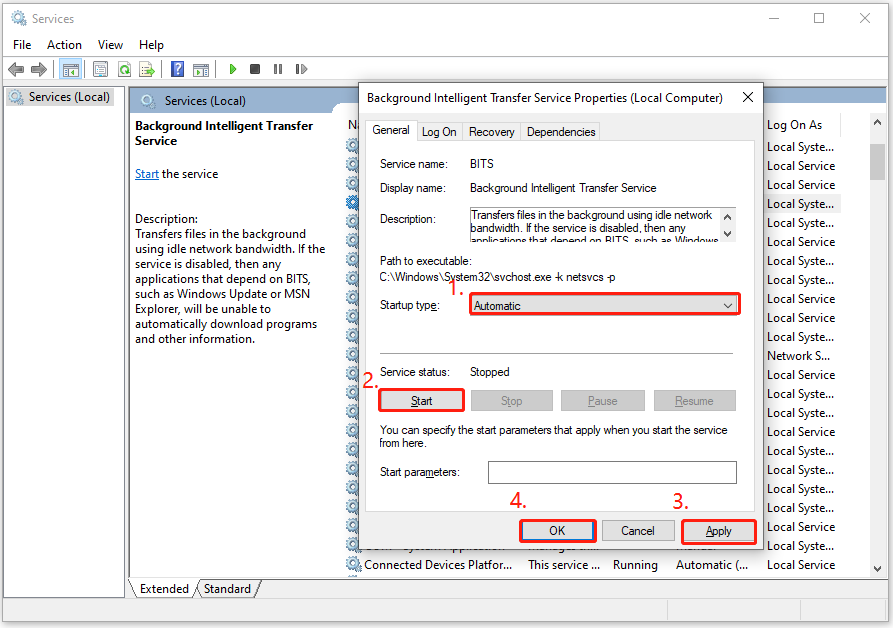
Way 4. Restart Update Relevant Services
If there is something wrong with the Windows relevant services on your PC, you can encounter the KB5053618 fails to install issue as well. Therefore, you can try restarting the services by following the steps mentioned below to fix the issue:
- Press the Win + R keys to open the Run window, type “services.msc”, and then press Enter.
- In the Services window, double-click Windows Update from the list.
- From the Startup type field, select Automatic from its drop-down menu.
- Go to the “Service status” and click on Start.
- Then, click Apply and OK to save the changes.
- Next, do the same operations with Cryptographic Services and Background Intelligent Transfer Service.
- Once done, restart your PC and check if you fixed the KB5053618 fails to install issue successfully.
Bottom Line
This post introduces a full guide on KB5053618 installation and provides several effective solutions to fix the Windows 10 KB5053618 not installing issue. If you run into the same issue on your PC, you can try the mentioned solutions one by one until the issue gets fixed.
About The Author

Position: Columnist
Charlotte is a columnist who loves to help others solve errors in computer use. She is good at data recovery and disk & partition management, which includes copying partitions, formatting partitions, etc. Her articles are simple and easy to understand, so even people who know little about computers can understand. In her spare time, she likes reading books, listening to music, playing badminton, etc.
User Comments :