Lots of users reported that Windows 11 24H2 cannot delete MCU update dll. Why delete mcupdateintell.dll on Win11 24H2? How do I fix the problem? Now, let’s dive into the answers together with Partition Magic.
The Windows 11 24H2 version is officially released to the public on October 1, 2024. Since its release, a large number of users have upgraded to Windows 11 24H2. However, they encounter various issues on Win11 24H2, like Windows 11 24H2 update error 0x800f0838, Windows 11 24H2 installation error 0x80042444 – 0x4002f, Win11 24H2 error 0x80070001 – 0x4002f, and the one discussed here.
Some users from the Reddit forum are discussing that cannot delete mcupdateintell.dll on Win11 24H2.
I have always manually deleted the Intel mcupdate .dll microcode file in System32. Removing this file allows the system to run using only the microcode installed in the motherboard bios. After updating to Windows 11 24H2, the OS refuses to boot if I delete mcupdate like I used to in the previous versions.https://www.reddit.com/r/overclocking/comments/1d28a8y/windows_11_24h2_and_mcupdate_microcode/
Why Cannot Delete Mcupdateintell.dll on Win11 24H2
According to user reports, they want to delete the mcupdateintell.dll to force using the previous microcode CPU in BIOS. However, they found that Windows 11 24H2 cannot delete mcupdate_GenuineIntel because the system won’t boot after deleting. The MCU update dll file is located in the System32 folder, which is protected and cannot be deleted.
What to Do If Windows 11 24H2 Cannot Delete MCU Update DLL
How to fix it if Windows 11 24H2 cannot remove MCU updates? We summarize 3 feasible solutions to the problem. Let’s try them in order.
Fix 1. Rename the MCU Update DLL File
Some users from forums have proven that the Windows 11 24H2 cannot delete mcupdate_GenuineIntel issue can be solved by renaming the dll file. To do that, right-click the mcupdate_AuthenticAMD.dll, select Rename, and change its name to mcupdate_GenuineIntel.dll. Then rename mcupdate_GenuineIntel.dll to mcupdate_AuthenticAMD.dll. Once done, reboot your computer and see if it works.

If you still want to delete the MCU update dll files manually, try the following 2 methods. Bear in mind that deleting the mcupdateintell.dll from the System32 folder may lead to the Windows unbootable.
Fix 2. Get Permissions for the DLL File
If the MCU update dll file is located in the System32 path, it cannot be deleted without permission. You can follow the guide below to take ownership of the file.
Step 1. Right-click the dll file and select Properties from the context menu.
Step 2. In the Properties window, navigate to the Security tab and click on the Advanced button.
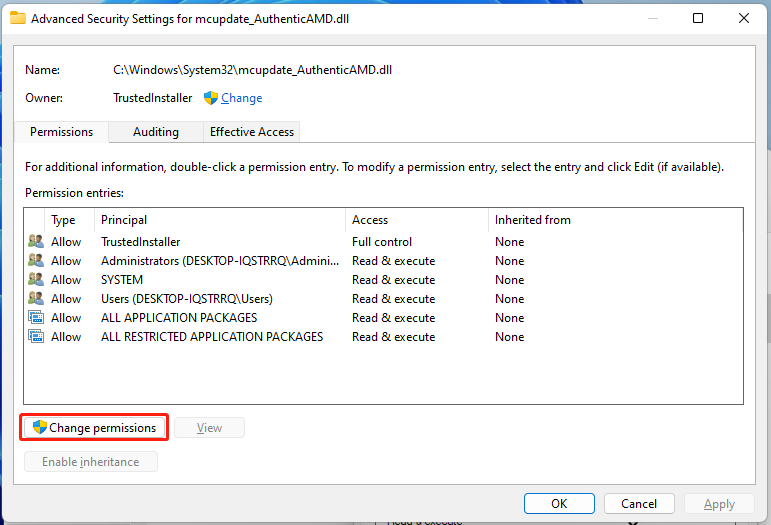
Step 3. Now the Advanced Security Settings window pops up, and then go to the Permissions tab and click Change Permission.

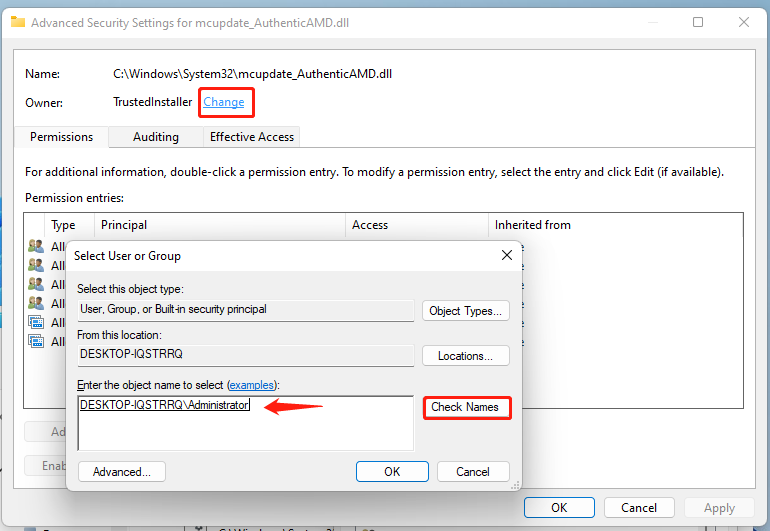
Step 4. Click on the Change link next to Owner.
Step 5. Type your user account name (e.g. Admin) in the box, click Check Names, and click OK.

Step 6. Click OK in the Advanced Security Settings window. After that, you can delete the file and check if the “Windows 11 24H2 cannot remove MCU updates” issue gets solved.
Fix 3. Delete the MCU Update DLL Files Using MiniTool Partition Wizard
If you still cannot remove MCU updates dll on Windows 11 24H2, try using a professional file deleter – MiniTool Partition Wizard. It can not only analyze disk space but also quickly delete dll files on Windows 10/11 by its file name.
It’s a powerful disk partition manager that can partition a hard drive, clone a hard drive, migrate OS to SSD, recover data, convert MBR to GPT without data loss, etc. Here’s how to fix the “Windows 11 24H2 cannot delete MCU update dll” problem using the tool.
MiniTool Partition Wizard FreeClick to Download100%Clean & Safe
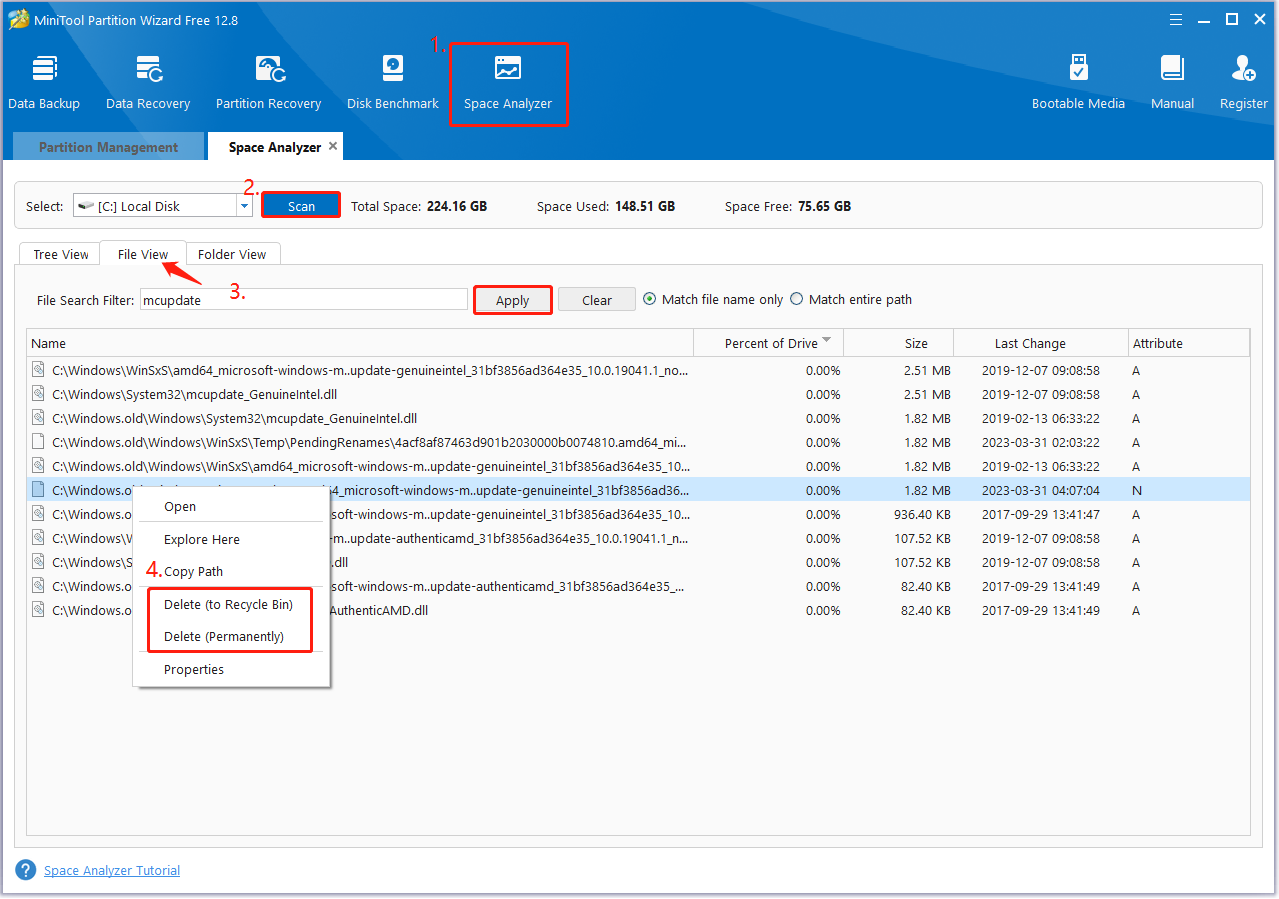
Step 1. Launch the MiniTool software to get its main interface and click Space Analyzer from the top toolbar.
Step 2. Select the drive where you want to delete DLL files from the drop-down menu and click on Scan.
Step 3. Wait for the scanning process to complete. Go to the File View tab, type mcupdate in the search box, and click Apply. Then it will display a list of MCU update dll files for you. Right-click your unwanted file and select Delete (to Recycle Bin) or Delete (permanently).

Now the “Win11 24H2 unable to delete MCU update dll files” issue should be solved. You can further explore other functions of MiniTool Partition Wizard.
To Sum Up
This post discusses why Windows 11 24H2 cannot delete MCU update dll and provides 3 ways to fix the problem. I recommend you rename the mcupdate_GenuineIntel first and see if it works. If the “Win11 24H2 unable to delete MCU update dll files” issue persists, try the latter 2 methods.


User Comments :