A lot of users receive the “VirtualBox failed to open the hard disk file” error message when trying to open an existing disk image file in VirtualBox. Don’t worry. This post of MiniTool Partition Wizard provides several effective ways to fix it.
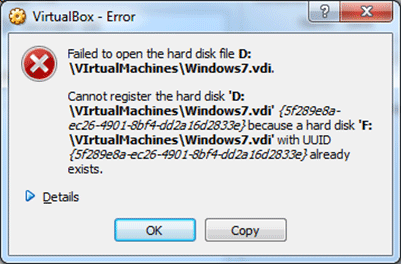
“Unable to open disk image file – Unable to register hard drive” error occurs in VirtualBox because the virtual machine disk image file you are trying to open has the same UUID as another virtual disk image file. In this case, VirtualBox fails to register the disk image file (VDI, VHD, VMDK, etc.) and displays the following error:

-Image from Wintips.org
This error appears with the result code VBOX_E_OBJECT_NOT_FOUND (0x80BB0001). Well, how to fix this error? Please keep reading.
Way 1. Remove Missed Virtual Disks from VirtualBox
The above error may appear if you have moved the virtual hard disk to another location and then tried to re-add the virtual hard disk to a new or existing virtual machine without removing the missing disk from VirtualBox before. In this case, you should free the missing virtual disk files using VirtualBox Media Manager.
Step 1: Open VirtualBox and go to File > Virtual Media Manager.
Step 2: Highlight the missed Virtual Disk (the one with the error sign) and click Release.
Step 3: Click Remove to remove the missing virtual hard disk. Then close the Virtual Media Manager window.
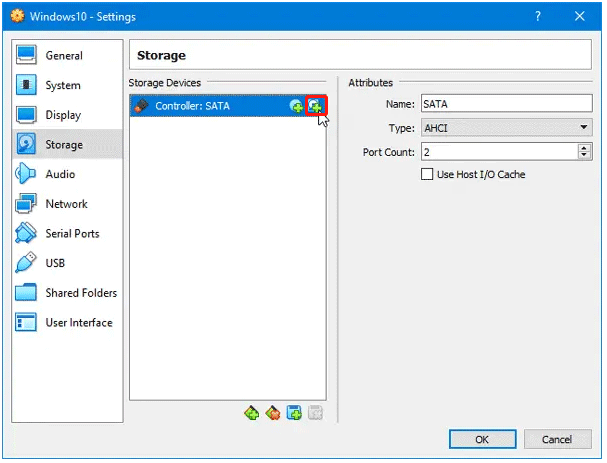
Step 4: Highlight the VM that you want to add the Virtual Hard Drive file and click Settings.
Step 5: Switch to the Storage section, and click the plus sign to add the virtual disk file.

Step 6: On the pop-up menu, select Choose existing disk and select the disk file.
Step 7: Save the changes and try to start your virtual machine.
Way 2. Clone Virtual Disk with Virtual Media Manager
To avoid the “VirtualBox failed to open the hard disk file” error from happening, you can try cloning the Virtual disk image file with Virtual Media Manager. The correct way to successfully clone an existing virtual hard disk image file (VDI, VHD, VMDK, etc.) is to use the copy function in VirtualBox Media Manager.
Step 1: Go to Virtual Media Manager. Then select the Virtual that you want to clone and click Copy.
Step 2: Make some settings about the Disk Image File Type & Size and give a name for the new disk image.
Step 3: Once done, click Copy and wait until the new disk image creation is completed.
Way 3. Change the Virtual Disk’s UUID
The last method to resolve the “VirtualBox failed to open the hard disk file” error is to reset the UUID of the Virtual Disk file mentioned in the error.
Step 1: Type Command Prompt in the Search box. Then right-click on Command Prompt and select Run as administrator.
Step 2: In the Command Prompt window, type the following command and press Enter.
cd C:\Program Files\Oracle\VirtualBox
Step 3: Type the following command and press Enter:
- vboxmanage internalcommands sethduuid
- “Full Path To VHD File”
If you want to reset the UUID of the virtual disk image file “Windows7.vdi” which located at “C:\Users\Admin\VirtualBox VMs\Windows7VM” folder, the command should be:
vboxmanage internalcommands sethduuid
“C:\Users\Admin\VirtualBox VMs\Windows7VM\Windows7.vdi”
Step 4: If everything goes fine, then you should be informed that the UUID has changed.
After that, close Command Prompt and try to attach the Virtual hard disk to a new Virtual Machine.
Bottom Line
This post provides 3 ways for you to solve the “VirtualBox failed to open the hard disk file” error. Besides, if you suspect some bad sectors with your hard disk, you can try the Surface Test of MiniTool Partition Wizard.
MiniTool Partition Wizard FreeClick to Download100%Clean & Safe


![[Solved] The Specified Disk or Diskette Cannot Be Accessed](https://images.minitool.com/partitionwizard.com/images/uploads/2024/05/the-specified-disk-or-diskette-cannot-be-accessed-thumbnail.png)
![[Tutorial] How to Recover Data from Spy Pen Camera](https://images.minitool.com/partitionwizard.com/images/uploads/2024/05/spy-pen-camera-data-recovery-thumbnail.png)
User Comments :