If you find the USB Serial CH340 Chipset not working after a Windows Update, you don’t need to worry. Here, Partition Magic offers several effective solutions to help you troubleshoot the issue.
Updating Windows regularly has many advantages, such as improving computer performance, maintaining safety, fixing bugs, etc. However, some people report that the USB Serial CH340 Chipset is not working after a Windows Update on their PCs. This issue bothers them a lot.
When this error occurs, the affected device may be unable to recognize the CH340 component, resulting in other issues. After searching for this error on the Internet, I found that the error is mainly linked to compatibility changes.
Have you also come across the same issue on your PC? This post gives a full guide on solving this error. You can try these solutions one by one if you experience the same issue.
MiniTool Partition Wizard FreeClick to Download100%Clean & Safe
Solution 1. Check the Current Driver Version
As the culprit of the “USB Serial CH340 Chipset not working after a Windows Update” issue is compatibility changes, checking the current driver version is necessary. Here’s how to do that:
Step 1. Connect the USB Serial Adapter to your computer.
Step 2. Press the Windows + X keys simultaneously to open the Device Manager window.
Step 3. Expand the Ports (COM & LPT) category, right-click the CH340 device, and select Properties.
Step 4. Then, navigate to the Driver tab and check the driver version and date.
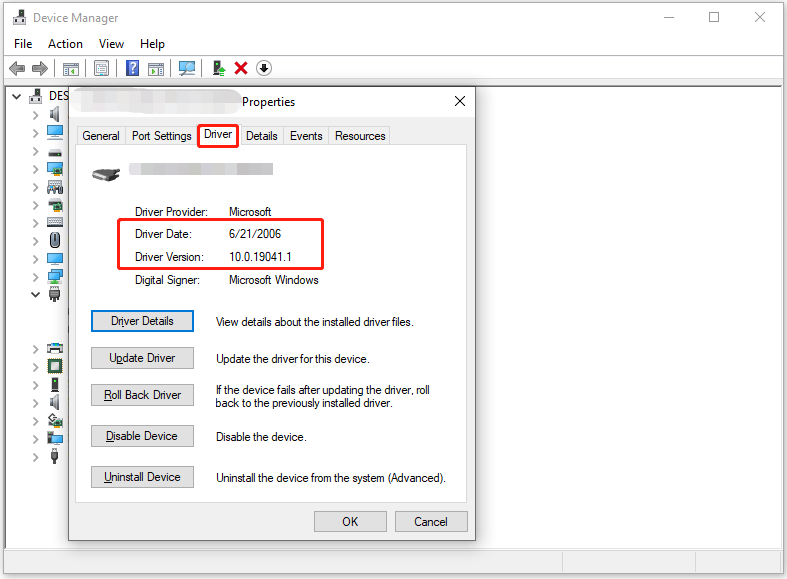
Step 5. If the driver is newer than the 2019 version, proceed to roll back or reinstall the compatible version. Here’s the way:
Roll back driver:
- In the Device Manager window, right-click the CH340 device and select Properties.
- Go to the Driver tab and click Roll Back Driver.
- Restart your computer and test the device again.
Reinstall driver:
- In the Device Manager window, right-click the CH340 device and select Uninstall device.
- Click Uninstall in the pop-up window.
- Restart your computer and check if the issue is fixed.
Solution 2. Manually Reinstall the 2019 WCH Driver
If you are unable to roll back the driver version to the 2019 WCH driver, you can also try manually reinstalling it. Here’s the guide:
- Download the compatible driver from your device manufacturer’s site.
- Disconnect the USB serial adapter.
- In Device Manager, uninstall the current CH340 device driver.
- After that, restart your computer.
- Install the 2019 driver manually by running the installer.
- Reconnect the USB adapter and test whether the issue is fixed.
Solution 3. Prevent Windows from Automatically Updating Drivers
Some people report that preventing Windows from automatically updating drivers is also useful for fixing the “USB serial CH340 chipset not working” issue. You can also have a try. Here’s the way:
Step 1. Press Windows + R to open the Run window, type “gpedit.msc” and press Enter.
Step 2. Navigate to Computer Configuration > Administrative Templates > System > Device Installation > Device Installation Restrictions.
Step 3. Right-click the policy “Prevent installation of devices that match any of these device IDs” and select Edit.

Step 4. Select Enabled in the pop-up window.
Step 5. Open the Device Manager window, right-click the CH340 device, and select Properties > Details.
Step 6. Then, select Hardware Ids from the dropdown menu, and copy the hardware ID here.
Step 7. Back to the group policy configuration window, click Show, and paste the copied ID under Value.
Step 8. Next, click Apply and OK to save the changes and restart your computer.
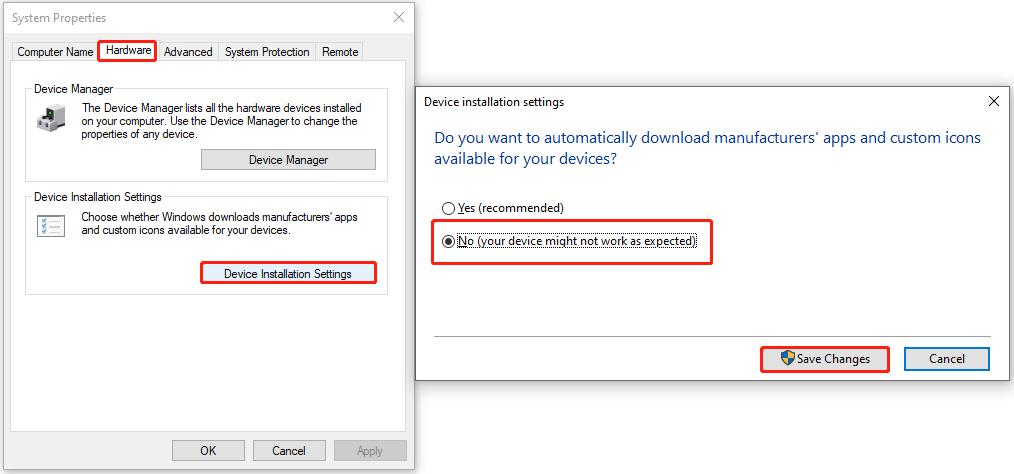
Solution 4. Disable Automatic Driver Updates
Also, disabling automatic driver updates may also work for fixing the “USB serial CH340 chipset not working” issue. Here’s the tutorial:
- Open the Run window, type “sysdm.cpl” and press Enter.
- Go to the Hardware tab and click Device Installation Settings.
- Choose No (your device might not work as expected).
- Then, click Save Changes.
After disabling automatic driver updates, you can try installing the driver in compatibility mode to fix the issue. Here are the detailed steps:
- Download the stable CH340 device driver from your device manufacturer’s site.
- Right-click on the CH340 device driver installer file and select Properties.
- Go to the Compatibility tab, check Run this program in compatibility mode for and choose Windows 7 or Windows 8 from the list.
- Click Apply and run the installer.
Solution 5. Uninstall the Problematic Update
You can also try uninstalling the problematic update to fix the “USB serial CH340 chipset not working” issue. To do so, follow these steps:
- Press the Win + S keys simultaneously to open the Search window.
- Type “control panel” in the search box and press Enter.
- Set View by as Categories, and click Uninstall a program under the Programs section.
- Click on View installed updates on the left side of the window.
- Right-click the most recent update and select Uninstall.
- Follow the on-screen instructions to complete the process.
- After that, open the Settings window and go to Update & Security > Windows Update.
- Click Pause the updates for 7 days.
Solution 6. Perform a System Restore
System restore can revert Windows to the previous status when the issue hasn’t occurred. Therefore, if none of the above solutions can help you fix the “USB serial CH340 chipset not working” issue, you can try performing a system restore to fix the issue. Here’s the way:
- Press the Win + I keys simultaneously to open the Settings window.
- Navigate to System > About, and select the System protection link on the right panel.
- In the new window, click the System Restore button.
- Select Next, and then select the restore point you want to use from those in the list.
- After that, click the Next button.
- Next, click Finish. Then choose Yes to the “Once started, System Restore cannot be interrupted. Do you want to continue?” question.
- Then the system restore process will begin. Wait for this process to be completed.
- Once done, your Windows will revert to the previous state as you select.
In Conclusion
How to fix the “USB serial CH340 chipset not working after a Windows update” issue? Now, you may already know the answer. This post offers some useful solutions to solve the issue. You can try them one by one until you fix the issue successfully.
About The Author

Position: Columnist
Charlotte is a columnist who loves to help others solve errors in computer use. She is good at data recovery and disk & partition management, which includes copying partitions, formatting partitions, etc. Her articles are simple and easy to understand, so even people who know little about computers can understand. In her spare time, she likes reading books, listening to music, playing badminton, etc.
User Comments :