Keeping Windows updated to date is important for the whole security and performance of the PC. However, some people report that they encounter the error code 0x80242006 when they update their Windows 10 PC. For example, here is a user report from the Reddit community:
I keep getting these errors (Error 0x80242006 and 0x80070424) and I'm not sure what to do. Help, please!https://www.reddit.com/r/Windows10/comments/ez5sjo/i_keep_getting_these_errors_error_0x80242006_and/

After conducting an online search, I discovered that the primary cause of the update error 0x80242006 in Windows 10 is usually corruption in the Windows 10 update components.
Additionally, this error can be caused by a security app block, outdated or incompatible drivers, an excessive amount of temporary and junk files, corrupted system files, registry file corruption, missing core files, stopped BITS to update remnants, and other factors.
Have you also encountered the Windows 10 update error 0x80242006? If so, please continue reading.
Method 1. Try Some Basic Tricks
Before trying other advanced methods to fix the update error 0x80242006, you can try these basic tricks first:
- Run Windows update troubleshooter
- Download and install the Windows update manually
- Disable Windows Defender/antivirus temporarily
- Update drivers
- Enable BITS services
- Remove temporary and junk files
- Use the Windows Update Assistant
To delete unwanted files, the Disk Cleanup tool which is a built-in Windows operating system is a good choice for you. However, if you encounter errors when running this tool, you can use MiniTool Partition Wizard as an alternative.
It provides the Space Analyzer feature that can help you remove unwanted temporary and junk files with ease. In addition, this multifunctional tool can also help you migrate OS to SSD without reinstalling OS, convert MBR to GPT, partition hard drive, format SD card FAT32, and more.
MiniTool Partition Wizard FreeClick to Download100%Clean & Safe
Method 2. Use Group Editor
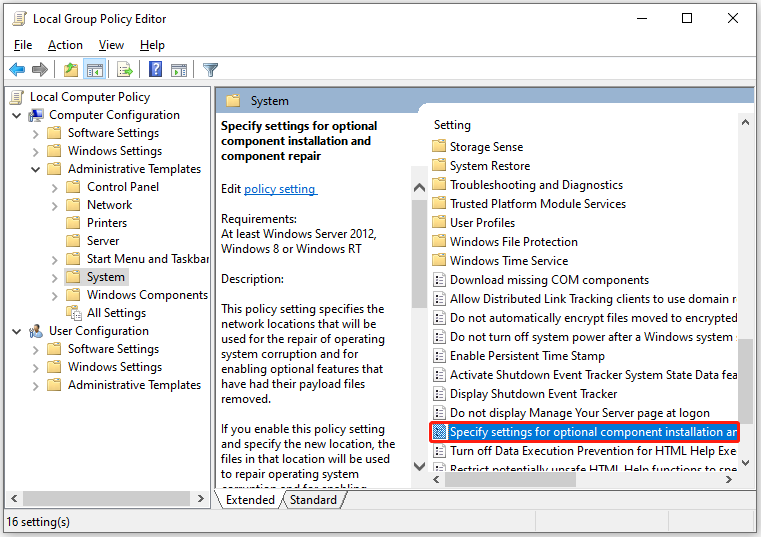
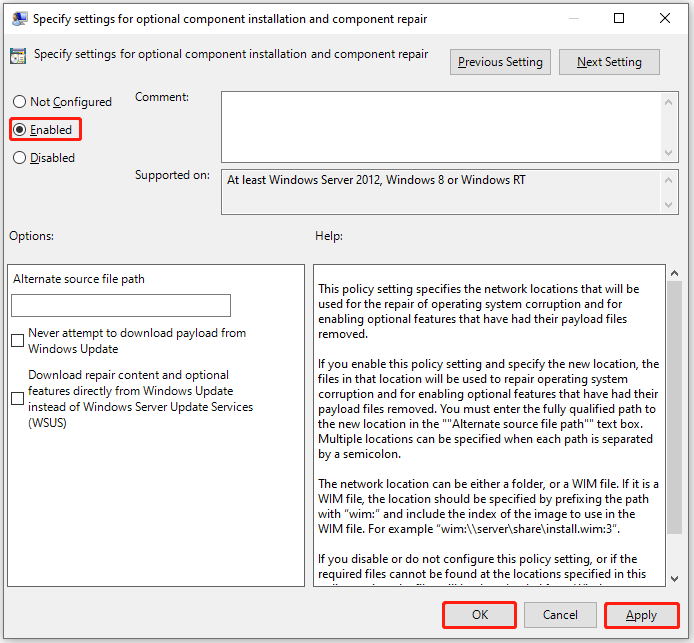
Some people report that they fixed the update error 0x80242006 successfully after enabling the Specify settings for optional component installation and component repair policy in Group Editor. You can also have a try. Here’s the guide:
Step 1. Press the Win + R to open the Run window, type “gpedit.msc” and press Enter.
Step 2. Go to Computer Configuration > Administrative Templates > System, and then double-click the Specify settings for optional component installation and component repair.

Step 3. Select Enabled. Then, click Apply and OK to save the changes.

Method 3. Run SFC and DISM
Corrupted system files are also responsible for the Windows update error 0x80242006. So, you can perform SFC and DISM to fix the corrupted system files and then get rid of the error code 0x80242006. Here’s the way:
Step 1. Press the Win + S keys simultaneously to open the Search window. Type “cmd” in the search box, right-click Command Prompt under Best Match, and then select Run as administrator.
Step 2. In the elevated Command Prompt window, type “sfc /scannow” and press Enter.
Step 3. Once the process is complete, restart your PC and check if the error has been resolved. If not, pro If not, proceed by initiating a DISM scan. Here are the DISM commands:
- DISM.exe /Online /Cleanup-image /Scanhealth
- DISM.exe /Online /Cleanup-image /Checkhealth
- DISM.exe /Online /Cleanup-image /Restorehealth
Method 4. Reset Windows Update Components
Corrupted Windows update components can also cause the Windows update error 0x80242006. So, you can try resetting Windows update components to fix the error. If you don’t know how to reset Windows Update Components, you can follow the guide in this post: How to Reset Windows Update Components in Windows 11/10?
Method 5. Reset the Catroot2 and Rename SoftwareDistribution Folders
The Catroot2 and SoftwareDistribution folders are Windows operating system folders that are required for the Windows Update process.
If you suspect that there is something wrong with the files in these folders that cause the error code 0x80242006, you can try resetting the Catroot2 and renaming the SoftwareDistribution folder to fix the error. To reset the Catroot2 folder, you can do the following:
Step 1. Run the Command Prompt as an administrator, type the following commands one after the other, and hit Enter:
- net stop cryptsvc
- md %systemroot%\system32\catroot2.old
- xcopy %systemroot%\system32\catroot2 %systemroot%\system32\catroot2.old /s
Step 2. Delete all the contents of the catroot2 folder.
Step 3. Back to the Command Prompt window, type the command “net start cryptsvc” and press Enter.
After that, if the error still occurs, you can try renaming the SoftwareDistribution folder to fix the error. To do that, you can refer to this post: How to Rename or Delete Software Distribution Folder on Windows.
Method 6. Try a Clean Install
If none of the above methods can help you fix the Windows 10 update error 0x80242006, you can try clean install Windows 10 to fix the error. Here are some posts, you can refer to:
- [Illustrated Guide] How to Clean Install Windows 10 21H1 on PC?
- [Illustrated Guide] How to Clean Install Windows 10 21H2 on PC?
- How to Clean Install Windows 10 22H2 (the 2022 Update) from USB?
In Conclusion
How to fix the update error 0x80242006? After reading this post, you may already know the ways. You can try the methods provided in this post one by one until you fix the error successfully.

User Comments :