Windows 11 offers a modern interface with improved features. You can customize notification sounds to change the way their computer alerts them to messages, emails, and reminders. This helps you stay updated and engaged. Depending on the device or application, the pitch, volume, and length of notification sounds may vary.
Turning on the flash screen during audio notifications in Windows 11 helps users who need visual notifications.
Whenever a notification arrives, your Windows computer will notify you and flash the screen. Once a notification pops up, Windows will flash the full screen, active window, or just the title bar.
Want to get notifications from screen flashing on your Windows 11 PC? This post will show you how to turn on/off flash screen during audio notifications in Windows 11 using Windows Settings, Control Panel, or Registry Editor.
Way 1. Use Windows Settings
You can turn on/off flash screen during audio notifications in Windows 11 by using Windows Settings. The steps are as follows:
Step 1: Press the Win + I key to open the Windows Settings.
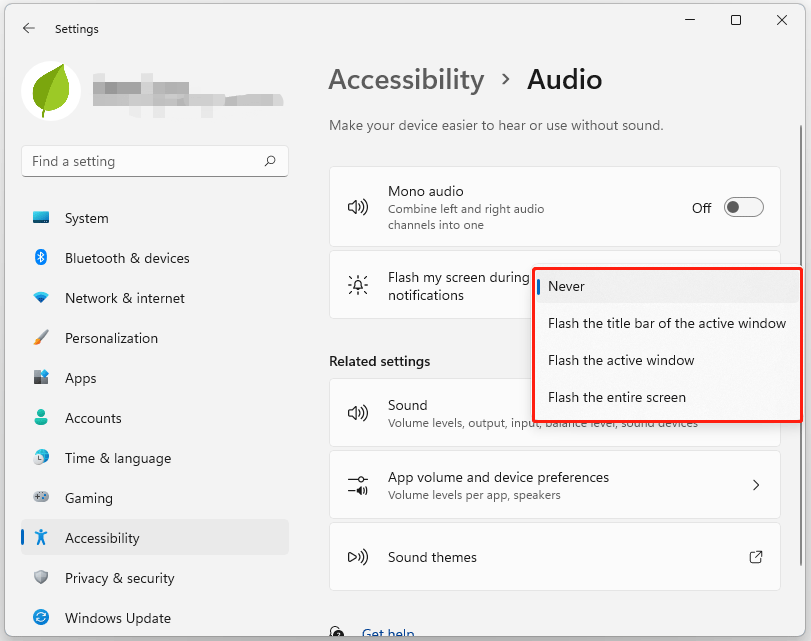
Step 2: Click the Accessibility option from the left side, and then click Audio on the right side.
Step 3: In the Flash my screen during audio notifications section, click the drop-down menu, and you will see for options available:
- Never
- Flash the title bar of the active window
- Flash the active screen
- Flash the entire screen

Step 4: If you want to turn on flash screen during audio notifications in Windows 11, you should choose from the following three options you want and the settings will take effect right away. If you want to turn off it, select Never.
Way 2. Use Control Panel
You can turn on/off flash screen during audio notifications in Windows 11 by using Control Panel. Here are detailed steps to do that.
Step 1: Type control panel in the Search bar and choose Control Panel to open it.
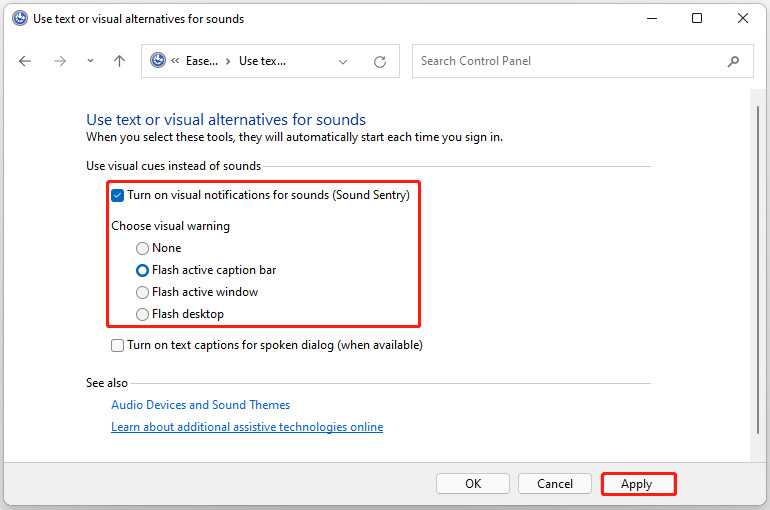
Step 2: In the Control Panel window, go to Ease of Access > Ease of Access Center > Use text or visual alternatives for sounds.
Step 3: Select Turn on visual notifications for sounds (Sound Sentry).
Step 4: Select the setting you want under Choose visual warning:
- None
- Flash active caption bar
- Flash active window
- Flash desktop
Step 5: Click Apply and restart your computer.

After restarting your computer, you will
Way 3. Use Registry Editor
You can turn on/off flash screen during audio notifications in Windows 11 by using Registry Editor. Here are detailed steps to do that.
Step 1: Press the Win + R key to open the Run dialog box. Then type regedit in it and press Enter to open Registry Editor.
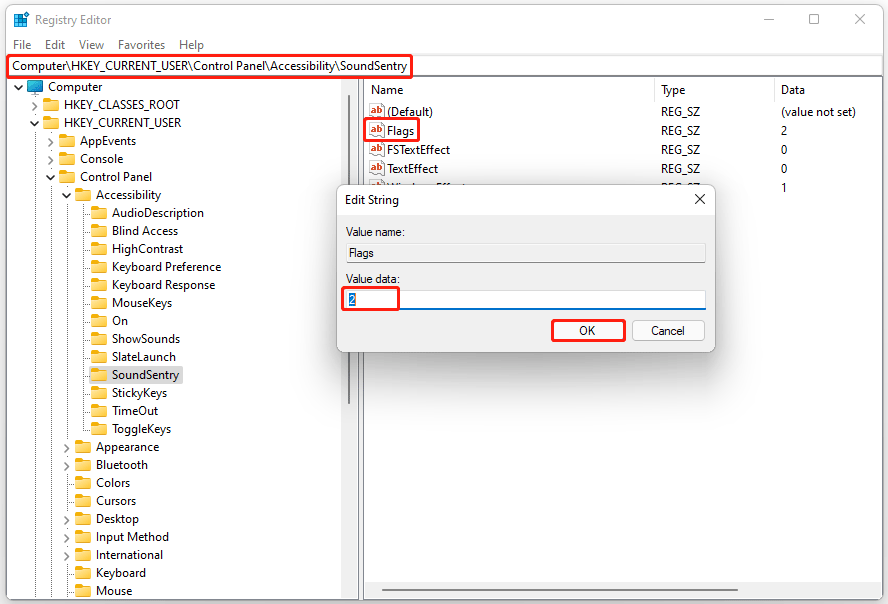
Step 2: In the Registry Editor window, go to the following path:
HKEY_CURRENT_USER\Control Panel\Accessibility\SoundSentry
Step 3: On the right side, double-click the Flags key and change the value of if as required:
- 0 = None
- 1 = Flash active title bar
- 2 = Flash active window
- 3 = Flash entire display

Once done, close Registry Editor and restart your PC to make the changes take effect.
Further reading: If you are looking for a professional partition manager, MiniTool Partition Wizard is a great choice. It aims to maximize disk performance. It can clone a hard drive, recover data from hard drive, format USB to FAT32, partition hard drive, and more. You can have a try.
MiniTool Partition Wizard DemoClick to Download100%Clean & Safe
Bottom Line
In conclusion, this post shows you 3 ways to turn on/off flash screen during audio notifications in Windows 10/11. If you have this need, you can choose one preferred one to do that.


User Comments :