The Toshiba Satellite boot menu is used to change the boot order on your laptop. It’s an important part of the BIOS setup and can be easily accessed by pressing F12. However, sometimes after you press the hotkey for the boot menu, you may find yourself not entering the specific menu but the desktop.
Once you experience the “Toshiba Satellite boot menu not working” issue, check the user’s manual to see if F12 is the correct hotkey for the boot menu on your PC. Besides, restart your computer and when the logo appears on the screen, try rapidly tapping the hotkey several times and then holding it instead of holding it all the time.
If the above measures don’t help with the annoying issue, you can then refer to the following methods.
Fix 1: Switch to a USB Keyboard
If there is a USB keyboard available, you can try connecting it to your laptop and then pressing F12 to test if you can enter the boot menu. If you can, then it’s the damaged keyboard that causes the “Toshiba Satellite boot menu not working” issue. If the issue persists on the USB keyboard, simply move on and use other ways to troubleshoot it.
Fix 2: Remove All Peripherals
The peripherals connected to your laptop may randomly lead to the “Toshiba laptop boot menu F12 not working” issue. Therefore, you can try removing all the peripherals from your PC when you fail to access the boot menu.
To do this, you should turn off your computer first. Then unplug the devices like power cables, external hard drives, USB drives, etc.
Fix 3: Disable Fast Startup
With the Fast Startup feature enabled, Windows will skip the screen guiding to the boot menu quickly. As a result, the “Toshiba laptop boot menu not working” issue comes out. To fix it, you can try turning off the specific feature. Here’s how to do this.
Step 1: Press Windows + R to open the Run dialog.
Step 2: Type control.exe in the text box and then press Enter.
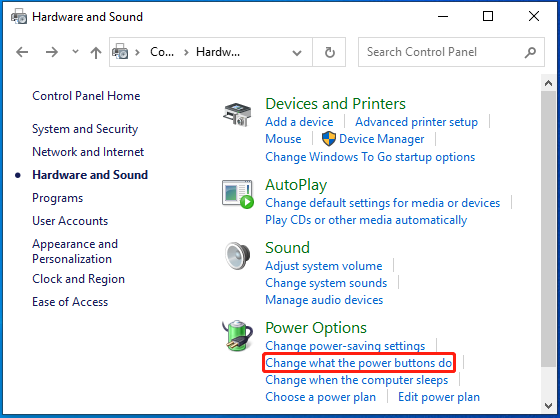
Step 3: In the Control Panel, click Hardware and Sound. Then click Change what the power buttons do under Power Options.

Step 4: In the next window, click the Change settings that are currently unavailable link.
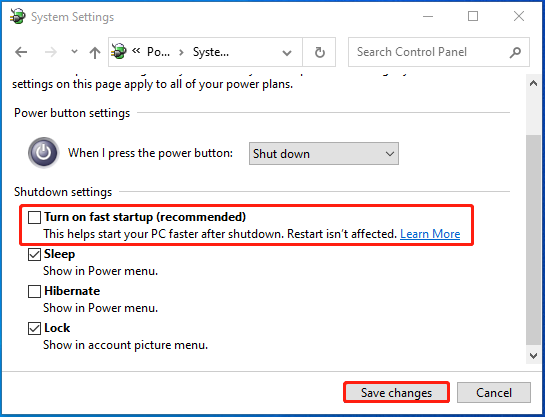
Step 5: After that, uncheck Turn on fast startup and then click Save changes.

Fix 4: Update the BIOS
You are also likely to repair the “Toshiba laptop boot menu F12 not working” issue by updating BIOS. If you have no clue how to execute the BIOS update, you can take a look at this post: How to Update BIOS Windows 10 | How to Check BIOS Version.
Fix 5: Factory Reset Your Laptop
When facing the “Toshiba laptop boot menu not working” issue, you can also try factory resetting your laptop. By doing so, the system may erase potential computer issues including the “Toshiba Satellite boot menu not working” issue.
It’s worth noting that factory resetting a laptop will wipe all saved data and restore your computer to its original state. So, to protect your data, you’d better make a backup before the process. Here, we highly recommend you use MiniTool Partition Wizard for backup.
It’s a professional disk partition manager that enables you to clone hard drive to SSD/HDD so that you can protect the whole drive from losing data. Additionally, it also allows you to partition/move/resize/wipe hard drives, convert MBR to GPT without data loss, recover data from hard drive, and more.
Get MiniTool Partition Wizard installed on your PC and use it to back up files. Then follow this guide to factory reset your Toshiba Satellite laptop: How to Factory Reset Toshiba Satellite on Windows7/8/10?
MiniTool Partition Wizard DemoClick to Download100%Clean & Safe
This post tells how to get rid of the “Toshiba Satellite boot menu not working” issue effectively. You can take it as a reference if you get stuck in the same issue. If you have any other great solutions to this issue, you can share them with us in our comment area below.


User Comments :