As we all know, Windows 11 comes with high system requirements, including 64GB storage space, 4GB RAM, enabled TPM, etc. However, it is not an ideal choice for those old or lower-end PCs. Tiny 11 comes here in time. You can install Tiny 11 on a computer with RAM and disk space.
If you want to install Tiny 11 on mobile devices like Raspberry Pi 4, you can download Tiny11 for Arm64. How to install Tiny11 for Arm64 on Raspberry Pi 4? Let’s keep reading.
What Is Tiny11 for Arm64
Tiny11 for Arm 64 is a tiny operating system of Windows 11 Pro 22H2. This version of Tiny 11 is designed for mobile devices, including Raspberry Pi 4, other WoA devices, or Apple M1/M2 VMs. Compared with standard Windows 11 installation, Tiny11 for Arm 64 is very lightweight (only 4.2GB) and has everything you need for a comfortable computing experience.
Tiny11 for Arm64 Download & Install on Raspberry Pi 4
How to download Tiny11 for Arm64 and install it on Raspberry Pi 4? This process can be divided into the following 2 parts. Let’s start trying.
Preparations to Install Tiny11 for Arm64 on Raspberry Pi 4
Before the Tiny11 for Arm64 installation, you need to prepare something important. Here we summarize them as follows:
Hardware requirements:
- Raspberry Pi 4 with 4GB or 8GB RAM
- An 8GB microSD card or USB 3.0 flash drive (FAT32)
- Keyboard, mouse, HDMI, and power for your Raspberry Pi 4
- Windows 10 computer
- A 32GB or larger SSD is recommended for better performance
Software requirements:
- Tiny11 for Arm64 ISO file
- The WoR (Windows on Raspberry Pi) tool
Further reading: The Tiny11 for Arm64 installation process will delete all data on the SD card. So, we highly recommend you back up them in advance. MiniTool Partition Wizard is a professional data recovery tool that can help you restore all data from an SD card easily. Besides, it’s a FAT32 formatter that can format a USB/SD card larger than 32GB to FAT32, convert NTFS to FAT32 without data loss, and more.
MiniTool Partition Wizard DemoClick to Download100%Clean & Safe
Tiny11 for Arm64 Download & Installation
To install Tiny11 for Arm64 on Raspberry Pi 4, you need to download the Tiny11 for Arm64 ISO file to a USB 3.0 flash drive. Here are detailed steps:
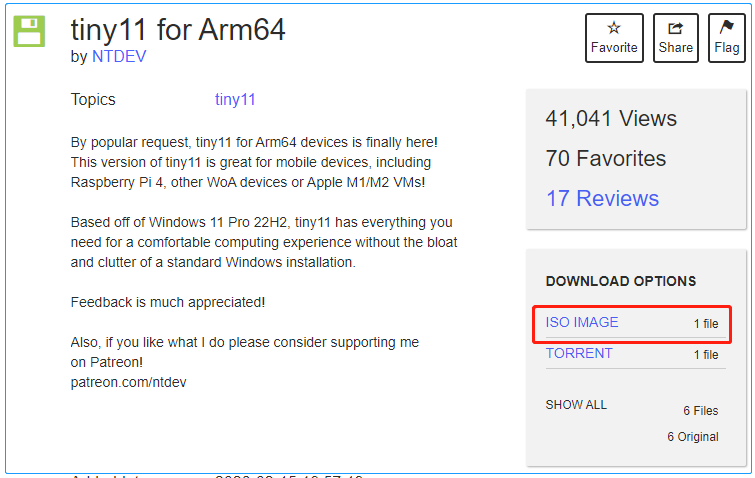
Step 1. Open the Windows 10 PC and visit the website from the Internet Archive “https://archive.org/details/tiny11a64”. Then click on ISO IMAGE under the DOWNLOAD OPTIONS section to get the Tiny 11 for Arm64.

Step 2. Download Windows on Raspberry imager from the Windows on Raspberry project page.
Step 3. Connect the USB 3.0 flash drive to your computer.
Step 4. Once downloaded, find the WoR folder and double-click to run the WoR app. Then you can set your language and wizard mode, and click on Next.
Step 5. Select the storage device from the drop-down menu, set the Device type to Raspberry Pi 4 / 400 (ARM64), and click on Next.
Step 6. Select the downloaded Tiny 11 for Arm64 iso file from the Image file section and click on Next.

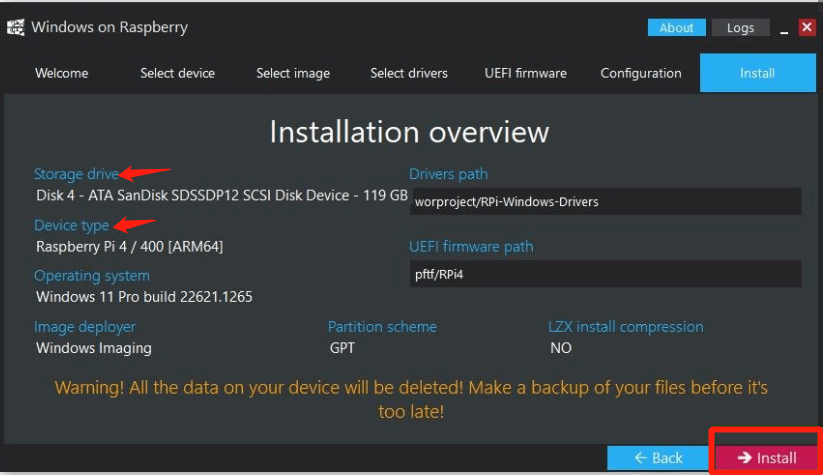
Step 7. Check out the Installation overview and click on Install. Here you should note the storage drive and device type.

Step 8. This process may take you some time. Wait patiently for the process to complete. Once done, click on Finish to end the Tiny11 for Arm64 installation.
Step 9. Now, you can remove the USB drive from the Windows PC and connect it to the Raspberry Pi 4.
Step 10. Connect the keyboard, mouse, ethernet, HDMI, and power to the Raspberry Pi 4.
Step 11. When the Raspberry Pi boots up from the USB drive, follow the on-screen instructions to install Tiny10 for Arm64.
Here comes the end of this post. Do you have any other opinions about the Tiny11 for Arm64 installation? Please share them with us in the comment area below.

User Comments :