About Tilde Key
Tilde key, as the name suggests, is the tilde on your keyboard. This key is located in the upper left corner of the keyboard, below the Esc (escape) key, and to the left of the key you use to enter the number 1 or exclamation mark (!).
The Tilde key has a variety of uses, especially in mathematics. It is used in coding systems to show approximate values, as an umlaut, and more.
To use the tilde key on Windows 11/10, simply hold down the Shift key, press the key to the left of the number 1 key (with the ` character), and release the key. This will enter a tilde symbol similar to a tilde (~).
However, the Tilde key on their PC is not working properly. This can be caused by a variety of factors, including a damaged tilde key, damaged or outdated keyboard drivers, incorrect language and keyboard layout settings, and application conflicts.
If you also encounter the Tilde key not working in Windows 11/10 problem, you can read the following ways.
How to Fix Tilde Key Not Working?
What to do if the Tilde key doesn’t work? We will offer you 4 effective ways for you to solve this issue.
Before trying the following fix, make sure there is no physical damage to the Tilde key. Also, clean any dust from the key and see if it works properly.
Fix 1. Run the Keyboard Troubleshooter
How to fix the Tilde key not working? You can try running the keyboard troubleshooter. Here is the guide.
- Press the Windows + I keys to open Settings.
- On Windows 10, go to Update & Security > Troubleshoot > Additional troubleshooters. On Windows 11, go to System > Troubleshoot > Additional troubleshooters.
- Choose Keyboard and click Run the troubleshooter.
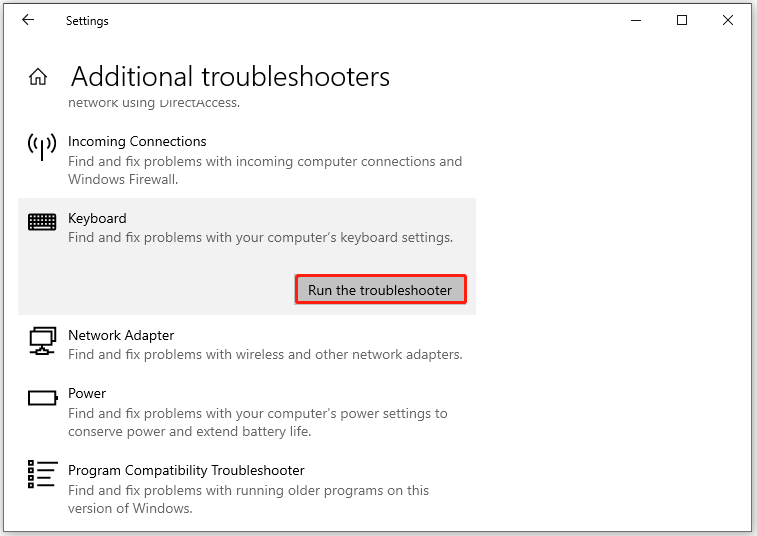
Then the moment the troubleshooting completes, restart your computer and determine whether the issue persists.
Fix 2. Make Sure Your Keyboard Language Is US Qwerty
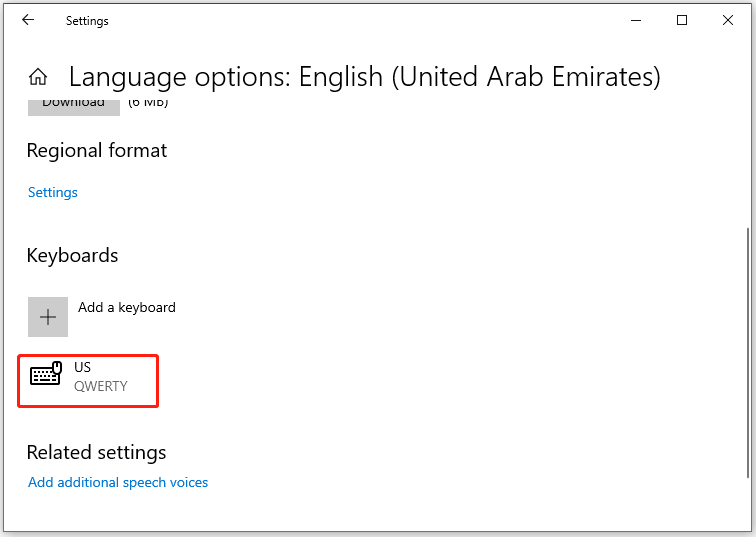
Some users reported that they encountered this problem because they selected a language other than English (United States). Therefore, set the language back to English-United States and make sure the keyboard layout is set to US Qwerty. To do this, follow these steps:
- Go to Settings > Time & Language > Language.
- Under Preferred languages, select the language that contains the keyboard you want, and then select Options.
- From here make sure you have US-Qwerty. If you are not using US-Qwerty, add it and remove the other one.
Fix 3. Update or Reinstall the Keyboard Driver
If this issue is caused by an outdated or corrupted keyboard driver, then updating or reinstalling the driver may resolve the issue. Here are the guidelines:
- Press the Windows + X keys and select Device Manager from the menu.
- Expand the Keyboards category.
- Right-click on the keyboard driver you want to update and click Update driver.
- Then follow the on-screen instructions to update the driver.
- As soon as the process is completed, make sure to restart your computer to save all the changes.
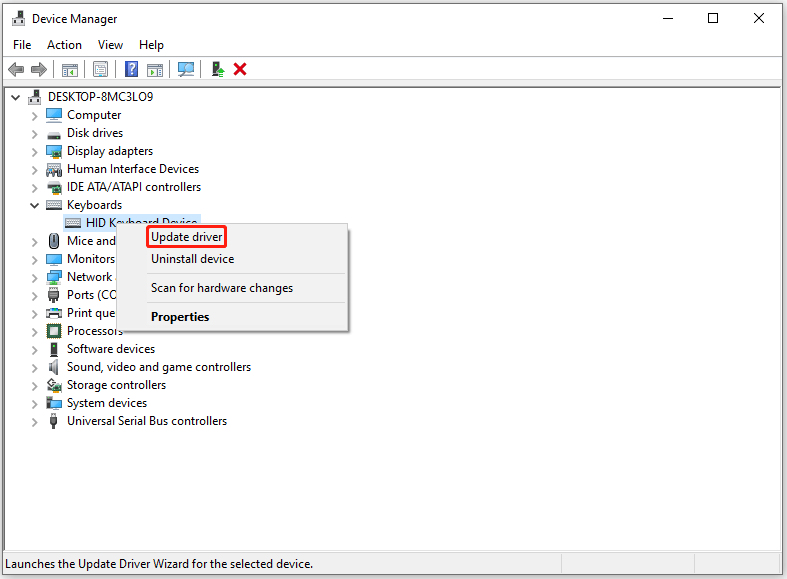
If updating the keyboard driver does not make any difference, reinstall it. To do that, you need to right-click the driver and select Uninstall device. After that, restart your PC and the driver will be reinstalled automatically.
Also read: [Easy Fixes] Keyboard Not Working in Windows 11/10?
Fix 4. Change the Advanced Language Settings
To solve the Tilde key not working in Windows 11/10 problem, you can also try to change the advanced language settings. The steps are as follows:
- Go to Settings > Time & Language > Language.
- Click Keyboard in the right-side panel and choose the Input language hot keys option.
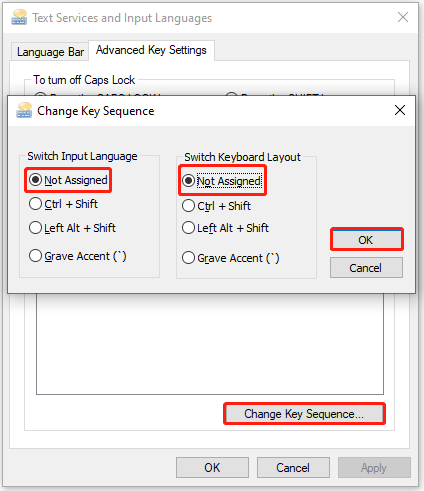
- In the pop-up window, under the Advanced Key Settings tab, click on the Change Key Sequence button.
- Change the Switch Input Language and Switch Keyboard Layout to Not Assigned. Then click OK.
- Finally, click Apply > OK to save the changes.
MiniTool Partition Wizard FreeClick to Download100%Clean & Safe
Bottom Line
If the Tilde key doesn’t work in Windows 11/10, you can try the methods above to solve it.

![How to Format an External Hard Drive Using Android? [Full Guide]](https://images.minitool.com/partitionwizard.com/images/uploads/2024/07/format-an-external-hard-drive-using-android-thumbnail.png)
User Comments :