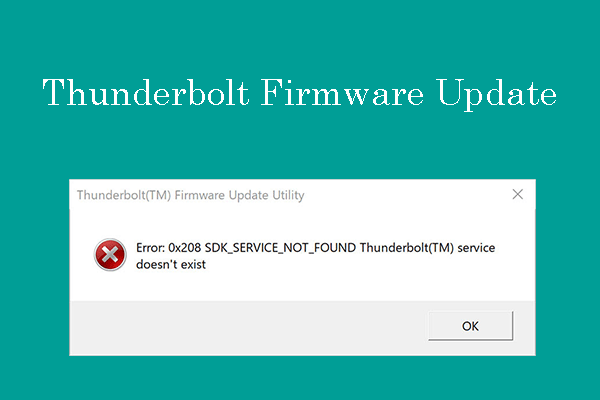
Some people say the Thunderbolt firmware can’t install on their computers. Do you face the same issue? Don’t worry. This post from Partition Magic offers you 5 ways to solve the Thunderbolt firmware update failed issue.
Thunderbolt Firmware Update Filed
Thunderbolt 3 is very popular on Windows PCs. It is very fast and functional. Many people may use it to connect an external graphics card, a Thunderbolt hub or dock, or a Thunderbolt SSD.
MiniTool Partition Wizard DemoClick to Download100%Clean & Safe
However, because the Windows 10 system doesn’t have the Thunderbolt driver built into the system, you need to update Thunderbolt firmware manually when it is outdated. Otherwise, your USB-C port might not work well.
Then, some people report that the Thunderbolt firmware can’t install. Here are some examples of the Thunderbolt firmware update errors:
- Error: Firmware update failed.
- Thunderbolt controller not detected.
- The Intel Thunderbolt(TM) Controller Driver needs to be installed before the Thunderbolt(TM) firmware can be updated.
- And so on.
How to Solve the Thunderbolt Firmware Update Error
In most cases, Thunderbolt firmware update failed just because you have used the wrong way to update the Thunderbolt firmware. Then, you can do as follows to get rid of the issue.
Fix 1. Update BIOS
The HP website recommends users update BIOS before installing the Thunderbolt firmware update. Therefore, if your Thunderbolt firmware can’t install, try updating BIOS and then install the update again.
Fix 2. Tweak BIOS Settings
Some ThinkPad users say that they should go into BIOS to ensure that Thunderbolt entry in the Security > I/O Port access is Enabled and Config > Thunderbolt(TM) 3 > Thunderbolt BIOS assist mode is Disabled. You can enter the BIOS to see if you have similar settings to tweak.
Fix 3. Install the Intel Thunderbolt Software
Step 1: Go to the Intel Thunderbolt Driver download page and click the Download button to get the TBT-Win10-1.41.1340.0.zip file. This version is released in 2023 and it should be the latest Thunderbolt firmware update.
Step 2: Extract the ZIP file and you will get a folder. Open the folder and you will see the Thunderbolt(TM) Software Installer.exe file.

Step 3: Double-click the Thunderbolt Software Installer.exe file and restart your computer. Then, the Thunderbolt Control Center software should be installed on your computer to identify your Thunderbolt devices.
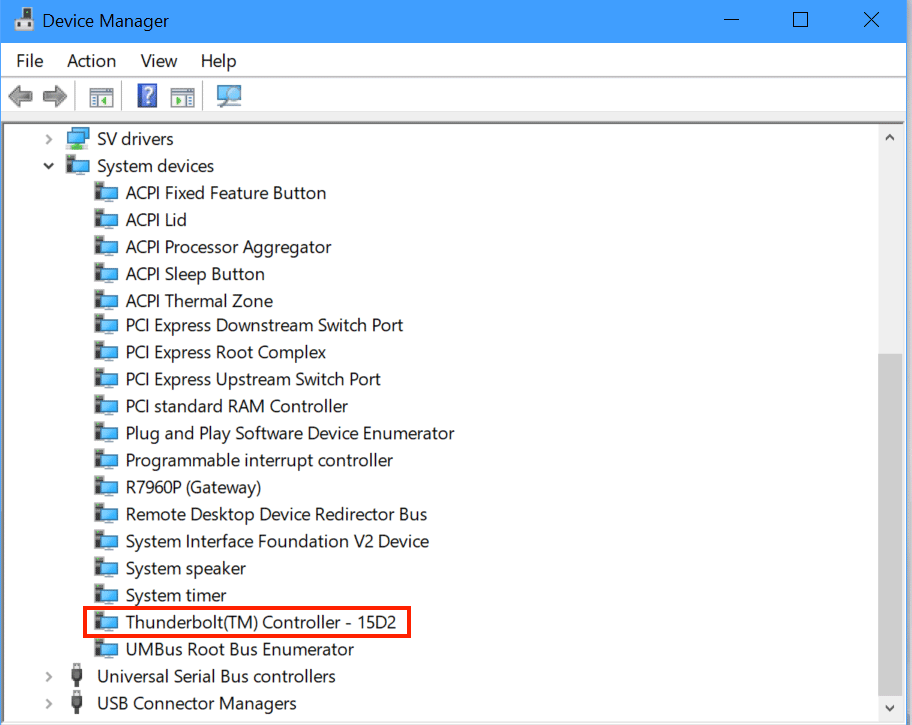
Fix 4. Uninstall Thunderbolt(TM) Controller in Device Manager
- Press the Windows logo key + X and then select Device Manager from the context menu.
- Expand System devices and scroll down to find Thunderbolt(TM) Controller.
- Right-click on it and choose Uninstall device.
Fix 5. Refer to the Following Update Process
Some ThinkPad users say the following update process is correct and works for them. You can use it as a reference.
- Go to BIOS to enable I/O Port access and disable Thunderbolt BIOS assist mode.
- Go to Lenovo and download the latest Intel Thunderbolt Software and Thunderbolt Firmware Update Utility. Then, download an older version of the Lenovo Power Management Driver.
- Turn on Flight mode to prevent Windows from updating drivers.
- Open Control Panel to uninstall Thunderbolt Control Center.
- Open Device Manager to uninstall Thunderbolt(TM) Controller and Lenovo PM Device.
- Restart the PC and then install the Intel Thunderbolt Software and Lenovo Power Management Driver.
- Restart the PC again and go into Device Manager to check if the versions of the Thunderbolt(TM) Controller and Lenovo PM Device are correct.
- Plug in the charger to the laptop. A non-Thunderbolt USB-C port is better.
- Install the Thunderbolt Firmware Update Utility to update Thunderbolt firmware.
- After the update is completed, restart the PC, Then, check Lenovo Software in Sys Tray, turn on Wi-Fi, and update the Lenovo PM Device. Now, all is the latest.
Bottom Line
This post offers you 5 ways to solve the Thunderbolt firmware update failed issue. You can have a try. If you know other solutions, contact me and I will add them to my post.
About The Author

Position: Columnist
Linda has been working as an editor at MiniTool for 5 years. She is always curious about computer knowledge and learns it crazily. Her articles are simple and easy to understand. Even people who do not understand computer can gain something. By the way, her special focuses are disk management, data recovery and PDF editing.
User Comments :