For some reason, you may want to upgrade your PC from an old version to Windows 10/11. However, the upgrade can’t always succeed as you expect. Sometimes when you execute a Windows upgrade, you may fail and receive an error message that says: This upgrade path is not supported.
Fortunately, this post summarizes several feasible solutions to the “this upgrade path is not supported Windows 11/10” issue. When you experience the issue, simply follow the listed methods for a repair.
Related articles:
- Windows 10 Requirements
- Windows 11 Requirements
- Upgrade Windows 8.1 to 10
- Upgrade Windows 7 to 11
- Upgrade Windows 10 to 11
Method 1: Run the Windows Update Troubleshooter
The Windows Update troubleshooter is a Windows built-in utility that repairs plenty of issues related to Windows updates and upgrades. When you encounter the “this upgrade path is not supported Windows 10/11” issue, you can try to fix it by running the troubleshooter.
Step 1: Press Windows + I to open Windows Settings. Then select Update & Security.
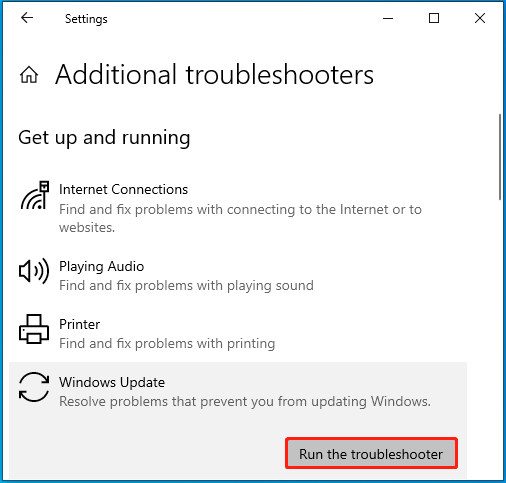
Step 2: Switch to Troubleshoot. Then click Additional troubleshooters from the right side.
Step 3: In the next window, select Windows Update and then click Run the troubleshooter.
Method 2: Check the Folder Name
An improper name for the folder containing the Windows setup file may lead to the “this upgrade path is not supported” issue as well. So, to troubleshoot the issue, you’d better check the name of the specific folder. Make sure there is no space in the folder name. Alternatively, you can also try directly locating the setup file in your drive but not inside a folder, e.g. E:\setup.exe.
Once done, run the setup file to upgrade your Windows again to see if the error disappears. If not, continue with the following methods.
Method 3: Use the Installprep.exe File
Running the installprep.exe file instead of the setup.exe file may also help fix the “this upgrade path is not supported Windows 10/11” issue. To do this, follow the steps below.
Step 1: Press Windows + E to open File Explorer.
Step 2: Navigate to the folder you got after extracting the ISO file. Then open the Sources folder.
Step 3: After that, scroll down to find the installprep.exe file. Then double-click it to start the Windows upgrade.
Method 4: Clean Install the Windows
If none of the above methods helps, you can then try clean installing the desired Windows. It’s also a possible way to bypass the “this upgrade path is not supported Windows 11” issue. You can learn how to perform the clean installation from this post: How to Clean Install Windows 11? Here Are 5 Options.
It’s worth noting that clean installing Windows will erase all the data on the PC. Therefore, in case of data loss, you may need to back up your computer first. Here, we highly recommend you use the powerful disk cloning software – MiniTool Partition Wizard to clone the whole hard drive for backup. It can help clone both system partitions and data partitions on the disk.
Moreover, MiniTool Partition Wizard also allows you to partition hard drive, format USB to FAT32, convert MBR to GPT, recover data from hard drive, and more.
MiniTool Partition Wizard DemoClick to Download100%Clean & Safe
All the methods mentioned in this post are feasible. When you are suffering from the “this upgrade path is not supported” issue, try these ways one by one until you solve the issue. For any problems with the issue, you can leave a message in our comment area below.
User Comments :