Microsoft Photos is a Windows-preinstalled application that can be used to create, edit, and view photos/videos. However, sometimes when you attempt to open an image via this app, you may fail with the “there’s nothing to show here” error.
To get rid of this annoying issue, this post explores multiple feasible troubleshooting methods below. You can try them to solve your problem.
MiniTool Partition Wizard DemoClick to Download100%Clean & Safe
Fix 1: Open the Photo from Its Save Location
Some users report that they encounter the “Windows Photos there’s nothing to show here” issue when opening the photo via Recent files. If you experience the issue in the same case, you’d better turn to open the photo from its save folder. This may help you view your photo successfully.
Fix 2: Run the Windows Store Apps Troubleshooter
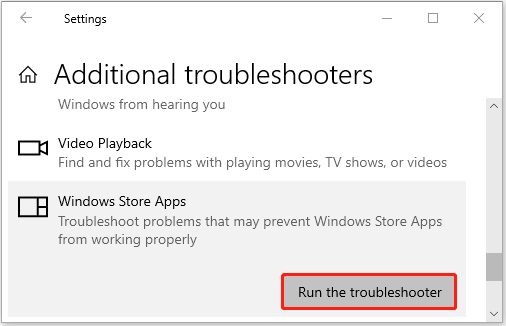
When facing the “Microsoft Photos there’s nothing to show here” issue, you can also try to fix it by using the Windows Store Apps troubleshooter. To do this, follow the steps below.
Step 1: Press Windows + I to open Settings and then select Update & Security.
Step 2: Go to Troubleshoot. Then click Additional troubleshooters from the right side.
Step 3: Scroll down to find and click Windows Store Apps. Then click Run the troubleshooter.

Fix 3: Convert PNG to JPG
In most cases, the “there’s nothing to show here Photos” error only occurs in PNG images. Therefore, if the photo you want to open is a PNG one, you can try to convert it to JPG to see if the error disappears.
To execute the PNG to JPG conversion, we’d like to recommend you use MiniTool PDF Editor. It’s a comprehensive image converter that enables you to convert PNG to JPG or other formats and vice versa. Moreover, it supports converting images in bulk, which saves you time if you have many images to convert.
You can follow this guide to finish converting PNG to JPG: PNG to JPG: How to Convert PNG to JPG with Ease.
Fix 4: Remove and Re-add the Source Folders
It’s also possible to solve the “Microsoft Photos there’s nothing to show here” issue by removing and re-adding source folders in the app. Here’s how to do this.
Step 1: Enter the main interface of Windows Photos.
Step 2: Click the three-dot icon at the top-right corner and then select Settings.
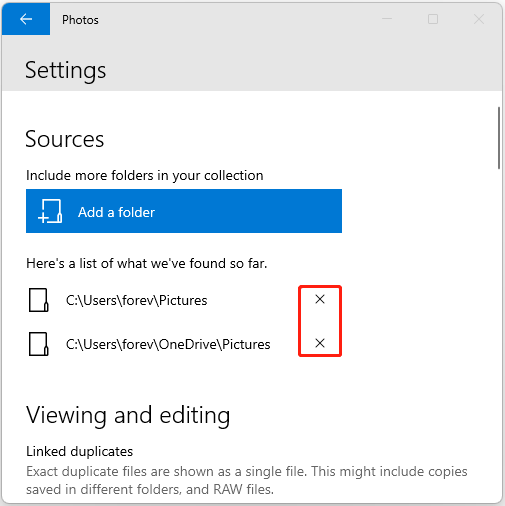
Step 3: In the next window, click the cross icon to delete the existing source folders.

Step 4: After that, click Add a folder to add the source folders back to the Photos app.
Fix 5: Repair/Reset the Photos App
Repairing or resetting the Photos app may also help you fix the “there’s nothing to show here Photos” issue. If you have no idea how to do this, you can pay attention to this post: How to Reset or Repair the Photos App on Windows 10/11?
Fix 6: Reinstall the Photos App
If none of the above methods works out the “Windows Photos there’s nothing to show here” error, it’s recommended that you uninstall and then reinstall the app. You can simply complete the operation with the given steps.
Step 1: Right-click the Start icon and select Windows PowerShell (Admin).
Step 2: Type the following command and press Enter to remove the Photos app from your PC.
get-appxpackage *Microsoft.Windows.Photos* | remove-appxpackage
Step 3: Once done, go to Microsoft Store to download and install the app again.
When stuck in the “there’s nothing to show here” issue, try to fix it with the methods mentioned in this post. If you have any other great solutions to this issue, please share them with us in our comment area below.

User Comments :