What to do if Windows 11 keeps adding keyboard layouts? Here are 5 troubleshooting methods for you. Try them now!
Method 1: Turn off the Automatic Keyboard Layout
When Windows 11 keeps adding keyboard layouts, the first thing you need to do is to turn off the automatic keyboard layout. To do that, follow these steps.
Step 1: Open the Settings app by holding the Windows + I keys simultaneously.
Step 2: Click Time & Language in the left panel. Then click Typing on the right side of the window.
Step 3: Navigate to the Advanced Keyboard Settings option.
Step 4: Find and untick the Let me set a different input method for each app window option. After that, Windows 11 won’t automatically add keyboard layouts based on language detection or other factors. However, if it doesn’t work, try other methods in the post to solve the problem.
Method 2: Remove the Unwanted Keyboard Layout
You can decrease the number of options displayed in the language selection menu by removing unwanted layouts. Then you are able to switch between the languages you often use. Here’s the tutorial for you.
Step 1: Open the Settings app, click Time & Language, and then click Language & Region.
Step 2: Tap on the three horizontal dots icon from the language that you want to remove the keyboard and choose Language options. Repeat this process to remove all unwanted keyboard layouts.
Method 3: Remove the Language from Word/Excel
Some languages installed in Microsoft Office applications like Word and Excel can add keyboard layouts too. These layouts may be used for spell-checking grammar and grammar suggestions. You can remove keyboard layouts by removing these languages with these steps.
Step 1: Open Word or Excel on your computer.
Step 2: Click the File tab at the upper left corner of the Word/Excel.
Step 3: In the pop-up menu, click Options to continue.
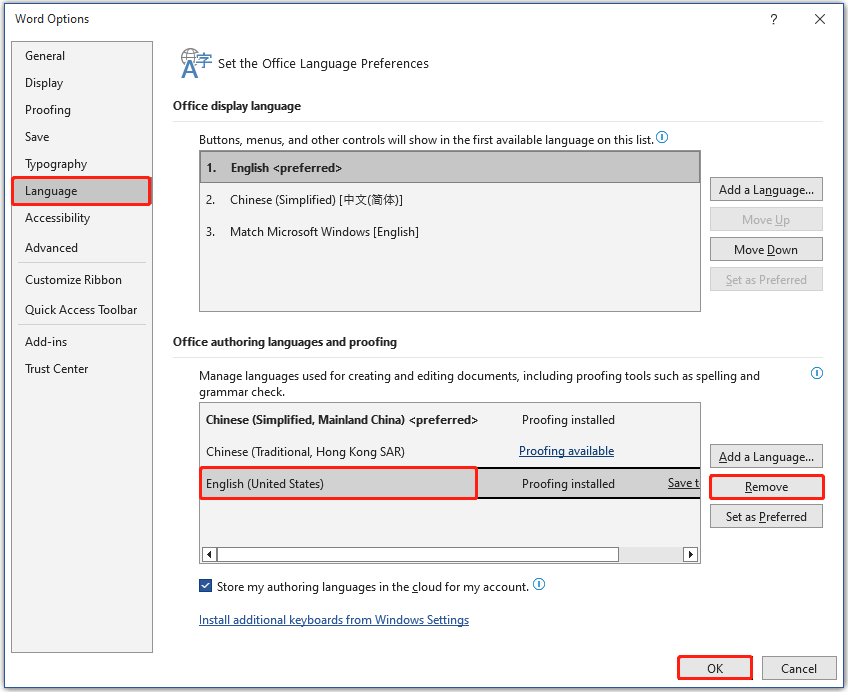
Step 4: In the pop-up window, click Language in the left panel. Then click on the language you want to remove in the Office authoring languages proofing section and then click the Remove button. Finally, click OK to save changes.

Step 5: Restart the computer and check if Windows 11 keeps adding keyboard layouts without permission.
Method 4: Modify Registry Editor
You can also modify Registry Editor to stop Windows 11 from adding keyboard layouts. Here’s the tutorial on how to stop Windows 11 from adding keyboard layouts automatically
MiniTool Partition Wizard DemoClick to Download100%Clean & Safe
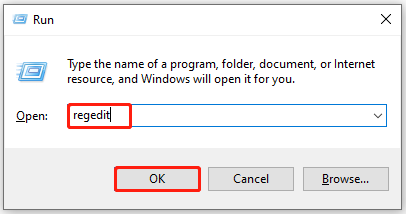
Step 1: Press the Windows and R keys to open the Run window.
Step 2: Type regedit in the Run window and click OK to open Registry Editor. If you receive the User Account Control window, click Yes to confirm the operation.

Step 3: In the left panel of Registry Editor, navigate to the destination by following the path below.
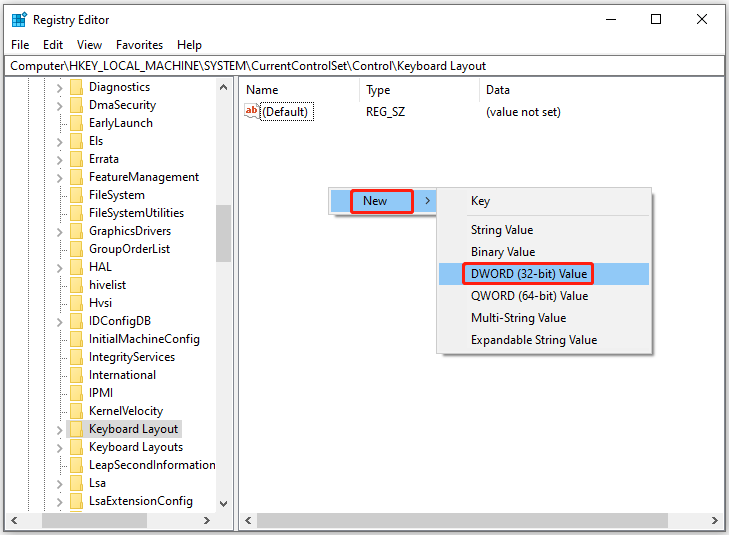
Computer\HKEY_LOCAL_MACHINE\SYSTEM\CurrentControlSet\Control\Keyboard Layout
Step 4: Right-click on the blank area in the right panel and click Next > DWORD (32-bit) Value.

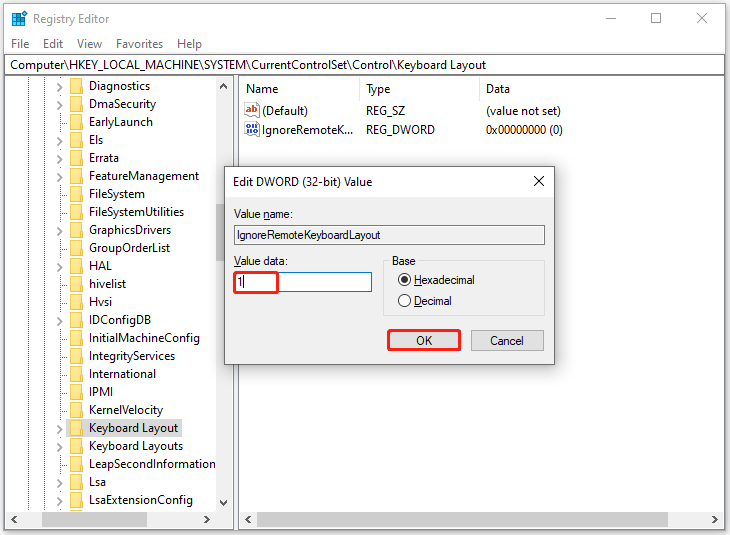
Step 5: Name the newly created DWORD as IgnoreRemoteKeyboardLayout. Then double-click the created DWORD, set its value to 1, and click OK to save changes.

Step 6: Exit Registry Editor and restart the computer.
Method 5: Run the Keyboard Troubleshooter
The Windows built-in keyboard troubleshooter is designed to identify and fix common issues with the keyboard. For instance, it can identify common keyboard malfunctions like incorrect driver settings, stuck keys, or Registry errors. Here, you can run it to stop Windows 11 from adding keyboard layouts.
Step 1: Open the Settings app and then click the System tab.
Step 2: On the right side of the window, scroll down and click Troubleshoot.
Step 3: Pick Other troubleshooters.
Step 4: Click the Run button behind the Keyboard option to run the Keyboard troubleshooter.
Step 5: Follow the on-screen instructions to complete the operation.
How to stop Windows 11 from adding keyboard layouts automatically? This post provides you with 5 methods. You can have a try!


User Comments :