What to do if your apps keep installing C drive? Don’t worry. In this post, Partition Magic provides a complete guide to help you stop programs installing on C drive.
My apps keep installing to C: Drive. When I try to download a game or app is downloads onto the C: drive. I changed the where new content is saved to D: drive but still It doesn't work. Please help.https://answers.microsoft.com/en-us/windows/forum/all/my-apps-keep-installing-to-c-drive
This is a true example from the answers.microsoft forum. He explained his apps keep installing to C drive. If you are also experiencing the same issue, you can keep an eye on this post.
Apps Keep Installing to C Drive
C drive is the boot disk for the operating system and stores a lot of information when the machine is running. If the computer is filled with installed applications or large files, your PC will soon fall into poor performance, lag response, or even a blue screen. Choosing to stop installing the program on the C drive can be helpful.
Normally, the C drive is the default storage location for Windows. If you want to stop programs installing on C drive, you should change some default settings.
How to stop programs installing on C drive? In the following part, we provide two methods for you.
How to Stop Programs Installing on C Drive
Now, I will introduce 2 ways on how to stop programs installing on C drive step by step. You can choose one way to try.
Method 1. Manually Change the Installation Path
You can stop programs installing on C drive by manually changing the installation path when installing a program. Simply select a different hard drive as the installation location when installing the software.
Method 2. Use Registry Editor
You can also stop programs installing on C drive via Registry Editor. It is recommended to back up all registry files before getting started with the steps. It will help restore the registry if something goes wrong. Here is how to do that:
Step 1: Press the Win + R key to open the Run dialog box. Type regedit.exe in it and press Enter to open Registry Editor.
Step 2: Go to the following path:
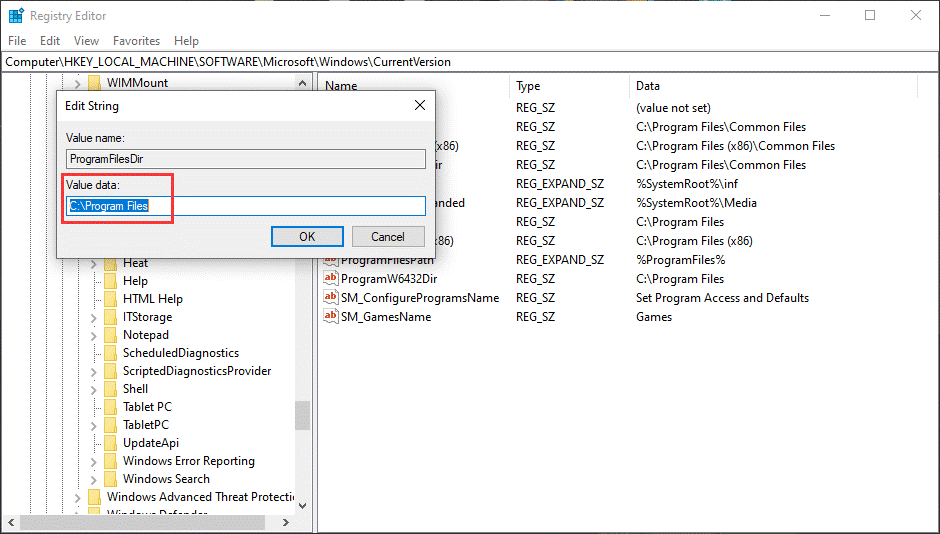
HKEY_LOCAL_MACHINE\SOFTWARE\Microsoft\Windows\CurrentVersion
Step 3: If you are using 64-bit Windows 10, you can see both ProgramFilesDir and ProgramFilesDir(x86) on the list. Double click on any of them to open the Edit String. By default, the content in Value data is C:\Program Files. You can change it to any location you want to save the installed programs, like D:\Program Files.

Step 4: Click OK to save the change.
Once done, close Registry Editor and restart your computer. Now, you can keep stop programs installing on C drive.
How to Move Installed Programs to Another Drive
Now you have blocked programs from being installed on drive C. But what about programs that have already been installed on drive C? To move a program that is installed on C drive or on the wrong drive to another drive like D drive, follow these steps:
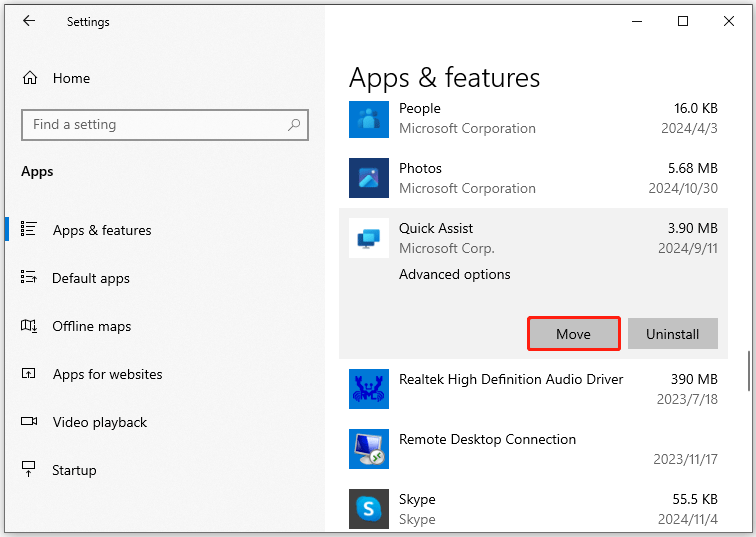
- Press the Win + I key to open Settings.
- Navigate to Apps to enter the Apps & features window.
- Scroll down, select an app that you need to move, and click the Move button.
- Choose a destination drive like D and perform the operation by clicking Move.

Not all apps have this option. If you cannot see it, read this post to try another method to move installed programs to another drive.
MiniTool Partition Wizard DemoClick to Download100%Clean & Safe
Bottom Line
How to stop programs installing on C drive? This post has provided 2 methods to help you do that. It also gives a guide to moving installed programs to another drive. MiniTool Partition Wizard is a great partition manager. If you need to manage your disks/partitions, it is a great choice.

![[Solved] Couldn't Find a Bootable Operating System on Surface](https://images.minitool.com/partitionwizard.com/images/uploads/2024/11/couldnt-find-a-bootable-operating-system-thumbnail.png)

User Comments :