Many users have reported seeing the “Secure Boot” option enabled in the BIOS but showing “Not Activated” on the system information page. It prevents them from updating on Windows 11.
Why is Secure Boot enabled but not active? How to fix it? Please keep reading to know the answers.
Why Is Secure Boot Enabled but Not Active
There could be several reasons why Secure Boot is enabled but not active on your computer. Listed below.
- Secure Boot disabled
- CSM enabled
- BIOS is outdated
- Virus Interface
How to Fix Secure Boot Enabled but Not Active
Here, we summarize several methods for the Secure Boot enabled but not active Windows 11 issue. You can try them one by one until the issue gets fixed.
Solution 1: Update BIOS
If the BIOS is not up to date, it may not support the Secure Boot feature. Therefore, you should check your motherboard manufacturer’s website for any available BIOS updates.
How to Update BIOS Windows 10 | How to Check BIOS Version
Solution 2: Disable CSM
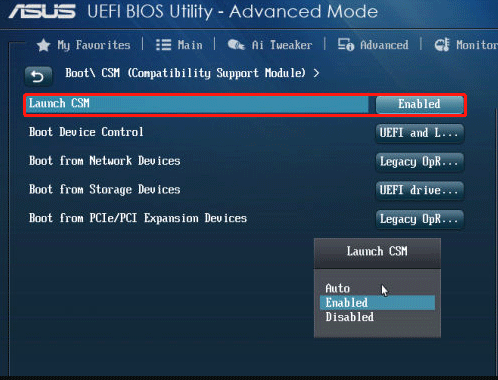
If you have CSM (Compatibility Support Module) enabled in your UEFI settings, you may find that Secure Boot is not an active issue. It’s best to disable it for secure boot options. Here take the Asus motherboard as an example.
Step 1: Start your computer, and then hold the F2 and Delete hotkey before the computer is booted. By doing so, you will enter BIOS.
Step 2: Navigate to the Boot tab using the left or right arrow key.
Step 3: Scroll down to the CSM (Compatibility Support Module) category.
Step 4: Now, set the Launch CSM option to Disabled.

–image from the Asus.com
Step 5: Scroll down to the last and select Save and Exit. Then your computer will reboot.
Solution 3: Change the Platform
You can try to change the platform and check if the error gets fixed.
Step 1: Enter the BIOS mode using the method explained in the above method.
Step 2: Go to System Mode, and select User instead of Setup.
Step 3: Locate Secure Boot Mode, and choose Custom if Standard is selected. Then change it back to Standard.
Step 4: Select Save and Exit.
Solution 4: Enable Secure Boot Properly
You should enable Secure Boot properly and the issue may be solved.
Step 1: Press the Win + I key to open Settings. Then go to Update & Security > Recovery > Advanced Startup > Restart now.
Step 2: Once your computer restarts, select Troubleshoot > Advanced options > UEFI Firmware Settings.
Step 3: This will take you to your computer’s BIOS setup. Make sure Secure Boot is enabled here.
Solution 5: Scan Your Computer for Malware
Antivirus software, system optimization utilities, and some other programs can interfere with Secure Boot. Therefore, you can try temporarily disabling any such software and see if that fixes the problem. After fixing the problem, you should turn on your antivirus software right away.
Further reading: If you are in the process of solving the problem, you find that some files are missing. Then you can use MiniTool Partition Wizard to recover lost/deleted data in the disk.
Additionally, as a multifunctional partition manager, it allows you to perform various operations related to hard disks and partitions. Specifically, it allows you to create/format/resize/move/extend/delete/copy partitions.
MiniTool Partition Wizard FreeClick to Download100%Clean & Safe
Bottom Line
This post describes 5 solutions for the Secure Boot enabled but not active Windows 11 issue. Hope these ways can help you.


User Comments :