It’s a great way to insert a SanDisk Ultra USB 3.0 Flash Drive into your PC for file transferring or backup. However, sometimes after connecting the USB drive, it may not work properly. Why is the SanDisk flash drive not working? Well, multiple reasons may lead to this issue, such as a damaged USB port, corrupted registry entry, incompatible file system format, etc.
To fix the “SanDisk USB flash drive not working” issue, this post summarizes several possible methods below. When you run into the same issue, you can try to fix it with these methods.
Method 1: Try Another USB Port
When facing the “SanDisk Ultra USB 3.0 Flash Drive not working” issue, you can try switching to another USB port first. It’s the easiest and quickest way to solve the connection problems. If the USB drive doesn’t show up with another USB port, then you should move to the following methods.
Method 2: Restart the Windows Plug and Play Service
Restarting the Plug and Play service may also help solve the “SanDisk flash drive not working” issue. To do this, follow the steps below.
Step 1: Press Windows + R to open the Run dialog.
Step 2: Type services.msc in the text box and press Enter.
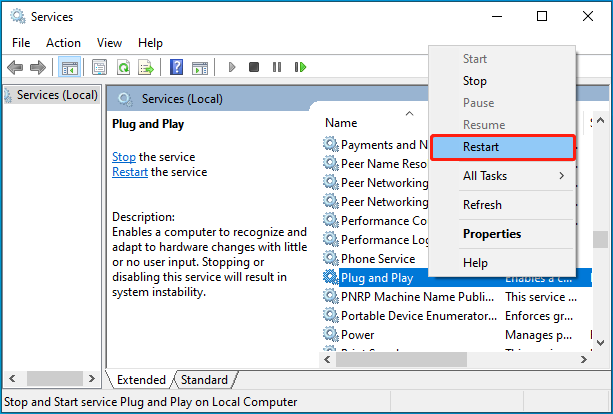
Step 3: In the Services window, scroll down to find and right-click Plug and Play. Then select Restart.

Step 4: Once done, restart your computer and re-insert the specific USB drive to see if it works normally.
Method 3: Delete the Corrupted Registry Entry
It’s also possible for you to fix the “SanDisk flash drive not working” issue by deleting the SanDisk information from Registry Editor. The following are detailed steps.
Step 1: Type regedit in the Run dialog box and press Enter. Then click Edit > Find.
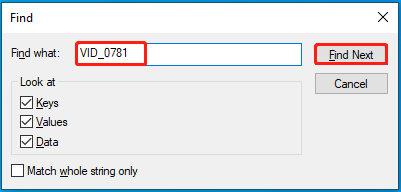
Step 2: After that, type VID_0781 in the blank field and then click Find Next.

Step 3: Once the search completes, right-click the highlighted registry key and select Delete.
Step 4: Press F3 to highlight the next registry key that contains VID_0781. Then right-click it and select Delete. Repeat the action until all relevant registry keys are removed.
Step 5: Restart your PC and then reconnect the USB drive to see if the error disappears.
Method 4: Reinstall the SanDisk USB driver
When the “SanDisk Ultra USB 3.0 Flash Drive not working” issue occurs, you are likely to fix it by uninstalling the SanDisk USB driver and then reinstalling it. Here’s how to do this.
Step 1: Right-click the Start icon and select Device Manager.
Step 2: Double-click the Disk drives category to expand it.
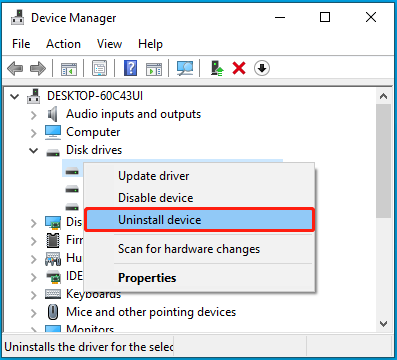
Step 3: Right-click the SanDisk USB Device and then select Uninstall device.

Step 4: Once done, restart your PC and reinsert the SanDisk USB drive. Then go back to Device Manager.
Step 5: After that, click Action and then select Scan for hardware changes. Then your system will automatically reinstall the SanDisk driver.
Method 5: Format the SanDisk USB drive
If the file system of the SanDisk USB drive is not compatible with your Windows, it can’t show up on your computer either. In this case, you can try to fix the “SanDisk flash drive not working” issue by reformatting the specific drive.
Here, we’d like to recommend you execute the format with MiniTool Partition Wizard. It’s a powerful partition manager that enables you to format a USB drive larger than 32GB to FAT32, which is not allowed by Windows built-in USB format tools.
How to format USB to FAT32 with this partition manager? You can follow the given steps.
- Make sure the SanDisk USB drive is connected to your PC. Then download and install MiniTool Partition Wizard on your PC.
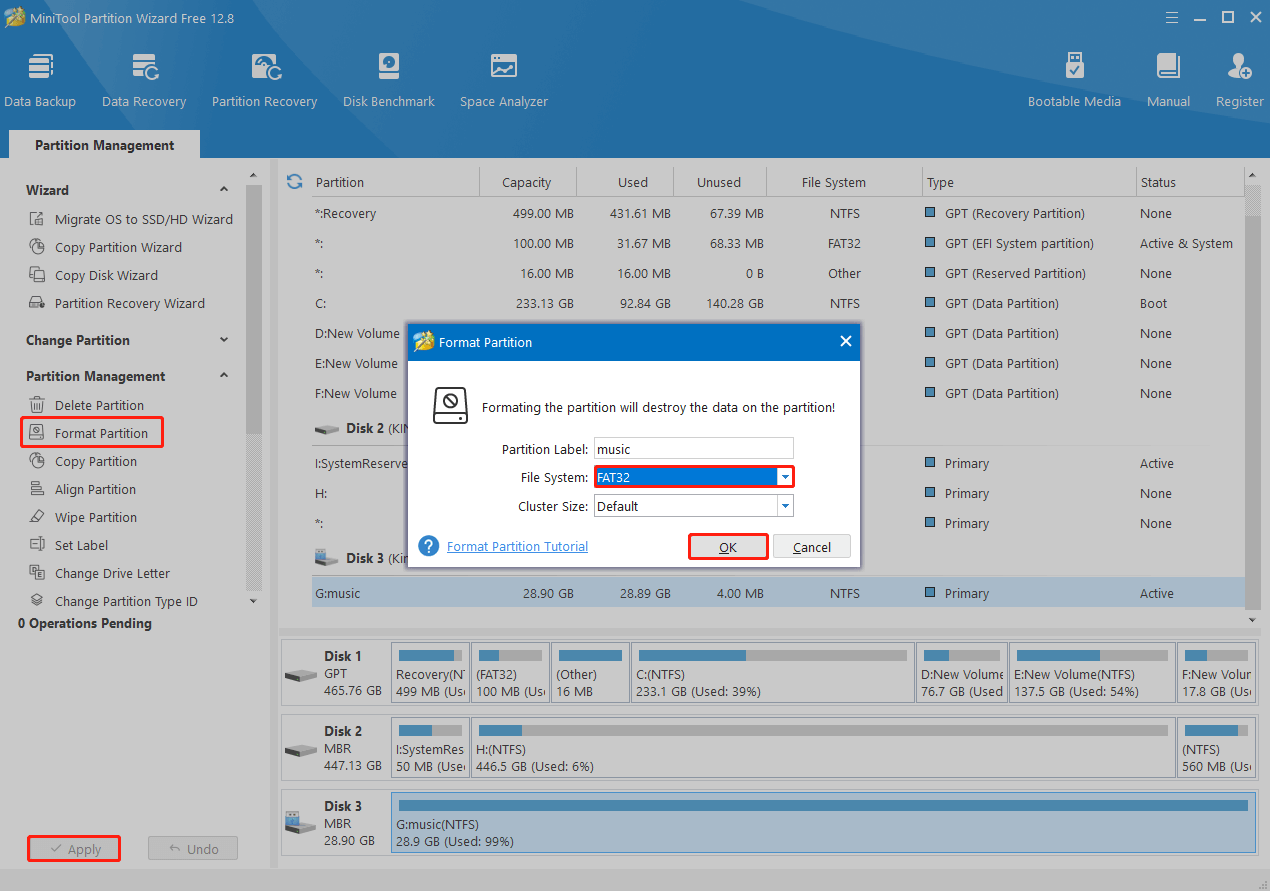
- Launch this program to enter its main interface. Then highlight the target partition and select Format Partition from the left action panel.
- In the pop-up window, select FAT32 from the drop-down menu and click OK.
- Finally, click Apply to execute the pending operation.
MiniTool Partition Wizard FreeClick to Download100%Clean & Safe

Is your SanDisk flash drive not working on the PC? If so, you can try to fix this issue with the above methods. If you have any other great solutions to this issue, you can share them with us in our comment part below.

User Comments :